Coffee Machine Care
How to Install Water Filters for Better Coffee
May
You buy fresh beans, dial in the grind, clean the brewer, and the cup still tastes flat, bitter, or oddly dull. In a lot of kitchens, the problem isn't the coffee at all. It's the water going through it.
I see this constantly with home brewers and small office machines. People blame the roast, the pod, or the machine, when the underlying problem is untreated water carrying the wrong minerals, chlorine taste, or sediment. Good filtration fixes more than flavor. It can also reduce the kind of buildup that makes a Keurig drip slowly, a Ninja brew unevenly, or a Breville demand descaling sooner than expected.
Why Your Coffee Tastes Off and How Water Filters Can Help
Coffee is mostly water, so bad water gives you bad coffee. That sounds obvious, but it gets missed all the time. If your cup tastes harsh one week and muddy the next, your tap water may be changing more than you realize.
Independent EPA guidance emphasizes that water quality can vary dramatically by location and plumbing, and it recommends checking your local consumer confidence report and testing private wells before choosing treatment, which matters for coffee drinkers because the right filter choice can address issues like hardness or chlorine that affect brew taste and scale control, as noted in this EPA-linked overview.
That's the part many homeowners skip. They jump straight to shopping for a filter without first asking what they're trying to remove. A filter that helps with chlorine taste won't necessarily solve a hardness problem affecting your kettle, espresso machine, or single-serve brewer.
Practical rule: If the water tastes or smells off on its own, your coffee will usually magnify it.
For coffee makers, the trade-off is simple. Untreated water can leave your machine fighting both flavor problems and mineral buildup. Overfiltered or mismatched water can create a different problem if the setup doesn't suit what's present in your line. That's why the installation itself is only half the job. The other half is choosing the right system before you grab a wrench.
If you're sorting out broader plumbing concerns around water movement and contamination control, it also helps to consult EZ Plumbing on backflow. It's a useful companion topic when you're thinking about where filtered water should go and how your kitchen plumbing behaves under pressure changes.
A lot of coffee drinkers also underestimate how dirty a “normal” water supply can feel once they compare it to filtered brew water. If that sounds familiar, this breakdown on why your coffee water may be dirtier than you think and how to fix it is worth reading before you choose a setup.
Before You Install Know Your Filter Options
Before you learn how to install water filters, decide what kind of filter fits your kitchen and your coffee habits.
The CDC notes that different home water filters serve different purposes, and NSF recommends starting with a Consumer Confidence Report from your local utility so you can identify contaminants and choose a certified filter that matches actual water conditions, as explained in the CDC guide to choosing home water filters.
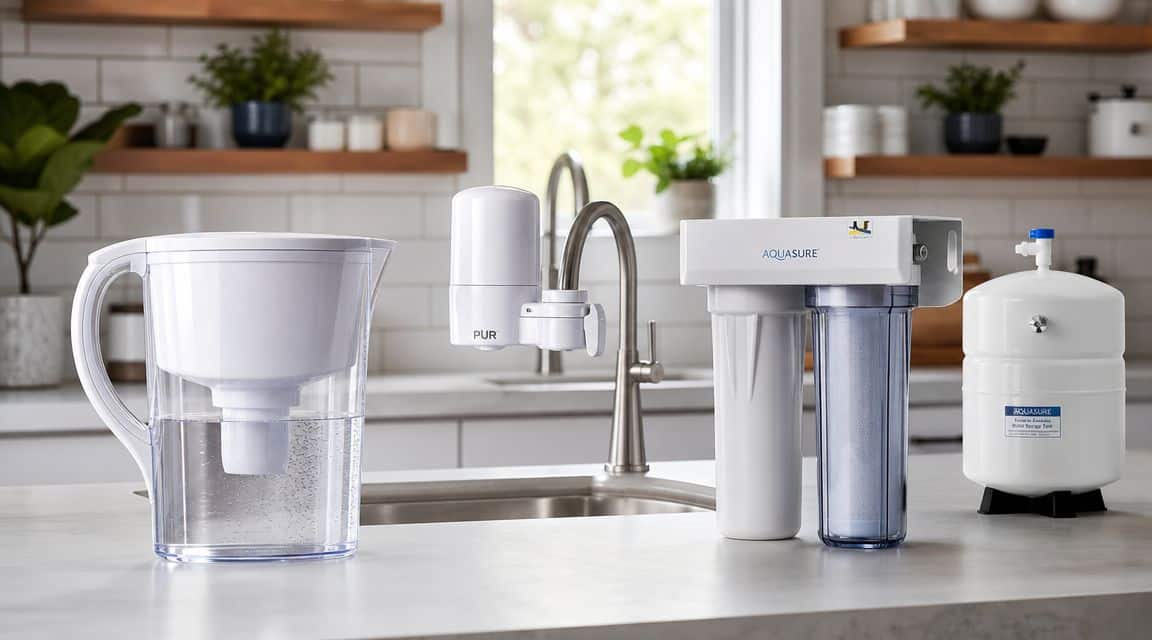
Four common paths for coffee drinkers
- Pitcher filters work for renters, light coffee use, and people who want a quick improvement in taste without touching plumbing.
- Faucet-mounted filters give you filtered water on demand, but they can clutter the sink area and aren't everyone's favorite if they use tall pots or odd-shaped faucets.
- Under-sink systems make the most sense when you want a dedicated filtered source for drinking water and coffee with a cleaner look above the counter.
- Machine-specific filters fit directly inside brewers like Keurig, Ninja, and Breville models. They're simple to use, but they only treat the water that enters that machine.
What works and what usually disappoints
Pitchers are easy, but they rely on you keeping them filled. Faucet units are convenient, but some people get tired of switching flow modes. Under-sink filters take more effort up front, yet they're often the most satisfying long-term setup for serious home coffee use because you're not waiting on a pitcher or refilling a machine from untreated tap water.
If you're comparing home setups with more advanced professional water purification solutions, it helps to look at them the same way a technician would. Match the filter type to the water issue first, then worry about convenience, price, and installation effort.
For espresso users, the decision gets even more specific. This guide to the best water filter for an espresso machine is a useful reference if your main concern is protecting brew flavor and machine internals rather than filtering the whole kitchen sink.
How to Install an Under-Sink Water Filter
Under-sink filters are the sweet spot for many coffee lovers. They're more committed than a pitcher, less invasive than a whole-house system, and they give you filtered water exactly where you fill a kettle, a coffee reservoir, or a glass.
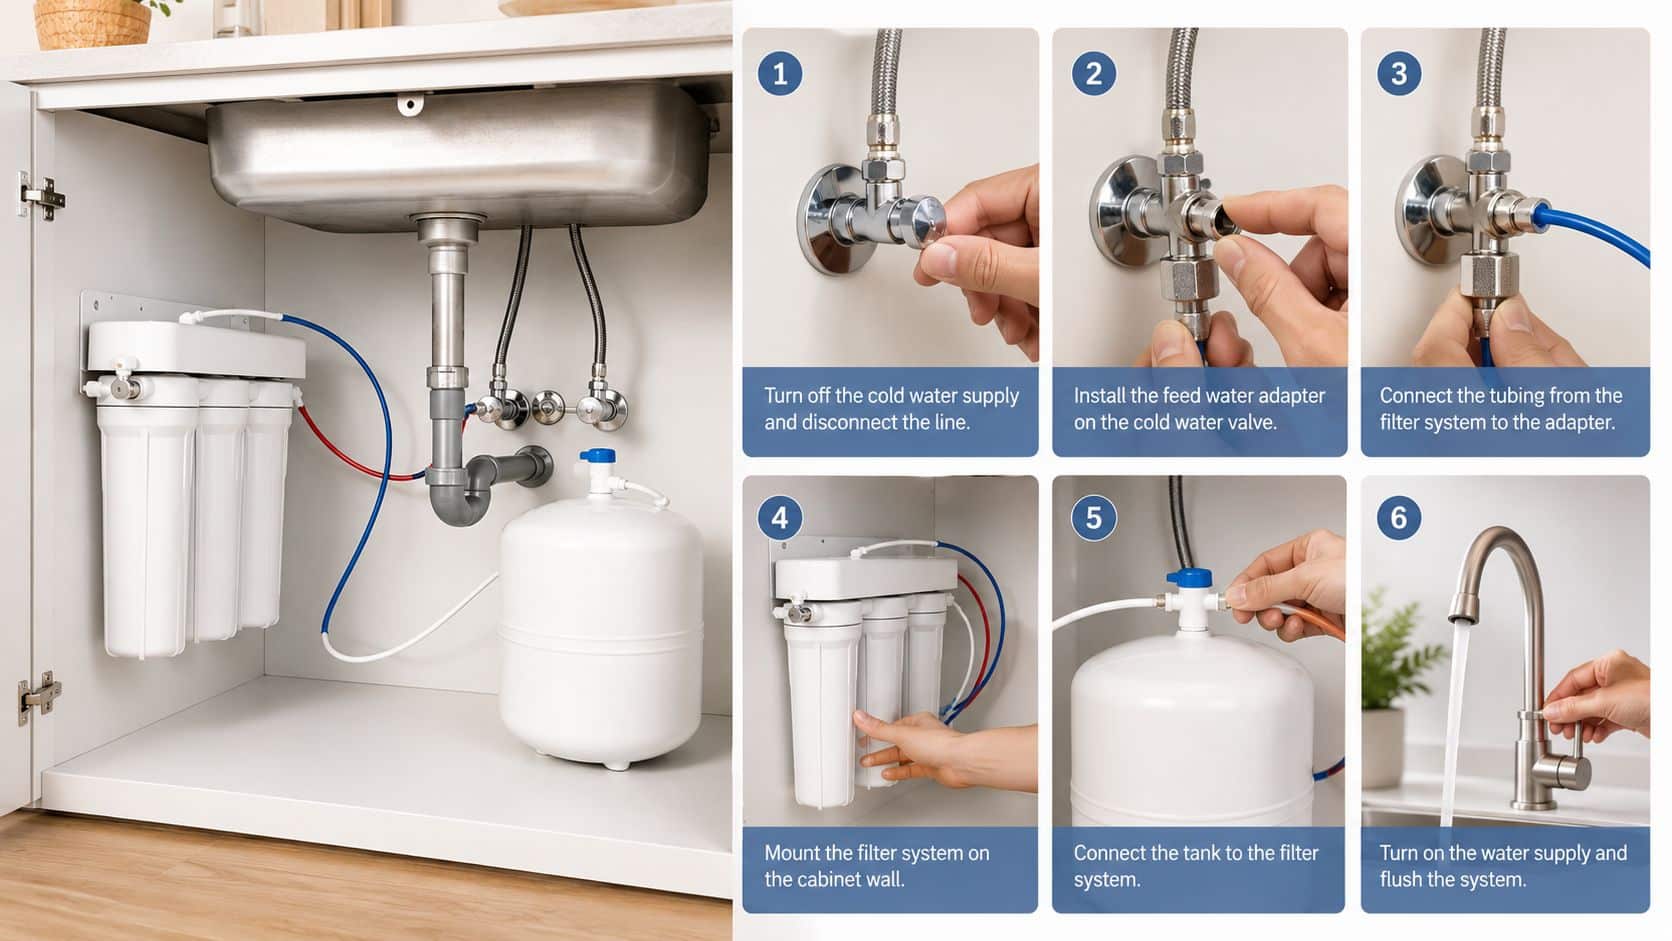
Whirlpool's under-sink installation guidance lays out the standard workflow clearly: shut off the cold-water supply, install the feed-water adapter, mount the dedicated faucet, make sure all tubing is fully inserted into the fittings, and finish with a full flush to clear the system and check for leaks before first use in its under-sink filtration installation guide.
Start with the space under the sink
Empty the cabinet first. Don't try to work around cleaners, trash cans, or a pull-out bin. You need room to see the shutoff valve, hold a wrench properly, and route tubing without kinks.
Have a towel and a shallow tray ready. Even a careful install usually leaves a little water behind when you disconnect the cold-water line.
Check these points before you mount anything:
- Cold-water shutoff access matters more than shelf space. If you can't reach the valve cleanly, maintenance will be annoying every time.
- Faucet-hole options decide how clean the finished install looks. Some sinks have an unused soap-dispenser hole you can reuse.
- Tubing path should stay smooth. Sharp bends lead to weak flow and stress on push-fit connectors.
A neat tubing run isn't cosmetic. It prevents strain, accidental pullout, and mystery drips a week later.
Make the cold-water connection correctly
Turn off the cold-water supply, then open the faucet to relieve pressure. That second move gets skipped a lot, and it's one reason people get splashed or think a valve is still leaking.
Install the feed-water adapter onto the cold-water line exactly as the filter manufacturer specifies. Once that adapter is in place, mount the dedicated faucet if your system includes one. If you need to drill stone, porcelain, or another brittle surface, that's the point where many homeowners are better off calling a pro instead of gambling on a cracked sink or countertop.
If your sink area also includes a disposal and crowded plumbing, it helps to understand layout constraints before you start. This practical guide on local rules for sink disposals can help you think through clearances around the drain, trap, and nearby hardware.
Seat every tube all the way
Most under-sink leaks come from one simple mistake. The tubing isn't inserted fully into the fitting.
Cut the tubing square, not at an angle. Push it into the fitting until it bottoms out. If your system includes locking clips, use them. They're there to keep the tube from backing out when pressure returns.
After the lines are connected, this walkthrough video gives a useful visual reference before you pressurize the system:
Flush before you trust it
Turn the cold-water supply back on slowly. Don't blast the system with pressure all at once. Watch every connection while the housing and lines fill.
Then flush the filter according to the manufacturer's instructions and inspect all joints again. If you see a slow bead of water forming, shut it back down and reseat the line before you put anything back under the sink.
For coffee use, I like to wait until that final flush is complete before filling a brewer reservoir. That keeps the first rinse water and any carbon dust out of the machine.
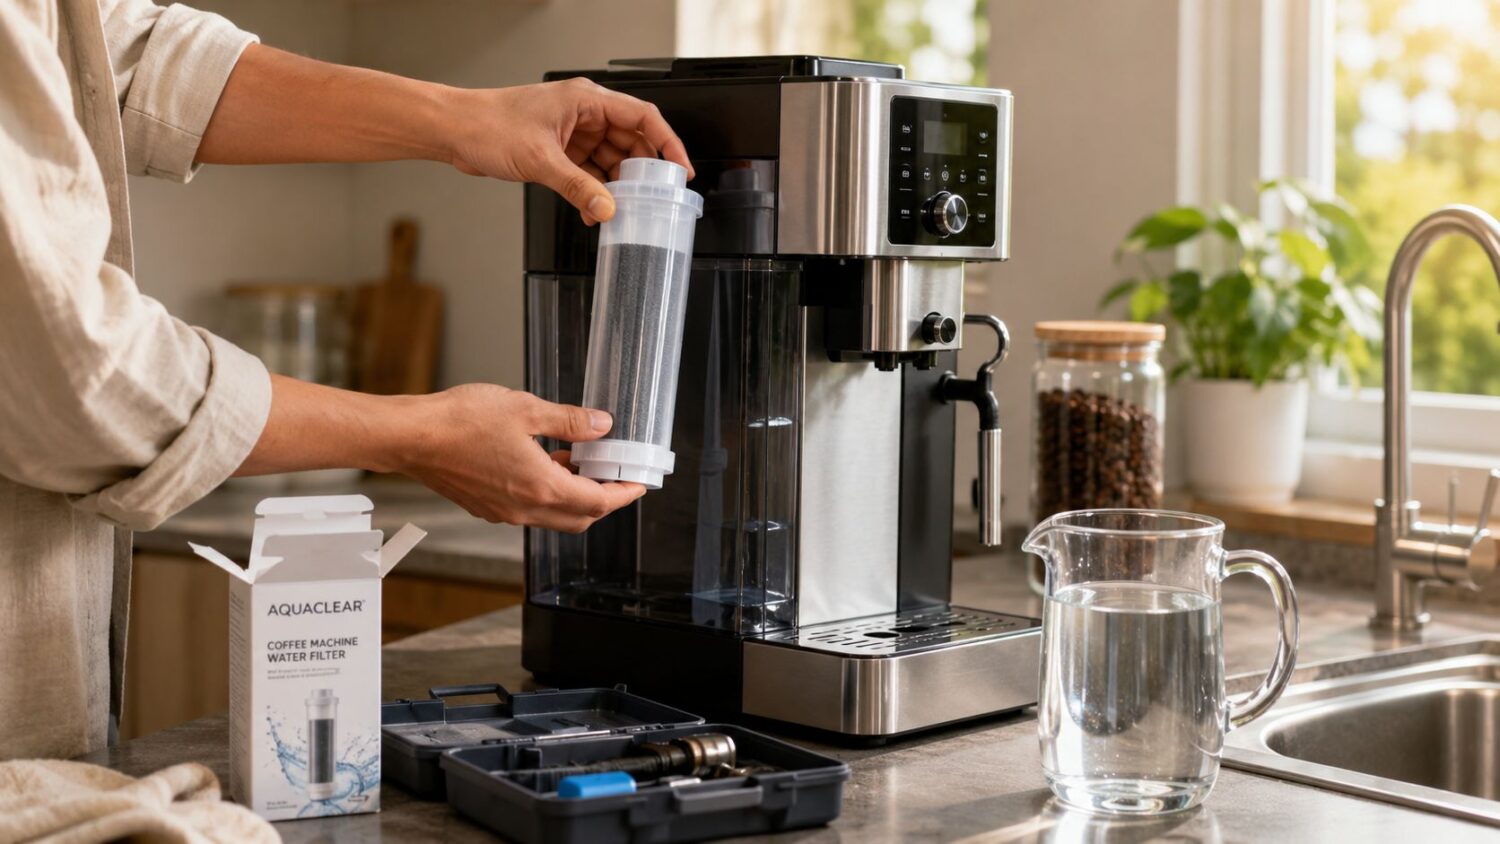
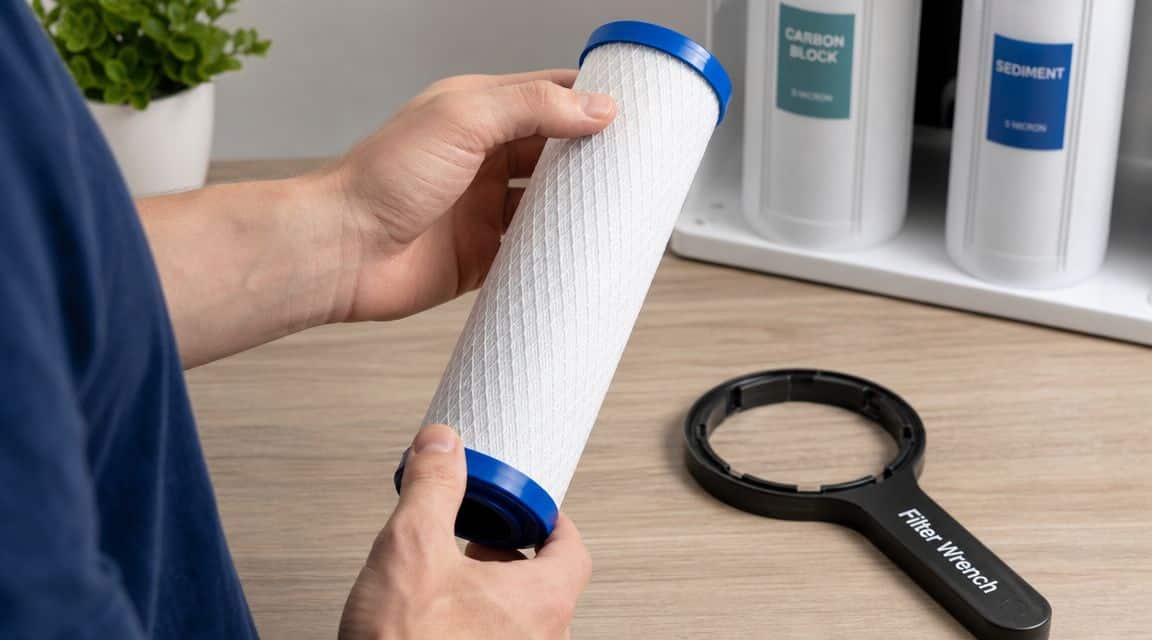
Installing Filters in Keurig Ninja and Breville Machines
Machine filters are much simpler than under-sink systems, but they still need correct placement. A loosely fitted cartridge, a holder clipped in the wrong way, or an unsoaked charcoal insert can reduce the benefit you expected.
Recent NSF consumer guidance highlights that a filter only helps if it's certified for the relevant contaminant and installed in the correct orientation with the right flow path. For coffee makers, proper installation directly affects brew taste and how well the setup supports scale control, as explained in this NSF consumer guidance summary.
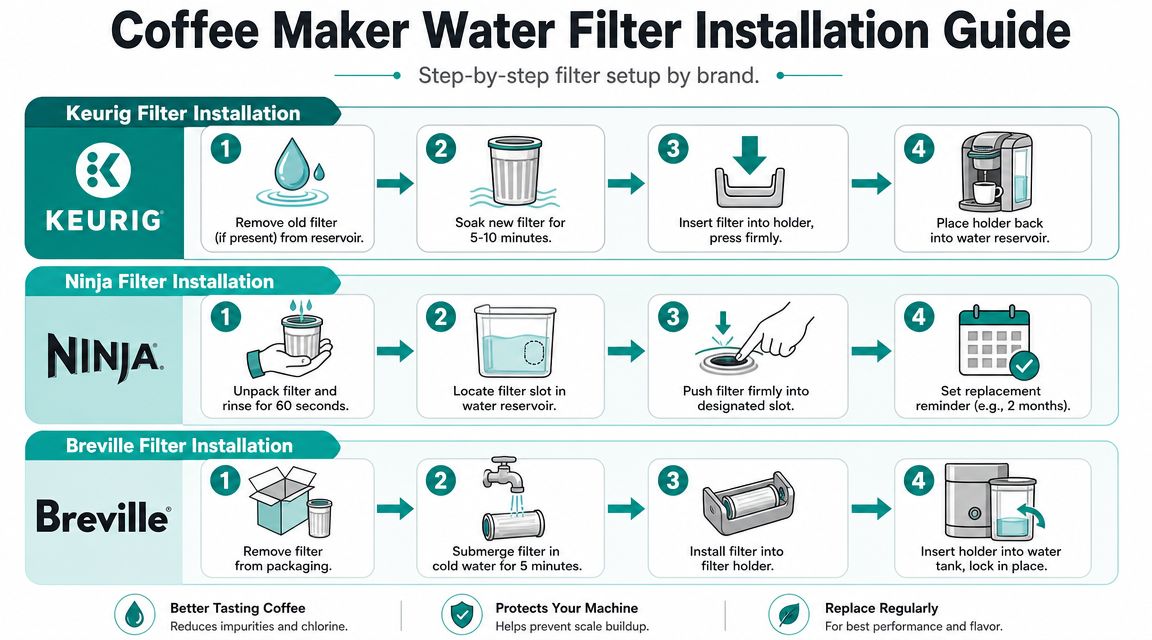
Keurig fit matters more than people think
With Keurig machines, remove the old filter from the reservoir holder if one is installed. Soak the new cartridge briefly if the instructions for your model call for it, rinse it, then place it into the holder and snap or press the holder back into the reservoir.
The main mistake here is using the wrong holder style for the machine generation. A filter can look close enough and still fit poorly. When that happens, water may not pass through the cartridge the way the machine expects.
Ninja filters are simple but easy to rush
Ninja reservoirs usually make the process straightforward. Rinse the filter, locate the filter slot in the reservoir, then press the filter into place firmly. Don't force it sideways. If it resists, pull it back out and check alignment.
If you use a Ninja in a busy household or breakroom, pair filtration with regular descaling instead of treating the filter as a complete substitute. Filtration helps incoming water. Descaling removes buildup that already formed inside the machine.
Breville users should pay attention to the holder
Breville machines typically use a tank-mounted holder for the water filter. Soak the new charcoal filter if required, rinse it, place it in the holder, then insert and lock that holder into the tank.
A loose holder is a common small mistake. The machine may still run, but the water path won't be as controlled as intended.
Workshop note: If a filter cartridge rattles, rocks, or feels undersized in the holder, stop and recheck compatibility before brewing.
For owners who want model-specific help, this guide to Breville coffee machine water filters is a solid next read.
One practical option in this category is PureHQ Inc., which offers replacement coffee machine water filters and related maintenance accessories for Keurig, Ninja, and Breville-compatible setups. The important thing isn't the logo on the box. It's getting the right fit, correct orientation, and a cartridge you'll replace on schedule.
PureHQ Filters vs Generic A Clearer Choice
Cheap replacement filters can work. They can also create the kind of small, irritating problems that waste time and leave you wondering why coffee still tastes off.
The biggest objection I hear is price. Fair enough. But a water filter that fits poorly or cracks in the holder isn't cheaper once it causes bypass, weak contact, or a leak inside the reservoir area.
Where generics often fall short
Generic filters usually miss in one of three places:
- Fit tolerance is loose, so the cartridge wiggles or doesn't seat with confidence.
- Plastic quality feels brittle, which matters when the holder gets opened and closed repeatedly.
- Consistency varies from batch to batch, even when the listing claims broad compatibility.
That doesn't mean every generic filter is bad. It means you have to inspect them more carefully and trust them less automatically.
| Feature | PureHQ Filters | Generic Alternatives |
|---|---|---|
| Compatibility focus | Designed around specific coffee machine fitment | Often marketed as broadly compatible |
| Fit in holder | Intended to seat cleanly in supported models | Can feel loose, tight, or inconsistent |
| Materials approach | Marketed as premium coffee machine accessories | Quality can vary by seller and batch |
| Leak and bypass confidence | Better choice when precise fit is a priority | Higher risk of poor seating if tolerances are off |
| Support and troubleshooting | Direct brand support is available | Support often depends on marketplace seller |
| Buying decision | Better for owners protecting a costly brewer | Better only if the exact fit is already proven |
You're not only buying filtration media. You're buying confidence that water actually goes through the filter instead of around it.
If your machine is expensive, or if you've already had one bad experience with a sloppy aftermarket part, it usually makes sense to choose the filter with clearer compatibility and better physical fit.
Filter Maintenance and Common Installation Fixes
Most filter problems show up right after installation. Slow flow, sputtering, drips at a fitting, or a brewer that seems unchanged. Usually, the fix is simple.
The Home Depot's whole-house installation guidance emphasizes turning off the water supply and draining the system before making cuts, and that same discipline matters on smaller filter jobs because following the sequence correctly helps avoid common issues like leaks or trapped air, as shown in its whole-house filter installation guide.
Quick fixes that solve most headaches
- Leaking under-sink tubing usually means the tube wasn't pushed fully into the fitting. Shut the water off, remove it, cut the end square if needed, and reseat it fully.
- Weak flow at a new filter faucet often points to a kinked tube or air still purging from the line.
- A sputtering coffee maker after a filter change usually clears after a rinse cycle or two as trapped air moves out.
Maintenance that keeps flavor steady
Replace machine filters on the schedule your brewer or cartridge maker specifies. Replace under-sink cartridges when the manufacturer calls for it, or sooner if flow drops noticeably or taste changes. Don't wait until coffee tastes bad again. By then, you've already lost the benefit.
Keep descaler on hand if you use pod machines, drip brewers, or espresso machines regularly. Filters help reduce incoming trouble. Descaling handles what the machine has already collected.
If you want compatible coffee machine filters and maintenance accessories that are built around everyday brewing, shop PureHQ Inc. and match your Keurig, Ninja, or Breville setup with the right replacement parts.
