Coffee Machine Care
Coffee Machine Cleaning Brush: Restore Coffee Flavor
Jun
You buy good beans. You use filtered water. You descale on schedule. Then the first sip lands with a stale, bitter edge that shouldn't be there.
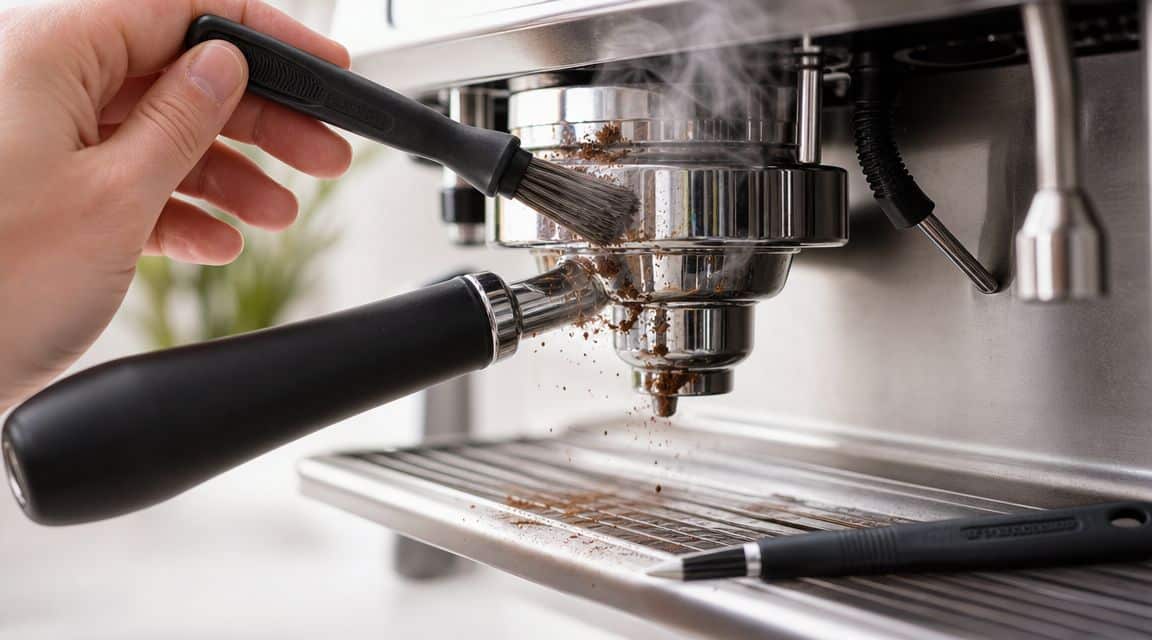
That taste usually isn't coming from the coffee itself. It comes from the hidden places your normal rinse never touches. A coffee machine cleaning brush fixes that problem because it physically scrubs away the oily residue and packed grounds that keep riding into every fresh cup.
Why Your Coffee Tastes Off and How to Fix It
A lot of people end up in the same spot. The machine looks clean from the outside, the reservoir is fresh, and the brew still tastes muddy or sharp in a way that's hard to describe. That mystery usually lives in the machine's tight spaces, not in the bag of beans on your counter.
Coffee leaves behind oils and fine particles. Water alone won't remove all of it, and descaling won't solve every flavor problem either. Mineral scale and coffee residue are different messes, which is why a machine can be descaled and still taste off.

Where the bad taste hides
On espresso machines, buildup often sits around the group head, seals, and shower screen. On a Keurig, it can collect around the pod holder and narrow exit points. On drip brewers and Ninja machines, oils cling to basket corners, spouts, and the places where brewed coffee slows down before it drops into the carafe.
That pattern is similar to other household fixtures with narrow passages. If you've ever looked into effective shower head cleaning, you already know that a clean-looking surface can still hide deposits inside the parts that control flow.
Practical rule: If fresh beans suddenly taste dull, bitter, or oddly old, check for residue before you blame the roast.
The simple fix most people skip
The fix is mechanical contact. A brush gets into places that rinse water misses and loosens the film that keeps affecting extraction and flavor. That's why baristas have relied on brushes for years, especially on equipment that has seals, screens, narrow channels, and other awkward spots.
If your machine also needs a scale treatment, pair brushing with a descaler that fits your brewer's cleaning routine. PureHQ has a useful guide on choosing the best descaler for a coffee machine, and that combination matters because scale and coffee oils are two separate cleanup jobs.
The Unseen Grime a Cleaning Brush Removes
A coffee machine cleaning brush isn't just a smaller scrub brush. It's a tool built for the exact places where coffee residue sticks hardest and causes the most trouble.
The main job is simple. Scrub what chemical cleaning loosens and what water can't lift on its own. That means oils on metal surfaces, fines packed into corners, and residue trapped around seals or screens.
What brushing actually does
Think about the difference between rinsing a skillet and scrubbing it after grease dries. Coffee machines work the same way. The machine may flush loose debris, but the brush removes the stubborn layer that keeps affecting taste and flow.
A brush is especially useful in these areas:
- Group head surfaces: It clears residue from the gasket area and around the shower screen.
- Grinder chutes: It removes stale grounds before they mix with the next dose.
- Basket edges and spouts: It reaches the corners where oils cling after repeated brews.
- Narrow machine recesses: It gets into spots that cloths and rinse cycles cannot reach.
Why professionals treat it as standard gear
This isn't a niche home hack. In practical café workflows, cleaning guidance commonly pairs a brush with backflushing. One training guide recommends cycling a manual lever machine on and off every five seconds for at least five cycles, then using the brush to scrub the seals and shower screen after the chemical clean, which shows the brush is a standard maintenance accessory in real espresso service, not an optional extra in a gadget drawer, as described in this coffee machine cleaning brush guide from Green Plantation.
That matters because it reflects how experienced operators clean for flavor, not just appearance. They don't stop at detergent or backflush cleaner. They finish the job by physically removing loosened grime from the parts that touch brewing water.
A machine can look spotless and still carry old coffee oils in the exact spot where fresh water enters the puck or passes through the brew path.
Brushing and descaling do different jobs
One of the most common maintenance mistakes is expecting descaler to solve everything. Descaler helps with mineral deposits. A brush handles oily residue, fines, and stuck particles. If you want a complete clean, you need both.
That also makes the brush one of the most cost-effective tools in coffee maintenance. It works across machines, across brew styles, and even on grinders. Used correctly, it protects flavor and helps reduce problems like blocked flow, uneven extraction, and stale carryover from yesterday's coffee.
Bristles Handles and Heads Understanding Brush Design
Brush design decides whether cleaning feels easy or annoying. The right brush gets into the problem area, scrubs without damage, and keeps your hand away from hot metal and splash-back. The wrong one just smears residue around.
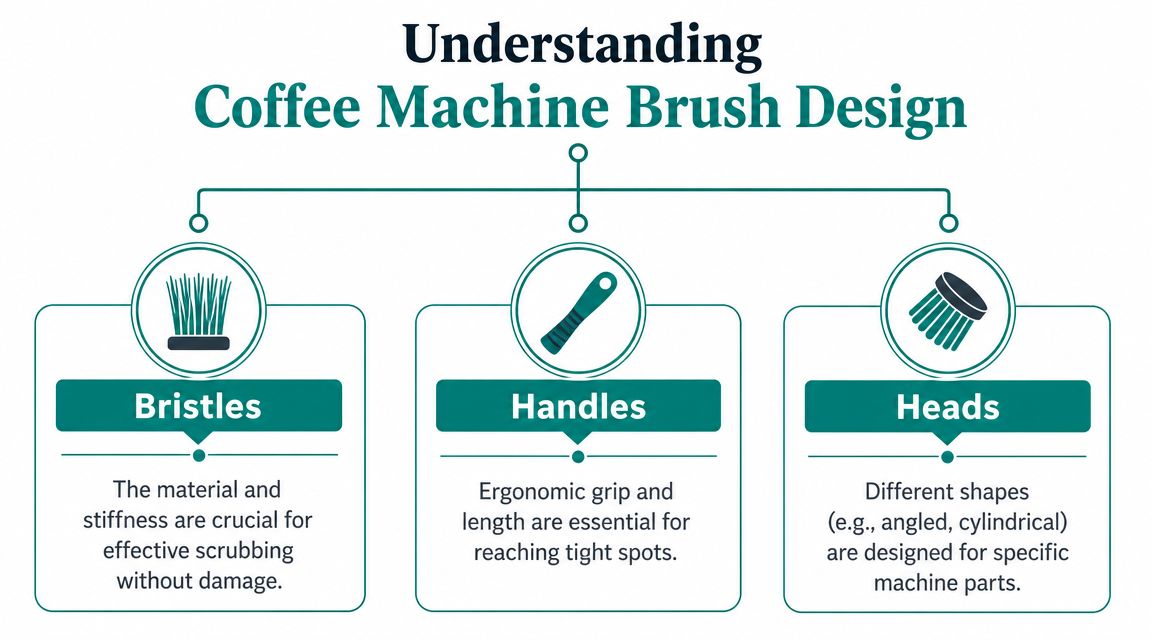
Bristles need firmness without damage
For coffee equipment, nylon bristles are a practical choice because they can remove grounds and residue without scratching metal or chewing up a rubber gasket. That balance matters more than people think. If the bristles are too soft, they don't lift compacted residue. If they're too aggressive, they can mark polished surfaces or wear sensitive parts.
One commercial coffee machine brush specifies 34 mm and 50 mm bristle lengths on a 250 × 50 mm double-head design, which is a good example of how different lengths help the brush reach both shallow and deeper channels while staying gentle enough for surfaces that shouldn't be damaged, as shown in this double-head coffee machine cleaning brush listing.
If you already use a tougher general scrubber elsewhere in the kitchen, keep it there. A sustainable kitchen scrubber can be great for cookware, but coffee machines need a narrower and more precise tool.
Handle length affects safety and control
A short brush can work on cool parts at the sink. It becomes a bad idea when you need to clean near a recently used brew head. Handle length gives you clearance. Grip shape gives you control when you're working at an angle or trying not to slip.
Good handles do three things well:
- Keep distance from heat: More length means less chance of brushing with your knuckles too close to the machine.
- Enable easier scrubbing: You can scrub seals and edges without twisting your wrist awkwardly.
- Reduce mess: Better control means less splash and less brushing in random directions.
Head shape must match the machine
The most overlooked design factor is geometry. A brush that fits a wide espresso group head won't automatically work for a narrow pod-machine opening or a slim reservoir channel.
For espresso tools, geometry is a major feature. Brushes built for 58 mm group heads are commonly about 9 inches long and designed for 360° rotation so the bristles can reach the gasket and shower screen edge in tight recesses without damaging surrounding parts, according to this 58 mm group head brush specification.
The brush should fit the machine interface first. Material and comfort come second.
If the head is too wide, you won't reach the recess that needs cleaning. If it's too narrow, you'll spend longer scrubbing broad surfaces and still leave corners dirty. That's why one brush rarely does every job well unless it's part of a kit with distinct shapes.
Why a Dedicated Brush Kit Outperforms a Generic Tool
Generic brushes usually assume you're cleaning one thing. Most often, that's an espresso group head. Real kitchens don't work that neatly.
A lot of home brewers have more than one machine. They might use a Keurig on weekdays, a Ninja carafe brewer when guests are over, and an espresso machine on weekends. A single brush won't serve all three very well because the cleaning targets are completely different.
The main problem with one-size-fits-all tools
Compatibility is the first objection I hear, and it's a fair one. People buy a brush, then discover it won't fit the narrow area that needs cleaning. Or it reaches the spot, but the bristles are wrong for the task.
A dedicated kit solves that in a practical way. It gives you different shapes for different cleaning points instead of asking one tool to do everything badly. In the same maintenance drawer, it also makes sense to keep cleaners for periodic deep work, such as cleaning tablets for coffee machines, because brushing and tablet cleaning handle different types of buildup.
PureHQ Brush Set vs. Generic Single Brush
| Feature | PureHQ Multi-Function Cleaning Kit | Generic Single Brush |
|---|---|---|
| Machine coverage | Built for multiple machine types and cleaning points | Usually aimed at one task |
| Fit for tight spaces | Better chance of having a brush that matches narrow or awkward areas | Often too wide, too short, or the wrong angle |
| Espresso cleaning | Can include a brush suited to group head work | Often decent if espresso is the only target |
| Pod machine cleaning | More likely to address small openings and pod-holder areas | Commonly poor fit |
| Drip brewer cleaning | Better for baskets, spouts, and channels if multiple shapes are included | Usually limited |
| Risk of improvised cleaning | Lower, because you have the right attachment on hand | Higher, because users substitute random household brushes |
| Storage and routine | One kit supports a repeatable maintenance routine | One brush often turns into a compromise tool |
PureHQ sells coffee maintenance accessories for different brewer types, so a multi-function set makes factual sense in that ecosystem. The useful part isn't branding. It's the idea that a mixed-machine household or small office benefits from purpose-matched tools instead of a generic brush that only partly fits.
What works better in practice
A dedicated kit works well if you switch between brewers, clean grinders too, or want a simple routine that doesn't involve repurposing old toothbrushes and hoping for the best. Generic brushes still have a place if you own one espresso machine and know exactly what size and angle you need.
Buy for the machine you actually own, not the machine the brush was designed around.
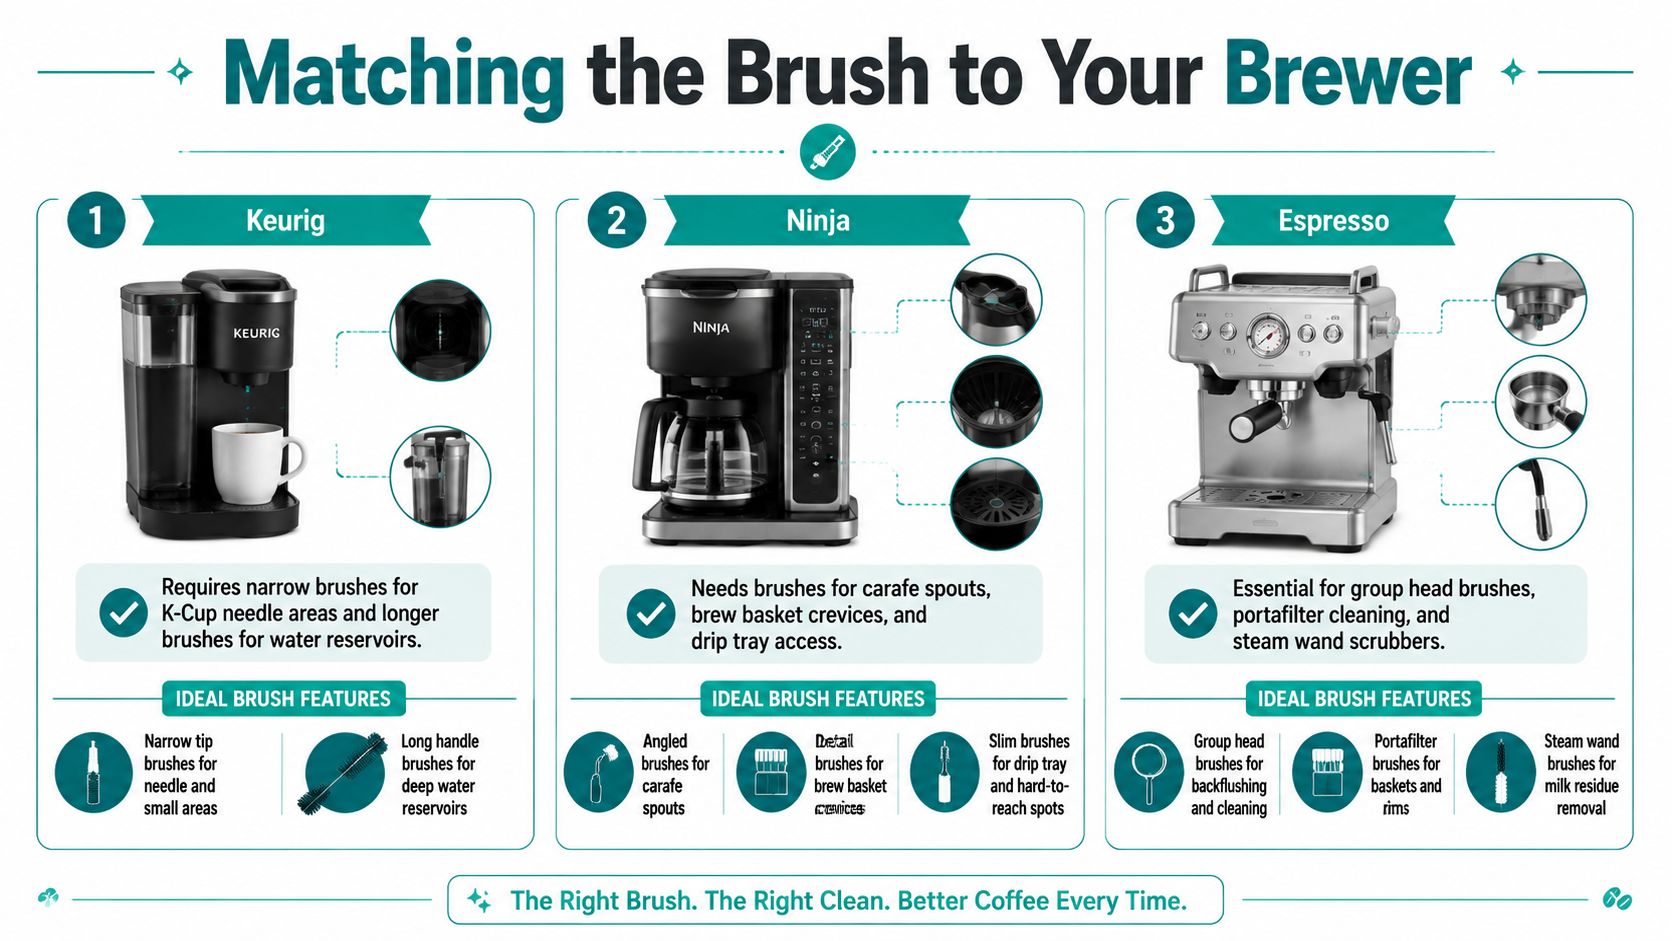
Matching the Brush to Your Brewer Keurig Ninja and Espresso
Most buying advice still centers on espresso machines. That's useful if you own a 58 mm group head machine, but it leaves Keurig and Ninja owners guessing. The cleaning targets are different, so the right brush shape is different too.
A product-focused gap in online advice is that most coverage emphasizes angled heads for espresso group heads but rarely answers whether that same tool works for a Keurig, Ninja DualBrew, or drip brewer, even though those machines have different cleaning challenges such as narrow needles and brew baskets rather than wide group gaskets, as noted in this coffee machine brush compatibility discussion.
For Keurig machines
Keurig owners should think small and precise. The machine has tight areas where grounds and residue gather around the pod holder and exit path. A bulky espresso brush won't help much there.
What works:
- A narrow brush head: Better for small openings and compact spaces.
- Fine bristles: Useful when you need to dislodge residue without forcing a large tool into a delicate area.
- A second longer brush: Handy for reservoir corners or channels that a stubby cleaner can't reach.
What doesn't work is jamming a wide brush into a narrow opening. That bends bristles, misses the target, and tempts people to use too much force.
For Ninja DualBrew and drip coffee makers
Ninja and standard drip brewers need a different approach. The main issues are less about a single gasket area and more about coffee oils collecting along the brew basket, carafe spout, drip tray edges, and other contact surfaces.
A good match here is a longer brush with enough flex to follow the contour of the basket or spout. You don't need a heavy-duty espresso head. You need reach, control, and bristles that can sweep oils and fines out of creases.
A simple way to think about it:
| Machine type | Best brush style | Main cleaning target |
|---|---|---|
| Keurig | Narrow detail brush | Pod-holder area and tight brew-path points |
| Ninja DualBrew | Longer flexible brush | Brew basket, carafe spout, reservoir corners |
| Standard drip brewer | Slim utility brush | Basket edges, drip path, hard-to-wipe channels |
For espresso machines and grinders
Espresso machines still benefit most from the classic angled brush. That shape lets you clean upward into the group head while keeping your hand out of the way. A firmer nylon head works well around the shower screen, gasket area, and portafilter basket.
Grinders need their own brush logic. You want a straight, stiff-bristled tool for the chute and burr area so stale dust doesn't keep mixing into fresh doses. That's especially useful if you switch coffees often and want the new bag to taste like itself right away.
If your brewer makes coffee through pressure, pods, or gravity, the brush still matters. You just need one shaped for that machine's mess.
How to Use and Maintain Your Cleaning Brush
A coffee machine cleaning brush only helps if you use it regularly and keep the tool itself clean. The actual process is quick. The benefit shows up in better flavor and fewer stubborn clogs.
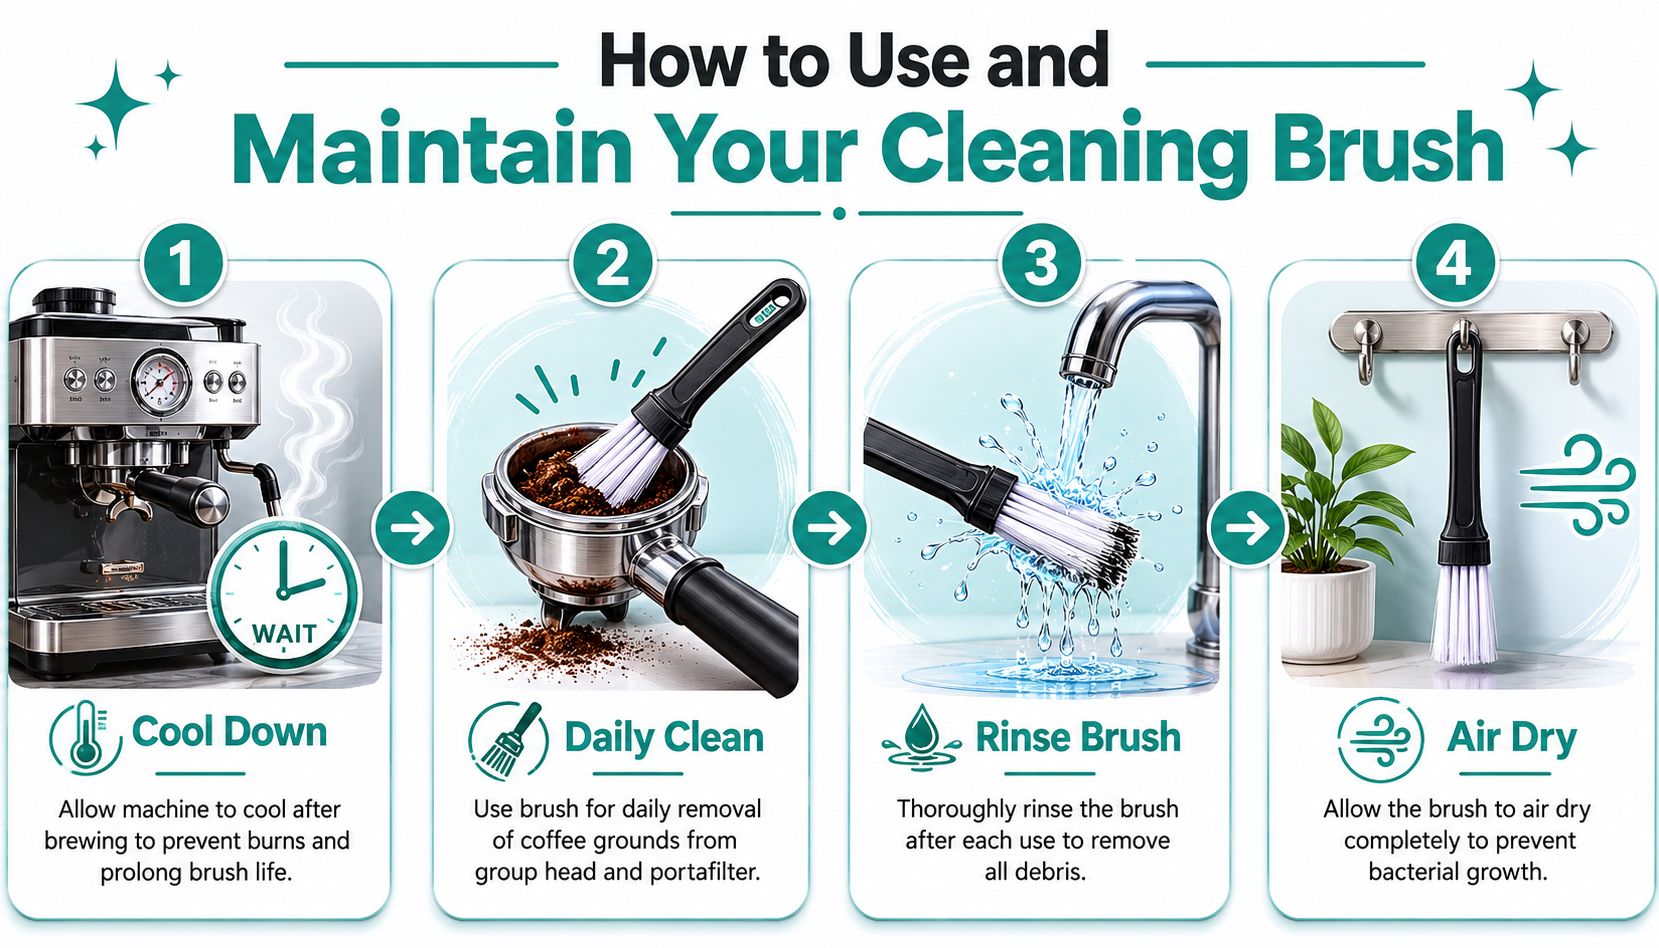
Start with safety. Let the machine cool enough that you're not scrubbing hot metal blindly. Then clean the part that touches coffee, not just the visible outer shell.
A simple routine that works
Use the brush as part of your shutdown routine after the last brew of the day.
- Let the machine cool briefly. Warm is manageable. Hot enough to burn your hand is not.
- Remove loose parts first. Pod holders, baskets, and portafilters are easier to clean outside the machine.
- Scrub the target area directly. Use circular motions on espresso group-head surfaces, short controlled strokes in pod-machine recesses, and longer passes through drip-brewer channels and spouts.
- Flush with water afterward. Run a water-only cycle or rinse the removable part to carry away loosened debris.
For a broader routine that covers more than brushing, this guide on how to clean a coffee maker is a useful companion.
A quick visual demo helps if you want to see the motion and pace in context.
Clean the brush too
This is the part often skipped. The brush collects the same oils and damp residue that you just removed from the machine. If you toss it in a drawer wet, it becomes its own little grime trap.
Do this after each use:
- Rinse thoroughly: Run hot water through the bristles until residue stops washing out.
- Shake off moisture: Don't leave the brush soaked.
- Air dry fully: Stand it bristle-down or hang it so moisture can escape.
Many sources explain how to use a brush but don't say much about maintaining the brush itself. Guidance exists on features like water deflectors, yet there is still little clarity on how to sanitize a machine brush after repeated contact with coffee oils, whether nylon bristles degrade over time, or which signs such as frayed bristles mean replacement is the hygienic move, as discussed in this coffee brush maintenance video reference.
When to replace it
You don't need a calendar reminder. You need to inspect the bristles.
Replace the brush when you see these signs:
- Fraying: The bristles splay out and stop reaching tight recesses cleanly.
- Permanent bending: The head no longer scrubs with even contact.
- Stubborn discoloration with residue feel: The brush still feels dirty after rinsing.
- Loose head or unstable handle: Control drops, and cleaning gets sloppy.
A worn brush doesn't just clean poorly. It also encourages harder scrubbing, which is when people start damaging soft parts or giving up on the routine.
Get Better Tasting Coffee Starting Tomorrow
If your coffee tastes off even though you buy good beans and keep up with basic maintenance, hidden residue is the first thing to suspect. That's especially true when the bad flavor seems vague. A little bitter, a little stale, a little flat.
A coffee machine cleaning brush solves a very specific problem. It reaches the oily, cramped, neglected spots that rinsing and descaling don't fully handle on their own. Once you match the brush to the machine, the job gets easier. Keurig owners need precision. Ninja and drip users need reach. Espresso owners need the right angle and enough firmness to scrub critical surfaces safely.
The result is simple. Cleaner brew-path parts, fewer leftover grounds, and a cup that tastes more like the coffee you bought.
Stop letting old residue ride along in every brew.
If you want a practical way to maintain Keurig, Ninja, espresso, and other home coffee setups, shop the coffee maintenance accessories from PureHQ Inc. and choose the brush and cleaning supplies that match your brewer.
