
Coffee Machine Care
Ninja Dual Brew Pod Adapter Not Working: Real Fixes

Sep
You're already late for work when the Ninja DualBrew starts with a hollow rush instead of the familiar sound of coffee extracting. Water gurgles beneath the brew basket, the K-Cup stays suspiciously intact, and your mug ends up half-filled with something closer to hot water. Searching for “Ninja DualBrew pod adapter not working” feels justified, but a failed adapter usually isn't the first diagnosis worth making.
The official Ninja Pod Adapter is designed for standard K-Cup pods only. Ninja's documentation also says it isn't compatible with reusable K-Cup filters, and the adapter must sit fully over the brew basket with its handle secured in the LOCK position before brewing (Ninja's CFP200 troubleshooting and FAQ guidance). Across CFP100, CFP200, and CFP305 product lines, the recurring problem is usually the swap between pods and grounds, not an electronic failure inside a passive plastic adapter.
The Morning Your Pod Adapter Stops Cooperating
The first clue is often sound. A working pod brew has resistance as water moves through the capsule. A misaligned setup sounds looser, with water rushing around the pod, a hollow gurgle under the basket, or a sudden stream that fills the cup without carrying much coffee flavor.
That moment makes owners blame the adapter. It's understandable. You insert the pod, close the handle, press brew, and the machine appears to ignore the component sitting directly in front of it. Yet the adapter itself has no independent electronics to reset. It provides the pod chamber and piercing path, while the brewer depends on the surrounding basket, handle, lid, and selected mode being aligned correctly.
The practical mistake is treating every symptom as one fault. A half-filled mug, a watery brew, a pod that stays dry, and a leak below the basket can come from different points in the same installation chain.
What the symptoms are really telling you
A machine that sends water around the pod may still have a functioning pump. A machine that won't detect the adapter may just be seeing a basket that isn't fully seated, a handle left short of LOCK, or a mode intended for grounds rather than pods.
Ninja's published troubleshooting tells users to re-seat the adapter, close the handle, and set the hot-water dial to the coffee-bean icon when checking detection (official Ninja support instructions). That advice matters because it identifies the mechanical checks that should come before buying another part.
Technician's rule: Don't replace the adapter until a clean, standard K-Cup has failed in the correct mode after the basket, adapter, handle, and lid have been reinstalled.
Frequent switching makes this problem especially common. One morning, the Grounds Adapter is in place for loose coffee. The next morning, someone drops the Pod Adapter over the wrong basket or leaves the control panel in the previous setting. The machine then behaves consistently with its setup, even though the user experiences the result as random.
The useful approach is a triage ladder. First verify the mode. Then verify the basket and adapter seating. Next check piercing and residue. Only after those tests should you investigate a warped hinge, a bent needle, or a persistent machine error.
Getting the Adapter Seated the Way Ninja Recommends
A pod adapter usually fails at the handoff between POD mode and the physical parts. The basket supports the adapter, the adapter holds the K-Cup, the handle positions the piercer, and the lid must close firmly enough to pierce and seal the capsule. If one part sits high or the controls remain in grounds mode, water can bypass the coffee even when the adapter itself is fine.
Set the mode before installing the pod
Choose the brewer's POD setting before inserting a capsule. Grounds mode sends the brew process around the pod setup, so pressing buttons repeatedly will not make a K-Cup extract correctly. Change the display or dial from grounds or another brewing function before testing the hardware.
Remove the current components and start with the empty brew basket. Set it into its platform and confirm that it drops flat without rocking. The rim should sit evenly, while the rubber gasket should remain flat, centered, and free of folds.
Use the four-stage seating sequence
Reinstall the brew basket. Remove stray grounds, place the basket back over the carafe platform, and run a finger around its rim. The gasket should be centered rather than twisted or lifted.
Place the Pod Adapter over the basket. Its wide flange should rest flush on the basket rim. Keep the pod cavity facing upward, and clear any residue that could leave the adapter perched on one side.
Move the handle into LOCK. Pull it down with even pressure until it clicks. A partially closed handle can leave the piercer out of alignment. Test it gently for unusual movement, and stop at its normal position instead of forcing it farther.
Close the lid firmly and test with a standard K-Cup. The Ninja DualBrew manual instructions place the adapter over the brew basket, with the handle locked and the lid closed before brewing.
Open the machine only when it is safe, then inspect the pod foil. A clean puncture shows that the upper and lower piercing paths met the capsule. For a water-only check, look for the first drip through the pod route, not water escaping around the basket.
If detection still fails, reinstall everything from the empty basket upward. A careful restart often exposes a basket that never dropped fully, a flange resting on residue, or a handle that stopped short of LOCK. Buying another adapter before checking those points is usually a wasted Saturday morning.
Cleaning the Parts That Break Pod Detection Without Notice
Residue can interrupt pod detection by changing how the adapter sits and how the piercer meets the capsule. Cleaning will not fix an incompatible reusable filter or a loose handle, so inspect the contact surfaces before reaching for descaler.
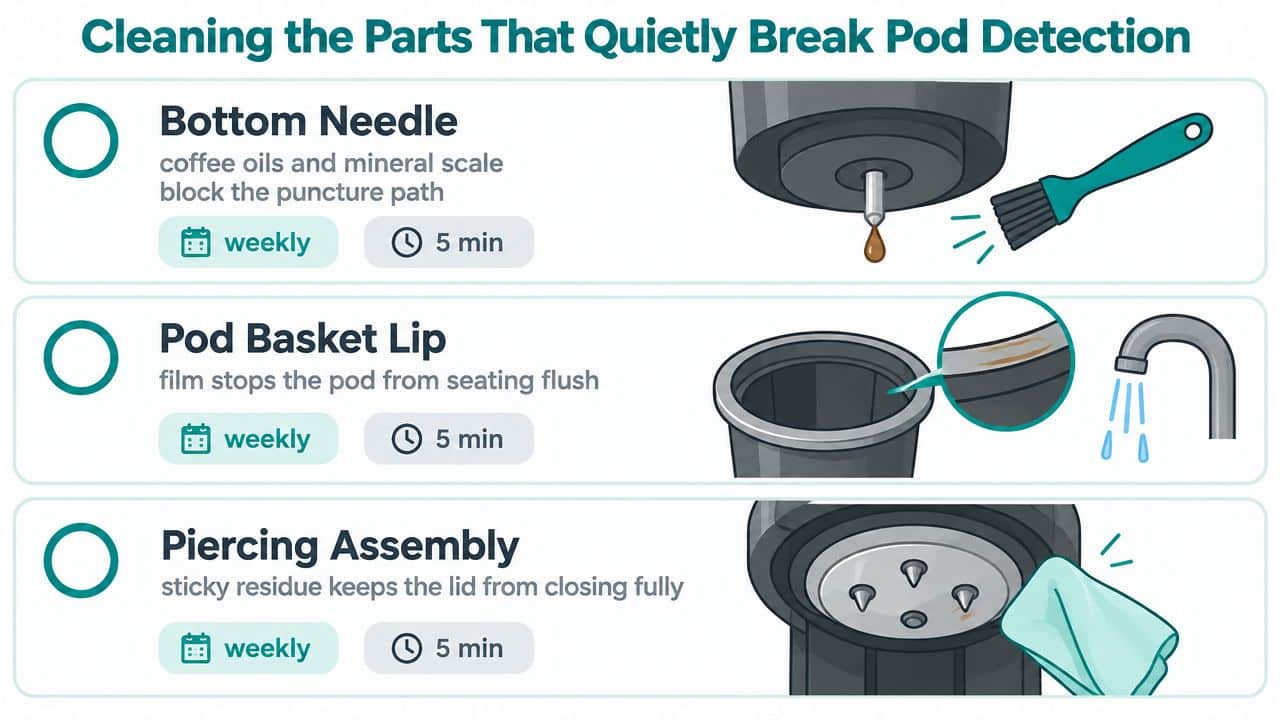
Remove the Pod Adapter from the brewer. Rinse loose coffee residue with warm water, then check the underside needle and the small exit opening. Coffee oils and mineral deposits can block the piercing path, leaving the pod partly punctured or apparently untouched. Wipe the pod seat after brewing, and remove pooled water or wet coffee film before installing the next pod.
Use a soft cloth on the pod seat, basket rim, and lid contact points. A nylon brush can loosen residue around the needle and exit opening. Rinse removable parts with warm water, keeping moisture away from the brewer's electrical areas, then dry every component before reassembly.
Remove the gasket only if your model's care instructions allow it. Clean its groove and reinstall it without twisting. A crooked gasket can create a leak path that resembles a detection fault, while a flat gasket preserves the intended seal.
For stubborn mineral buildup, use a descaling solution and follow the manufacturer-approved cleaning process. Do not assume a vinegar soak suits every removable part or DualBrew model. Check the care instructions before soaking anything. Metal picks and needles can deform the piercing tip, and a damaged tip can create a fresh puncture problem. Keep the Pod Adapter out of the dishwasher unless the model documentation specifically permits it, since heat and harsh detergents may affect plastic parts or seals.
The manual distinguishes between two leak locations. Liquid below the brew basket should involve a closed drip stop. A leak from the bottom of the unit is a reason to contact customer service rather than continue home repairs, according to CFP355A troubleshooting guidance.
Water-path care also has a limited role. A compatible filter and proper descaling can reduce buildup, and PureHQ's guide to water filtration for the Ninja DualBrew explains where filtration fits into routine maintenance. It cannot correct the recurring seating friction between pod and grounds modes, or replace selecting the correct brew mode and installing the adapter fully.
Reading the Real Symptoms Behind a Not Working Adapter
The output in the cup gives you useful evidence. Don't throw away the pod immediately. Look at the foil, the puncture marks, and whether liquid escaped around the basket.
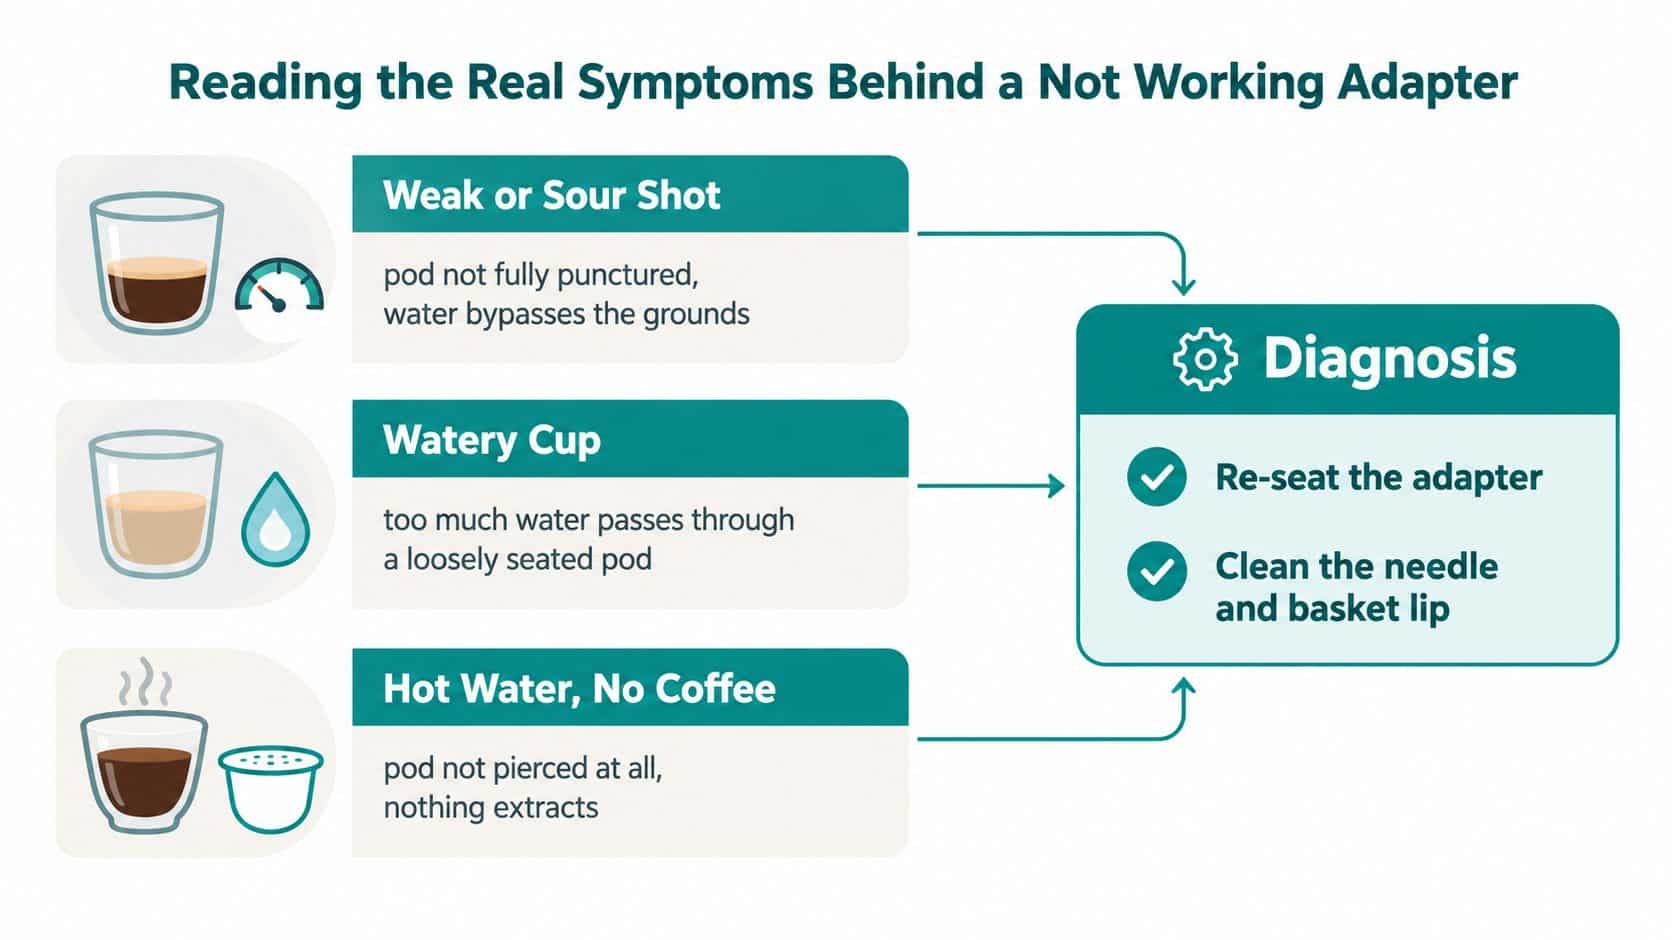
A weak or sour cup usually points to incomplete extraction. If the pod's foil barely opened, the upper piercer may have residue on it, the adapter may not have reached the correct position, or the pod may not have compressed against the lower spike. Clean the piercing path, reinstall the basket and adapter, and test with a standard K-Cup before changing multiple variables.
A watery cup suggests bypass. Water may be moving around a loosely seated pod rather than through the coffee bed. Check that the adapter flange sits flush, the basket gasket lies flat, and the lid closes fully. An off-brand or nonstandard pod can also change the fit, so use a conventional K-Cup for diagnosis.
Match the symptom to one correction
| Symptom | Most useful first check | What the result suggests |
|---|---|---|
| Weak or sour brew | Inspect the foil puncture and clean the piercing path | The pod may not have been fully pierced |
| Watery cup | Re-seat the basket, gasket, and adapter | Water may be bypassing the pod |
| Hot water with no coffee | Confirm POD mode and standard K-Cup compatibility | The machine may be in the wrong mode or the pod may not be pierced |
The official guidance emphasizes the same mechanical sequence. The adapter must sit over the brew basket, the handle must reach LOCK, and the control setting must correspond to the intended brew function (Ninja DualBrew manual troubleshooting).
Don't use repeated cleaning as a substitute for compatibility testing. If a standard K-Cup works after a clean reinstall, the original problem was probably installation, residue, or the pod format. If the same standard pod remains unpierced after those checks, the next suspects are a damaged adapter, a lid mechanism that isn't compressing correctly, or a brewer-side alignment problem.
Pod Adapter Versus Reusable Pods and Grounds Mode
A K-Cup-shaped accessory is not automatically compatible with the Ninja Pod Adapter. The adapter is intended for K-Cup pods, while reusable K-Cup filters and loose coffee belong to different setups. That distinction matters because a reusable insert can fit badly even when its outline looks correct.
Reusable pods reduce disposable waste and let you choose your own ground coffee, but they require closer maintenance. Fine grounds and coffee oils can clog the mesh screen. An insert that sits slightly too high can stop the lid from closing fully or shift the piercing position. A failed reusable-pod test does not establish that the official adapter is defective.
For loose coffee, remove the Pod Adapter and install the separate Grounds Adapter with a #4 cone paper filter or permanent filter, following the Ninja DualBrew grounds setup guidance. If you are switching between pod and grounds brewing, this guide to using coffee grounds in a Keurig explains the related setup and cleaning differences.
Adapter Type vs. Brew Mode Compatibility
| Adapter Type | Required Brew Mode | Pod/Waste Type | Common Failure Signature |
|---|---|---|---|
| Official Ninja Pod Adapter | POD mode | Standard K-Cup pod, disposable after brewing | Pod is not detected, remains unpierced, or produces hot water |
| Reusable third-party pod | POD mode, only where the accessory is compatible | Refillable pod, reusable after cleaning | Weak flow, watery coffee, poor fit, or clogged screen |
| Grounds Adapter | Grounds or Specialty mode | Loose coffee with a paper or permanent filter | Water bypasses the coffee setup when the Pod Adapter remains installed |
The trade-off is practical. The official adapter gives standard K-Cup pods the intended fit, while a reusable pod demands attention to its dimensions, screen cleanliness, and compatibility with your brewer. Grounds mode is a separate brewing path, so changing from pods to coffee grounds requires both the matching component and the matching control setting.
Keep the pod adapter, reusable insert, Grounds Adapter, and filters together by brewing type. That simple storage habit prevents a common misdiagnosis: blaming the pod adapter when the machine is still configured for the other setup.
Reset Routines and Knowing When to Call Support
A reset is worth trying when the machine's state seems confused, but it shouldn't replace a mechanical inspection. Unplug the brewer for 60 seconds, reconnect it, and run a plain-water cycle in POD mode with the adapter correctly installed. This confirms whether the pump primes and whether the brewer recognizes the setup without coffee complicating the result.
For a leak beneath the basket, inspect the drip stop and close it before testing again. Check the silicone gasket for cuts, flattening, or displacement. If water collects under the base of the machine rather than at the basket, stop using it and follow Ninja's service guidance instead of opening the housing.
Escalate with useful information
Contact support when the machine continues to blink, reports an error after a clean installation, or refuses to recognize a standard K-Cup in the correct mode. Record the display message, selected brew mode, pod brand, and the serial number from the base before contacting Ninja.
The adapter itself becomes a credible replacement candidate when you can see a warped plastic body, a loose hinge spring, or a visibly bent piercing needle. Those physical defects differ from a basket that sits unevenly or a pod that doesn't match the adapter's supported format.
Warranty questions also depend on the model and the nature of the fault. Keep the purchase information and review the applicable Ninja coffee maker warranty considerations before attempting any repair that could complicate service.
PureHQ Inc. offers compatible Ninja DualBrew accessories such as reusable pods, water filters, paper liners, and descaling products, so you can match maintenance supplies to the brewing setup rather than forcing an incompatible insert into the Pod Adapter.
Before ordering a replacement, reinstall the basket, confirm POD mode, lock the adapter, and test a standard K-Cup with a clean piercing path. Visit PureHQ Inc. to shop compatible Ninja DualBrew filters, reusable pods, cleaning supplies, and maintenance accessories for a more reliable brew routine.

