Coffee Machine Care
Best Keurig K Supreme Water Filter Guide for 2026
May
You fill the reservoir, drop in a pod, hit brew, and expect your Keurig K-Supreme to justify the money you spent on it. Instead, the coffee tastes flat, slightly odd, or weaker than it should. That’s frustrating on any brewer. It’s worse on one built around MultiStream brewing.
In most kitchens, the problem isn’t the pod. It’s the water going through the machine, and just as often, it’s the wrong filter, a poorly installed filter, or no filter at all. That small part controls more of the final cup than most owners realize.
That Disappointing Cup from Your Premium Keurig
A lot of K-Supreme owners end up in the same spot. The machine still turns on, still brews, and still looks fine on the counter. But the cup doesn’t taste clean. It tastes dull, or there’s a faint mineral edge that shows up most clearly in black coffee.
That’s what makes this issue easy to miss. The brewer feels functional, so people blame the coffee itself. They switch pod brands, brew a stronger setting, or try a different size. The result often stays about the same because the machine is still pulling water with chlorine, mineral taste, or both.

Why this gets worse over time
The K-Supreme is designed to do more with water than older single-stream brewers. When water quality drops, the machine can’t hide it. A premium brewer using poor water still makes poor coffee.
The second problem is the one you don’t see. If water carries more minerals, the inside of the brewer pays for it. Flavor slips first. Performance problems usually follow.
Practical rule: If your coffee suddenly tastes “off” and the pods haven’t changed, check the water path before you blame the coffee.
A proper keurig k supreme water filter isn’t a minor add-on. It’s part of the brewing system. Get it right, and the coffee tastes cleaner and the brewer runs the way it should. Get it wrong, and you end up with an expensive machine that keeps making average coffee.
What people usually try first that doesn’t work
Before fixing the actual cause, many owners go through the same dead ends:
- Changing pods: A different roast can mask bad water for a while, but it won’t fix it.
- Using stronger brew settings: That can push extraction harder, yet it won’t remove mineral taste.
- Buying the cheapest replacement filter online: Leaks, loose fit, and bypass problems frequently begin.
- Ignoring maintenance reminders: The brewer might still run, but cup quality keeps slipping.
The good news is that this problem is usually simple to correct once you know which filter the K-Supreme needs.
Why Your K-Supreme Needs a Specific Water Filter
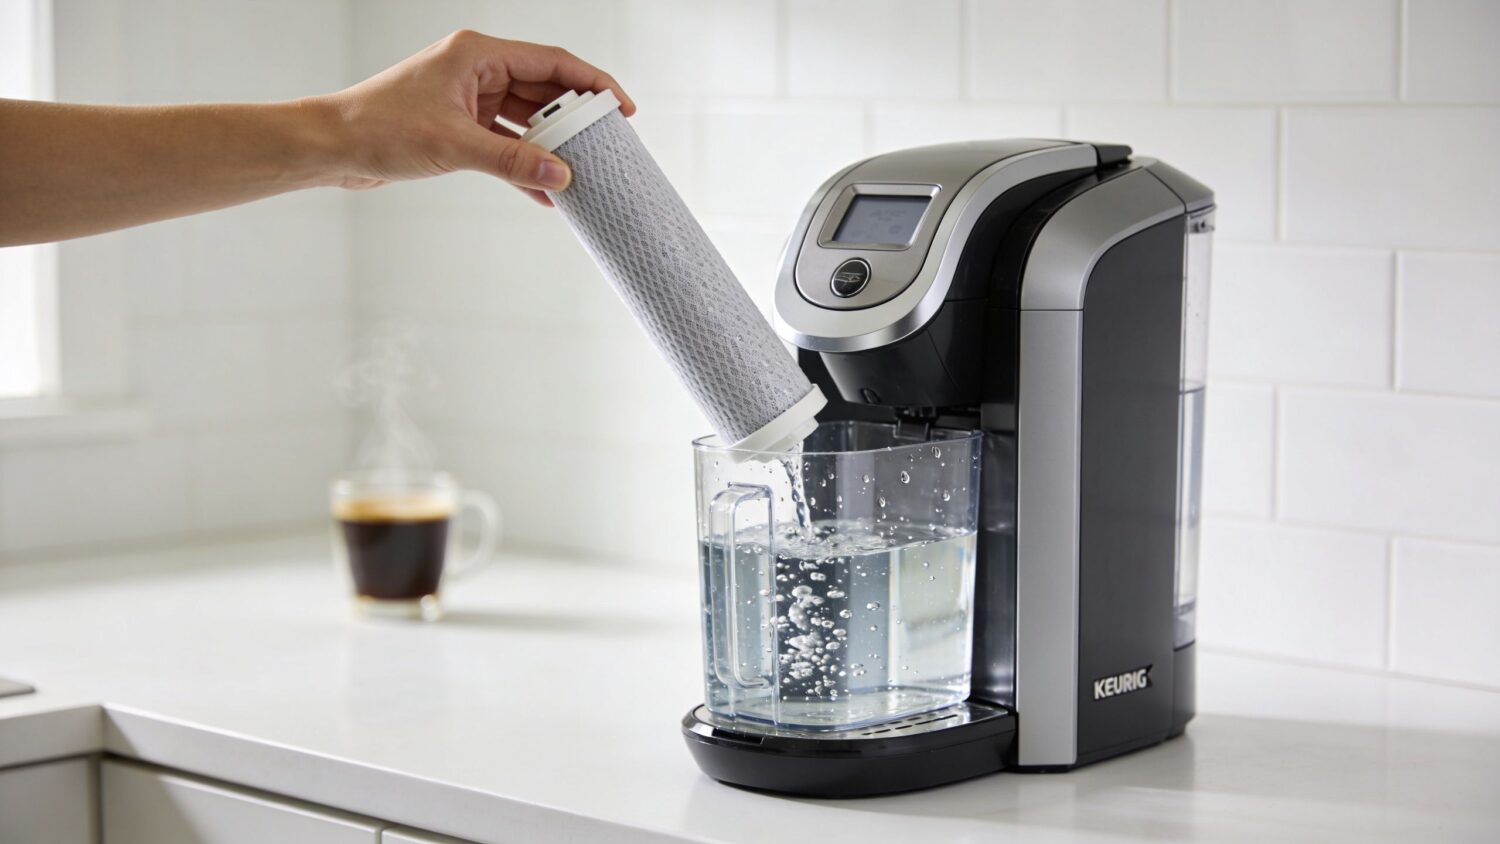
The K-Supreme does not use the same short, common Keurig filter many people already have in a drawer. According to this Keurig K-Supreme filter size guide, the Keurig K-Supreme water filter is a model-specific tall cartridge made for the K-Supreme line, measuring 1.4 inches in diameter and 2.75 inches tall, while the universal short filters used in models like the K-Classic are different. That size difference is the whole point. The brewer’s reservoir and holder were built around that exact shape.
The fit has to be exact
Picture a key and a lock. A filter that looks close is not the same as a filter that seals and seats correctly. The K-Supreme’s tall cartridge fits into the rear section of the side reservoir and uses the proper holder to stay in position.
If you’re not sure whether your brewer uses this system, this guide on whether your Keurig has a water filter helps clarify which models take which style.
Here’s what matters in practice:
- Correct dimensions matter: The K-Supreme tall filter is built for this brewer’s reservoir geometry.
- The holder matters too: The cartridge is meant to work with the starter kit handle, not as a loose drop-in part.
- Near-match filters cause real problems: If the threading or snap fit is off, water can leak around the filter instead of through it.
What the filter actually improves
A proper filter does two jobs. First, it helps reduce the chlorine taste and other impurities that can flatten coffee. Second, it cuts down the mineral load that contributes to scale inside the brewer.
Those two benefits show up in different ways:
| What you notice | What the filter is helping with |
|---|---|
| Cleaner flavor | Reduced chlorine and off tastes |
| Better aroma from the same pod | Fewer water-related flavor distractions |
| More consistent brewing | Fewer flow interruptions from poor fit or trapped air |
| Less stress on the brewer over time | Reduced mineral exposure |
The wrong filter doesn’t just underperform. It can route water badly enough that you think the machine has a bigger defect.
Why generic “compatible” isn’t enough by itself
Many listings say compatible. That word means very little if the filter body is slightly off, the snap point is loose, or the cartridge sits too high or too low in the holder. On a K-Supreme, those small mistakes show up fast because the reservoir design is less forgiving than older models.
That’s why buying by machine name alone isn’t enough. For this brewer, the right filter is the one built specifically for the K-Supreme tall-handle setup.
How to Install Your K-Supreme Water Filter Correctly
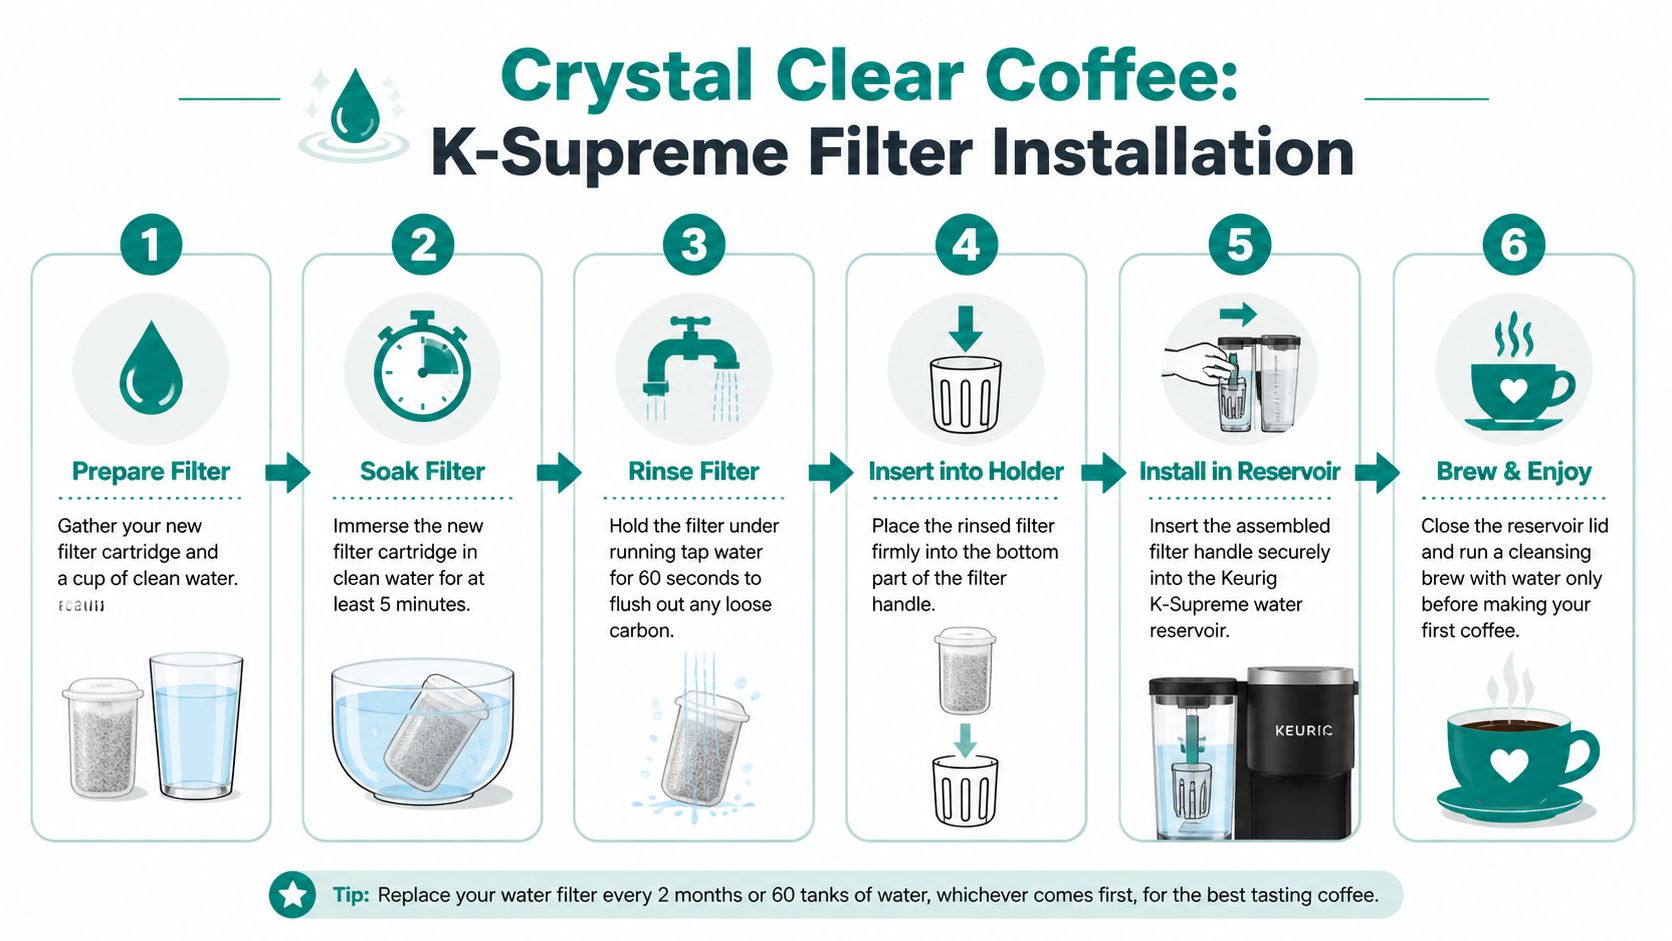
Most filter problems start during installation, not months later. A cartridge that wasn’t soaked long enough, wasn’t rinsed properly, or wasn’t seated fully can trigger strange behavior right away. According to this K-Supreme filter installation video, the process requires about 5 minutes of soaking and a 2-minute rinse, and improper installation can introduce air bubbles that lead to “ADD WATER” alerts or incomplete brews.
Start with the visual if you want a quick overview.
The install process that actually works
Use this order and don’t skip steps:
- Soak the new cartridge in clean water for about 5 minutes.
- Rinse it under running water for about 2 minutes to flush loose carbon.
- Open the reusable handle and snap the cartridge into place securely.
- Install the assembled holder into the reservoir in the correct position.
- Refill the reservoir and reattach it if removed.
- Run water-only brew cycles before making coffee.
The point of soaking and rinsing isn’t ceremony. The filter media needs to get fully wet, and the loose carbon needs to clear out before the brewer pulls water through it.
Why people get errors after a new filter
A fresh filter can cause problems if air is still trapped inside. The machine may act like it’s low on water even when the tank is full. Brew flow can pulse, stall, or stop short.
The fix is usually simple:
- Recheck the cartridge seating: Make sure it snapped in fully.
- Remove and rinse again: If you rushed the first rinse, do it properly.
- Run plain-water cycles: This helps purge trapped air and carbon residue.
For a model-specific walkthrough, these Keurig water filter replacement instructions are useful to keep nearby while you install the first one.
A video can also help if you want to confirm the motion and placement before you start.
One step people skip too often
After installation, run a few water-only brews before using a pod. Keurig guidance for this filter system includes 3 water-only brew cycles after setup to clear carbon dust and prep the system correctly in the brewer. That small step keeps your first coffee from tasting dusty or odd.
A new filter should make the next cup cleaner. If the first cup tastes worse, installation was usually rushed.
This is also the point where regular maintenance starts to make sense as a routine, not a repair. A water filter helps with incoming water quality. A descaling solution handles mineral buildup already inside the machine. They solve different problems, and both matter if you want the K-Supreme to stay consistent.
Choosing the Best Filter PureHQ vs Generic Alternatives
The biggest objection buyers have is reasonable. If the K-Supreme is picky about filter fit, why risk anything except the original? That concern is exactly why cheap generics disappoint so many people.
The weak point usually isn’t the carbon itself. It’s the physical fit. According to this discussion of common third-party K-Supreme filter problems, many generic filters leak, float, or fail to snap onto the intake, and anecdotal user reviews suggest failure rates as high as 20-30%. That’s the primary issue to avoid.
What matters when you compare filters
Don’t compare by price alone. On this brewer, the better question is whether the cartridge fits correctly every time and works with the proper holder without leaking or shifting.
Here’s a practical comparison.
K-Supreme Water Filter Comparison
| Feature | PureHQ Compatible Filters | Keurig OEM Filters | Generic Third-Party Filters |
|---|---|---|---|
| Designed for K-Supreme tall filter format | Yes, when purchased as K-Supreme-compatible replacements | Yes | Sometimes unclear |
| Works with the required holder system | Yes, if matched to the correct starter kit style | Yes | Inconsistent |
| Risk of leaks or floating | Lower when dimensions are controlled and tested for this model | Low | Higher based on common user complaints |
| Material and build confidence | Depends on brand specifications and quality control | Known Keurig format | Varies widely by seller |
| Buying experience | Often chosen for value and compatibility | Often chosen for OEM match | Often chosen for lowest upfront cost |
| Main trade-off | Need to confirm the exact compatible model before buying | Higher cost | Greater fit uncertainty |
The real trade-off
OEM filters give buyers confidence because the fit is known. The downside is simple. You usually pay more for that certainty.
Cheap generic filters go the other direction. They can look like a bargain until one sits crooked, leaks around the housing, or never locks in firmly. At that point, any savings disappear because the water may bypass filtration or the brewer starts acting up.
A tested compatible sits in the middle, which is where many K-Supreme owners want to be. PureHQ offers K-Supreme-compatible water filter options built around the correct tall-filter format and holder-based use, which makes sense for owners who want a non-OEM replacement without gambling on random marketplace generics.
If a replacement filter listing doesn’t clearly address K-Supreme fit, holder compatibility, and tall cartridge format, skip it.
How to decide without overthinking it
Use these filters for your decision:
- Buy OEM if you only want the original Keurig format and don’t mind paying more for it.
- Buy a tested compatible if you want the right physical fit and dependable day-to-day use without defaulting to OEM.
- Avoid vague generics if the listing is light on dimensions, holder details, or specific K-Supreme compatibility.
For this machine, fit is performance. A water filter that doesn’t lock in properly isn’t just a lesser option. It’s the wrong part.
Maintenance and Troubleshooting Common Filter Issues
Once the filter is installed correctly, the next win comes from replacing it before performance slips. Keurig recommends replacing the filter every 2 months or after 60 tank refills, and in hard water regions descaling may be needed as often as every 3 months, according to Keurig maintenance guidance for the K-Supreme system.
That schedule matters because the filter and the brewer age in different ways. The cartridge gradually loses effectiveness. The machine gradually collects mineral buildup.
When to replace the filter
You don’t always need a warning light to know the filter is due. Watch the cup and the brewer.
Common signs include:
- Coffee tastes less clean: The pod hasn’t changed, but the cup seems flatter or slightly harsher.
- Water quality in your area is challenging: If your tap water leaves mineral residue elsewhere, your brewer notices too.
- It’s time: Following the replacement interval is easier than waiting for flavor to drop.
The most common K-Supreme filter problems
A few issues come up again and again, and most have simple causes.
| Problem | Likely cause | What to do |
|---|---|---|
| “ADD WATER” shows when reservoir is full | Air trapped after install | Remove, rinse, reinstall, then run water-only brews |
| New filter won’t click in | Wrong model or wrong holder setup | Confirm it is the K-Supreme tall format |
| Water leaks around filter area | Poor fit or misaligned cartridge | Reseat the filter and inspect holder alignment |
| Coffee still tastes off after filter change | Old scale still inside brewer | Descale the machine separately |
If you want a deeper troubleshooting checklist, these common Keurig water filter mistakes and fixes cover the failure points that show up most often.
Filtering and descaling are not the same job
This distinction saves people a lot of frustration. A water filter helps reduce incoming impurities. Descaling removes mineral buildup that already formed inside the brewer.
So if you replace the filter and the cup still tastes wrong, or brew flow still feels inconsistent, don’t assume the new cartridge failed. The machine may need descaling too.
A fresh filter can improve incoming water. It cannot dissolve old scale already coating internal parts.
That’s why a basic maintenance kit makes sense for K-Supreme owners. Keep replacement filters on hand, and keep a descaling product nearby for scheduled cleaning. You’ll solve flavor issues faster and avoid the guessing game.
Enjoy Better Coffee and Protect Your Brewer Today
The K-Supreme can make a noticeably better cup than a lot of owners ever get from it. The usual reason isn’t the brewer. It’s the water path. Once you use the correct tall filter, install it properly, and replace it on schedule, the machine has a fair chance to do what it was built to do.
The maintenance side matters just as much as the flavor side. According to Keurig support documentation for the K-Supreme system, using filtered water can yield 15-20% higher flavor scores in customized brews, and scale buildup from unfiltered water is responsible for up to 40% of Keurig service calls. The same guidance also notes that leaving the filter in during descaling can neutralize the cleaning solution, which is why proper filter handling is part of machine care, not a side detail.
What actually works
Three habits solve most K-Supreme water issues:
- Use the correct K-Supreme-specific tall filter
- Install it with proper soaking, rinsing, and flush cycles
- Replace the filter and descale on schedule
That’s the whole game. Not complicated, but very easy to get wrong if you buy the wrong cartridge or trust a generic filter that doesn’t fit.
If your current filter leaks, floats, or never seems to lock in right, stop fighting the wrong part. Use a replacement made for this brewer’s filter format and holder system so the water goes through the filter instead of around it.
If you’re ready to fix the flavor, cut down on fit problems, and keep your brewer in better shape, shop PureHQ Inc. for K-Supreme-compatible water filters and maintenance accessories.
