Coffee Machine Care
Keurig Water Filter Holder Replacement Made Easy
May
Bad coffee from a Keurig usually sends people in the wrong direction first. They blame the beans, descale the machine, or assume the brewer is dying. A lot of the time, the problem sits in the reservoir: the water filter holder is cracked, warped, installed wrong, or no longer sealing the way it should.
That small part matters more than it looks. If the holder doesn’t sit correctly, water can bypass the charcoal filter, and your cup starts tasting flat, harsh, or oddly chemical. I’ve seen this over and over with Keurig owners who replace filters regularly but never realize the holder itself has become the weak point.
A proper keurig water filter holder replacement fixes two things at once. It restores filtered water flow, and it stops the annoying fit issues that cause leaks, weak brews, or black charcoal specks in the first rinse. Done right, it’s a quick repair. Done carelessly, it creates the exact problems people think the new part caused.
Why Your Coffee Tastes Off and How to Fix It
Your coffee can taste wrong even when your machine still powers on, heats water, and brews on schedule. That’s what makes filter holder issues so frustrating. The brewer seems fine, but the cup says otherwise.
Most people replace the charcoal cartridge and move on. If the holder is loose, worn, or seated badly, that fresh filter won’t help much. Water needs to pass through the filter the way the brewer expects. When it doesn’t, taste suffers and the machine may show other clues like inconsistent fill behavior in the reservoir or a sloppy fit when you reinstall the assembly.
The hidden culprit inside the reservoir
A water filter holder does more than hold the filter. It positions the cartridge, maintains the seal, and keeps water moving through the correct path. If the holder is cracked or the tabs don’t lock firmly, unfiltered water can slip past the filter media.
That’s why a lot of “bad coffee” complaints start after what should’ve been simple maintenance. The user changes the cartridge, reassembles everything, and the next cup tastes worse.
Practical rule: If the flavor changed right after filter maintenance, inspect the holder before you blame the brewer.
Cleaning still matters, of course. If your machine also has mineral buildup or old residue, pair this repair with a solid guide to cleaning your coffee maker so you’re not solving only half the problem.
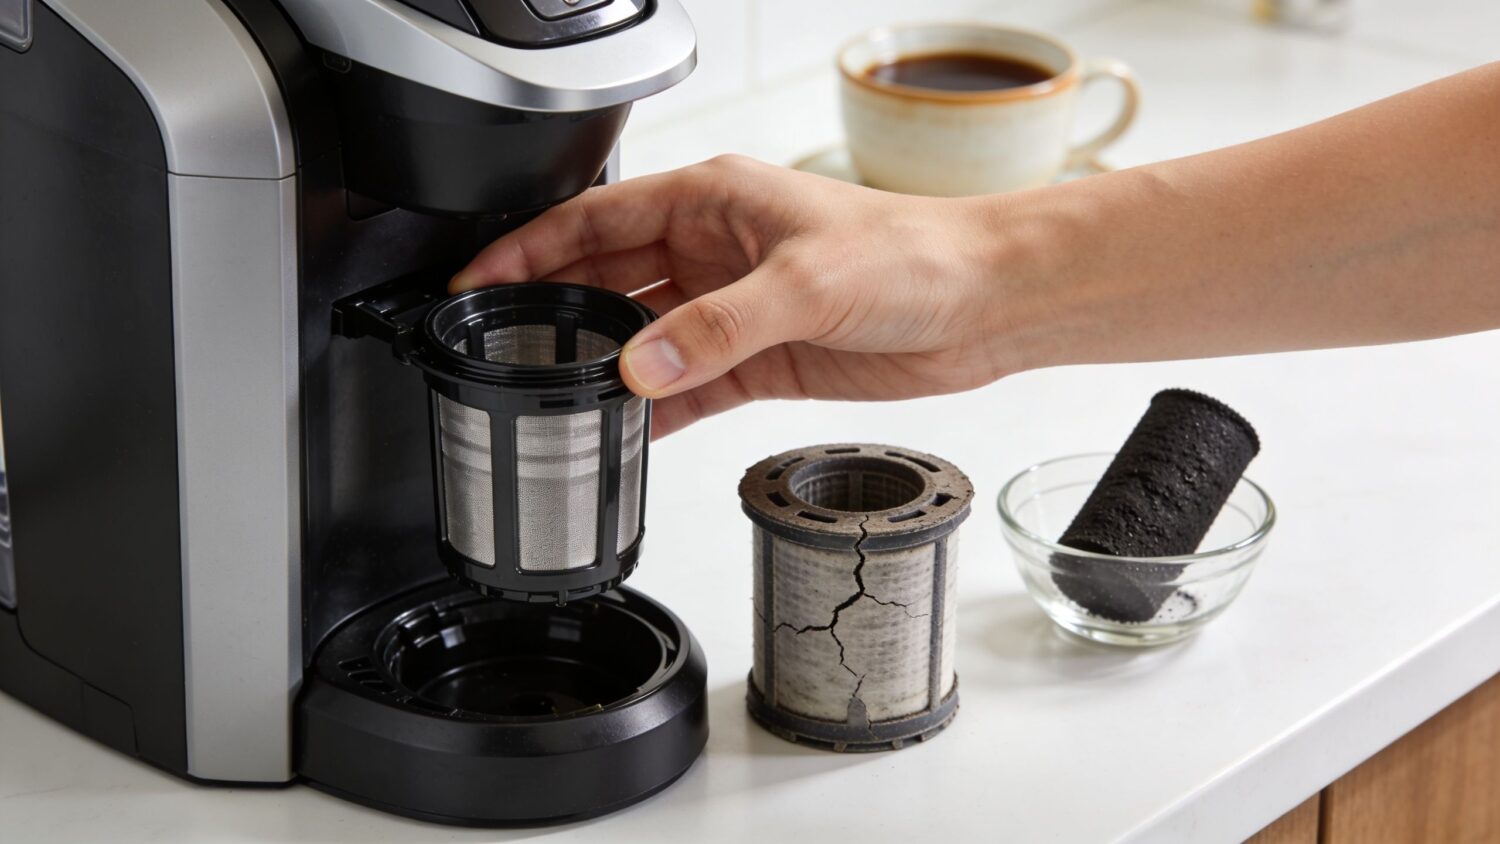
When replacement makes more sense than more cleaning
A dirty holder can be rinsed. A damaged or misshapen holder usually can’t be rescued. That’s the difference people miss. Repeated handling, hot kitchen conditions, and constant removal can wear out the plastic over time.
If you’re not sure whether you need a new cartridge or a full holder, this coffee maker water filter replacement guide is a useful way to separate routine maintenance from part failure.
Look for these signs:
- Loose fit: The holder no longer feels secure when reinstalled.
- Visible wear: Tabs, seams, or the mesh area look stressed or uneven.
- Persistent taste issues: Coffee still tastes off after a fresh filter and a clean reservoir.
- Bypass symptoms: Water seems to move around the assembly instead of through it.
A good replacement solves a surprisingly large share of “my Keurig tastes weird now” problems without touching the pump or internal tubing.
Replacing Your Keurig Water Filter Holder Step by Step
The physical swap isn’t hard. Precision matters more than force. The process has 7 to 8 distinct steps, and one of the biggest failure points happens during removal. In Keurig filter replacement guidance summarized from the manufacturer video, misalignment during removal accounts for 25 to 30% of user failures, soaking for 5 minutes matters because 30 seconds only activates 60 to 70% of the filter media, and a 60-second rinse helps deliver a clean first brew with a 98% success rate for avoiding residue and startup issues, as shown in this Keurig water filter replacement walkthrough.
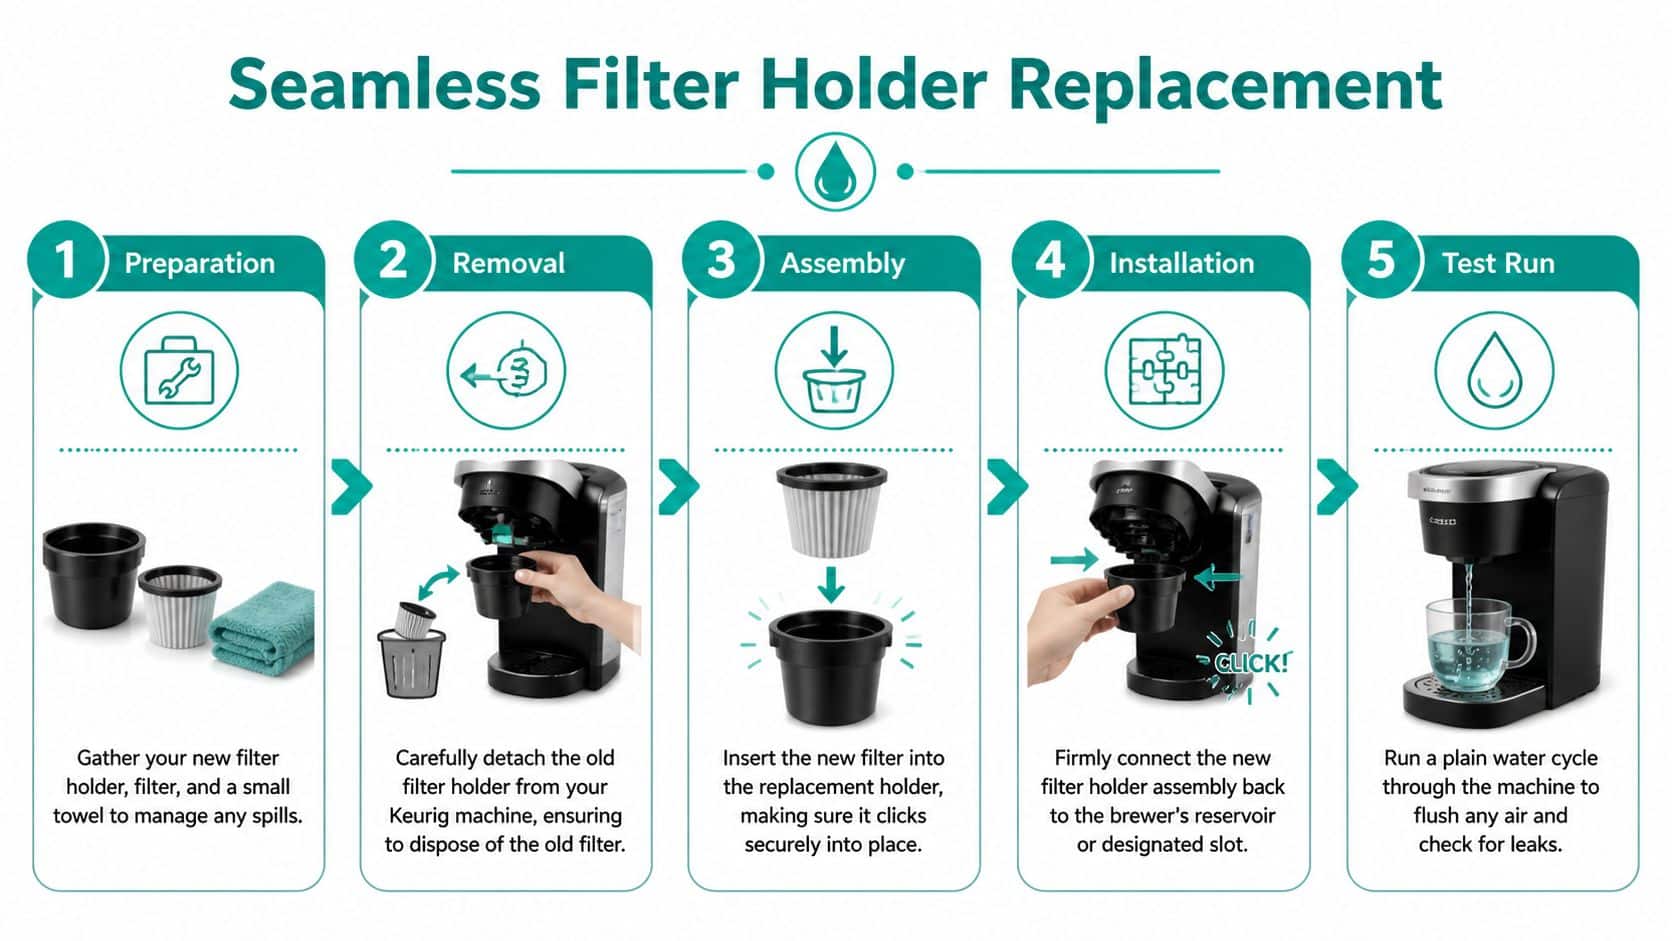
Remove the old holder without damaging the reservoir
Start by taking off the reservoir top and emptying the reservoir if needed. You want a clear view and a dry grip.
Then hold the upper filter holder handle and gently rock the lower holder out of its grooves. Don’t yank it straight up if it resists. That rocking motion matters because the assembly is designed to release from its track, not pop out under brute force.
This matters even more on brewers that use different filter shapes across model families. A K200 Plus setup, for example, uses a shorter clear filter than some taller K300-series designs. If the parts aren’t aligned the way that specific holder expects, users often think the holder is defective when the issue is fit and angle.
Once the assembly is out:
- Pinch the lower tabs inward to release the old filter.
- Pull the spent filter down and discard it.
- Rinse the mesh thoroughly to clear trapped debris.
Skipping that rinse creates its own headache. Debris left in the mesh can interfere with flow and make a brand-new filter behave like an old one.
Prep the new filter the right way
This is the phase often rushed, leading to charcoal dust in the first brew or weak flow right after installation.
Insert the new charcoal filter with the round side up into the lower holder. Make sure the mesh fully covers the flat side. If the filter sits crooked inside the holder, the assembly may still snap together, but water won’t move through it evenly.
After that, soak the assembly in cold water for 5 minutes. That isn’t a ceremonial step. The media needs time to absorb water properly. Quick dunks don’t do the same job.
A rushed soak is one of the easiest ways to create your own “bad replacement part” problem.
Then rinse the new filter under cold water for 60 seconds. That flushes away loose charcoal particles before they end up in your reservoir or cup. If you’re replacing both the holder and cartridges at the same time, a bundled setup like this Keurig water filter replacement guide and cartridge overview can help you confirm the order of assembly before you click everything together.
Reassemble and seat the holder securely
Now snap the upper holder back onto the lower holder. Listen for the click. That sound confirms the two pieces have sealed correctly.
Then reinstall the full assembly into the reservoir. Align it carefully and press until it clicks into place. If it doesn’t click, stop and check the angle. Forcing it usually bends the fit or leaves the holder partially seated.
Use this short checklist before you brew:
- Check orientation: The holder should sit straight, not twisted.
- Confirm the snap: Both the holder assembly and the reservoir install should feel locked.
- Inspect the mesh area: No folded edges, no tilted cartridge.
- Run flush cycles: Brew 1 to 2 plain-water cycles at 12 ounces each to clear residual charcoal.
Some newer users also do well keeping extra charcoal filters and a descaling product nearby. It saves you from fixing one maintenance issue while another one is already starting in the background.
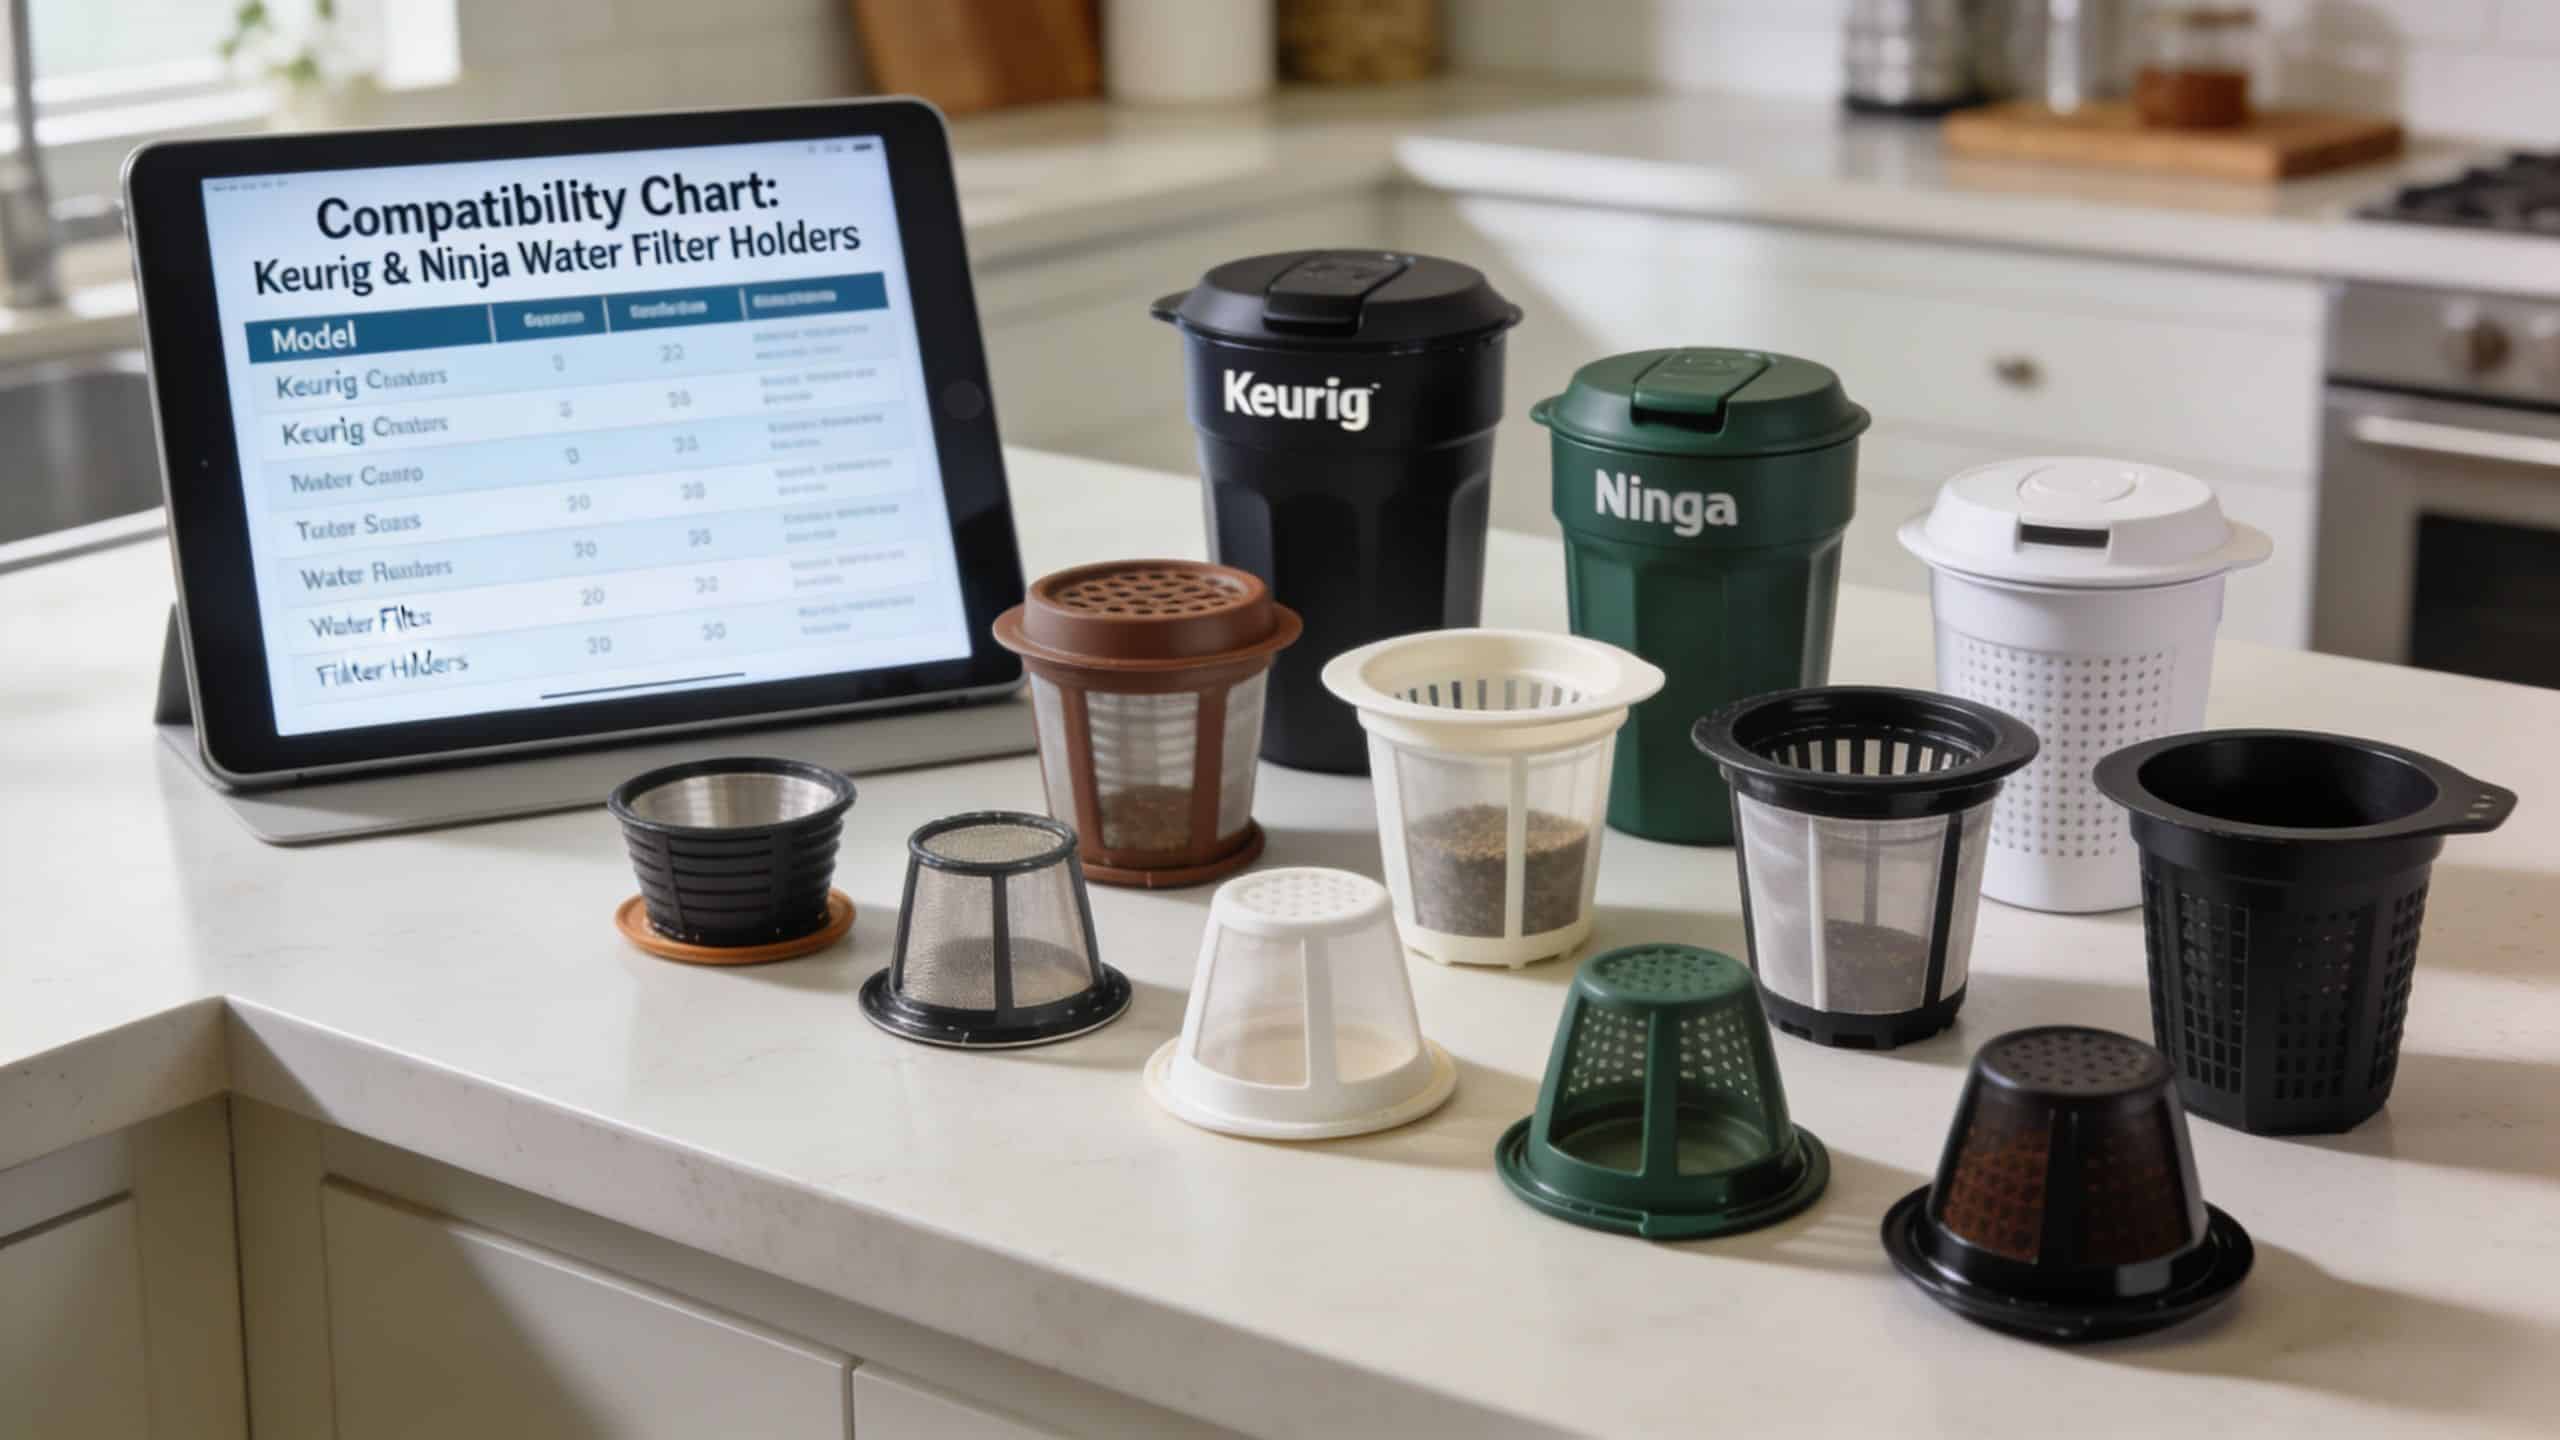
Finding the Right Holder for Your Keurig or Ninja Brewer
The hardest part for many people isn’t the replacement itself. It’s ordering the right holder in the first place. Keurig has used different reservoir and holder styles across model families, and Ninja DualBrew users face a similar compatibility problem.
K-Classic and older 1.0 style brewers
These are the machines many people know best. The holder setup is usually straightforward, but age creates confusion because older machines may have worn parts, faded model labels, or mixed replacement pieces from previous repairs.
If you own a K-Classic or another older Keurig 1.0 style brewer, check the reservoir shape and the way the holder locks at the base. Don’t rely on visual similarity alone. Two holders can look close enough on a product page and still seat differently in the brewer.
Keurig 2.0 and model-family differences
Keurig 2.0 machines add another layer of confusion because several brewers in that family use different filter dimensions. Shorter and taller filter formats aren’t interchangeable just because they both fit loosely inside the reservoir area.
When you’re matching a holder, focus on:
- Model number on the brewer body
- Reservoir design
- Existing holder height and latch style
- Whether your current filter is short or tall
That prevents the classic mistake of buying by machine color or by a generic “fits Keurig” listing.
K-Supreme, K-Slim, K-Duo, and newer slim designs
These brewers often use a different holder profile than older classic models. The dimensions and click points matter more because the reservoirs tend to be more compact. A holder that’s even slightly off can feel almost correct while still failing to seal consistently.
For users comparing options across these newer lines and Ninja compatibility, this Ninja DualBrew filter compatibility guide is useful for sorting brewer families before you buy.
If a listing says it fits “most Keurig models,” treat that as a starting point, not proof.
Ninja DualBrew compatibility
Ninja owners run into the same issue from a different angle. A brewer can support filtration, but the holder geometry and fit points still need to match the reservoir design exactly. If you’re shopping across Keurig and Ninja households, keep those parts separate and label spare accessories clearly. It saves a lot of trial and error later.
PureHQ vs Generic Holders What to Know Before You Buy
Price matters, but it shouldn’t be the only filter you use when choosing a replacement holder. The bigger question is how the part behaves after months of use, repeated cleanings, and constant reservoir removal.
One documented gap in the market is that shoppers rarely get clear durability guidance. Background product research notes that OEM and premium third-party holders are generally designed to last for years with proper care, while many generic holders can degrade, crack, or lose seal integrity within 6 to 12 months of daily use, which can erase the initial savings and create more plastic waste, as summarized in this filter holder lifespan and durability discussion.
Where premium and generic parts usually differ
The biggest trade-off isn’t marketing. It’s manufacturing tolerance. A holder that’s slightly off in shape can still install, but the seal may be inconsistent. That’s where leaks, bypass, and annoying reinstallation problems begin.
A better-made holder usually gives you a cleaner snap, steadier alignment, and less wobble over time. Generic parts can work, but the risk is variability. One unit fits fine. The next from the same listing may not.
| Feature | PureHQ Filter Holder | Standard Generic Holder |
|---|---|---|
| Material approach | Designed as a durable replacement accessory for compatible brewers | Material quality often isn’t clearly stated |
| Fit consistency | Built for specific Keurig model families and sold with compatibility guidance | Listings often group many models together with limited detail |
| Seal behavior | Aims for proper seating when matched to the correct brewer | Inconsistent molding can lead to loose fit or bypass |
| Durability outlook | Intended for long-term use with normal care | Some generic holders may crack, discolor, or loosen sooner |
| Buying experience | Usually paired with compatible filter info and support content | Often limited to short marketplace descriptions |
A common objection about price
A lot of buyers ask a fair question: why pay more for a holder when it’s just a plastic part?
Because “just plastic” still has to hold shape, align correctly, and keep a proper seal in a water path. If a cheaper holder starts loosening or cracking early, you buy again, troubleshoot again, and throw away more plastic. That’s not always a bargain.
For households that brew daily or small offices that rely on one machine, the more useful question is whether the holder keeps doing its job without becoming a maintenance nuisance.
Troubleshooting Common Fit and Flow Issues
The most frustrating moment comes after you install the new holder and something still feels off. The good news is that many of these “replacement failed” situations are setup mistakes.
Keurig’s support guidance notes that many user-reported failures are installation errors, not defective parts, and that poor seals and restricted flow often come from holders that didn’t click fully into place or filters that weren’t properly primed. You can review that directly in Keurig’s water filter support guidance.
If the holder won’t lock into place
Stop pressing harder. Resistance usually means one of three things: the holder is angled wrong, the reservoir base has debris, or the holder doesn’t match that brewer family.
Try this sequence:
- Remove and inspect: Look for a skewed filter, bent mesh, or a tab that didn’t snap shut.
- Check the base: Wipe the reservoir contact area so residue isn’t blocking the fit.
- Reinsert straight down: Align first, then press until you hear or feel the click.
If you never get that final seated feeling, don’t keep forcing it. Recheck compatibility before you blame yourself.
Why water leaks around the holder
Leaks usually point to a seal problem. The holder may be partially seated, or the two-piece holder assembly may not be fully snapped together.
A holder can look installed from above and still be loose at the seal point below.
Also inspect the holder body for fine cracks around tabs or latch areas. Those small failures often show up as occasional leaking long before the part completely breaks.
For a visual walkthrough of common installation mistakes, this short video is worth a look:
How to fix slow or weak brews after replacement
Weak flow after a holder swap often comes from poor priming. If the filter wasn’t soaked and rinsed correctly, trapped air or loose charcoal can interfere with normal flow.
Work through this list:
- Remove the holder and inspect the filter position.
- Re-prime the filter in cold water if the original soak was rushed.
- Rinse again to clear any lingering charcoal.
- Run a plain-water cycle and watch for normal draw.
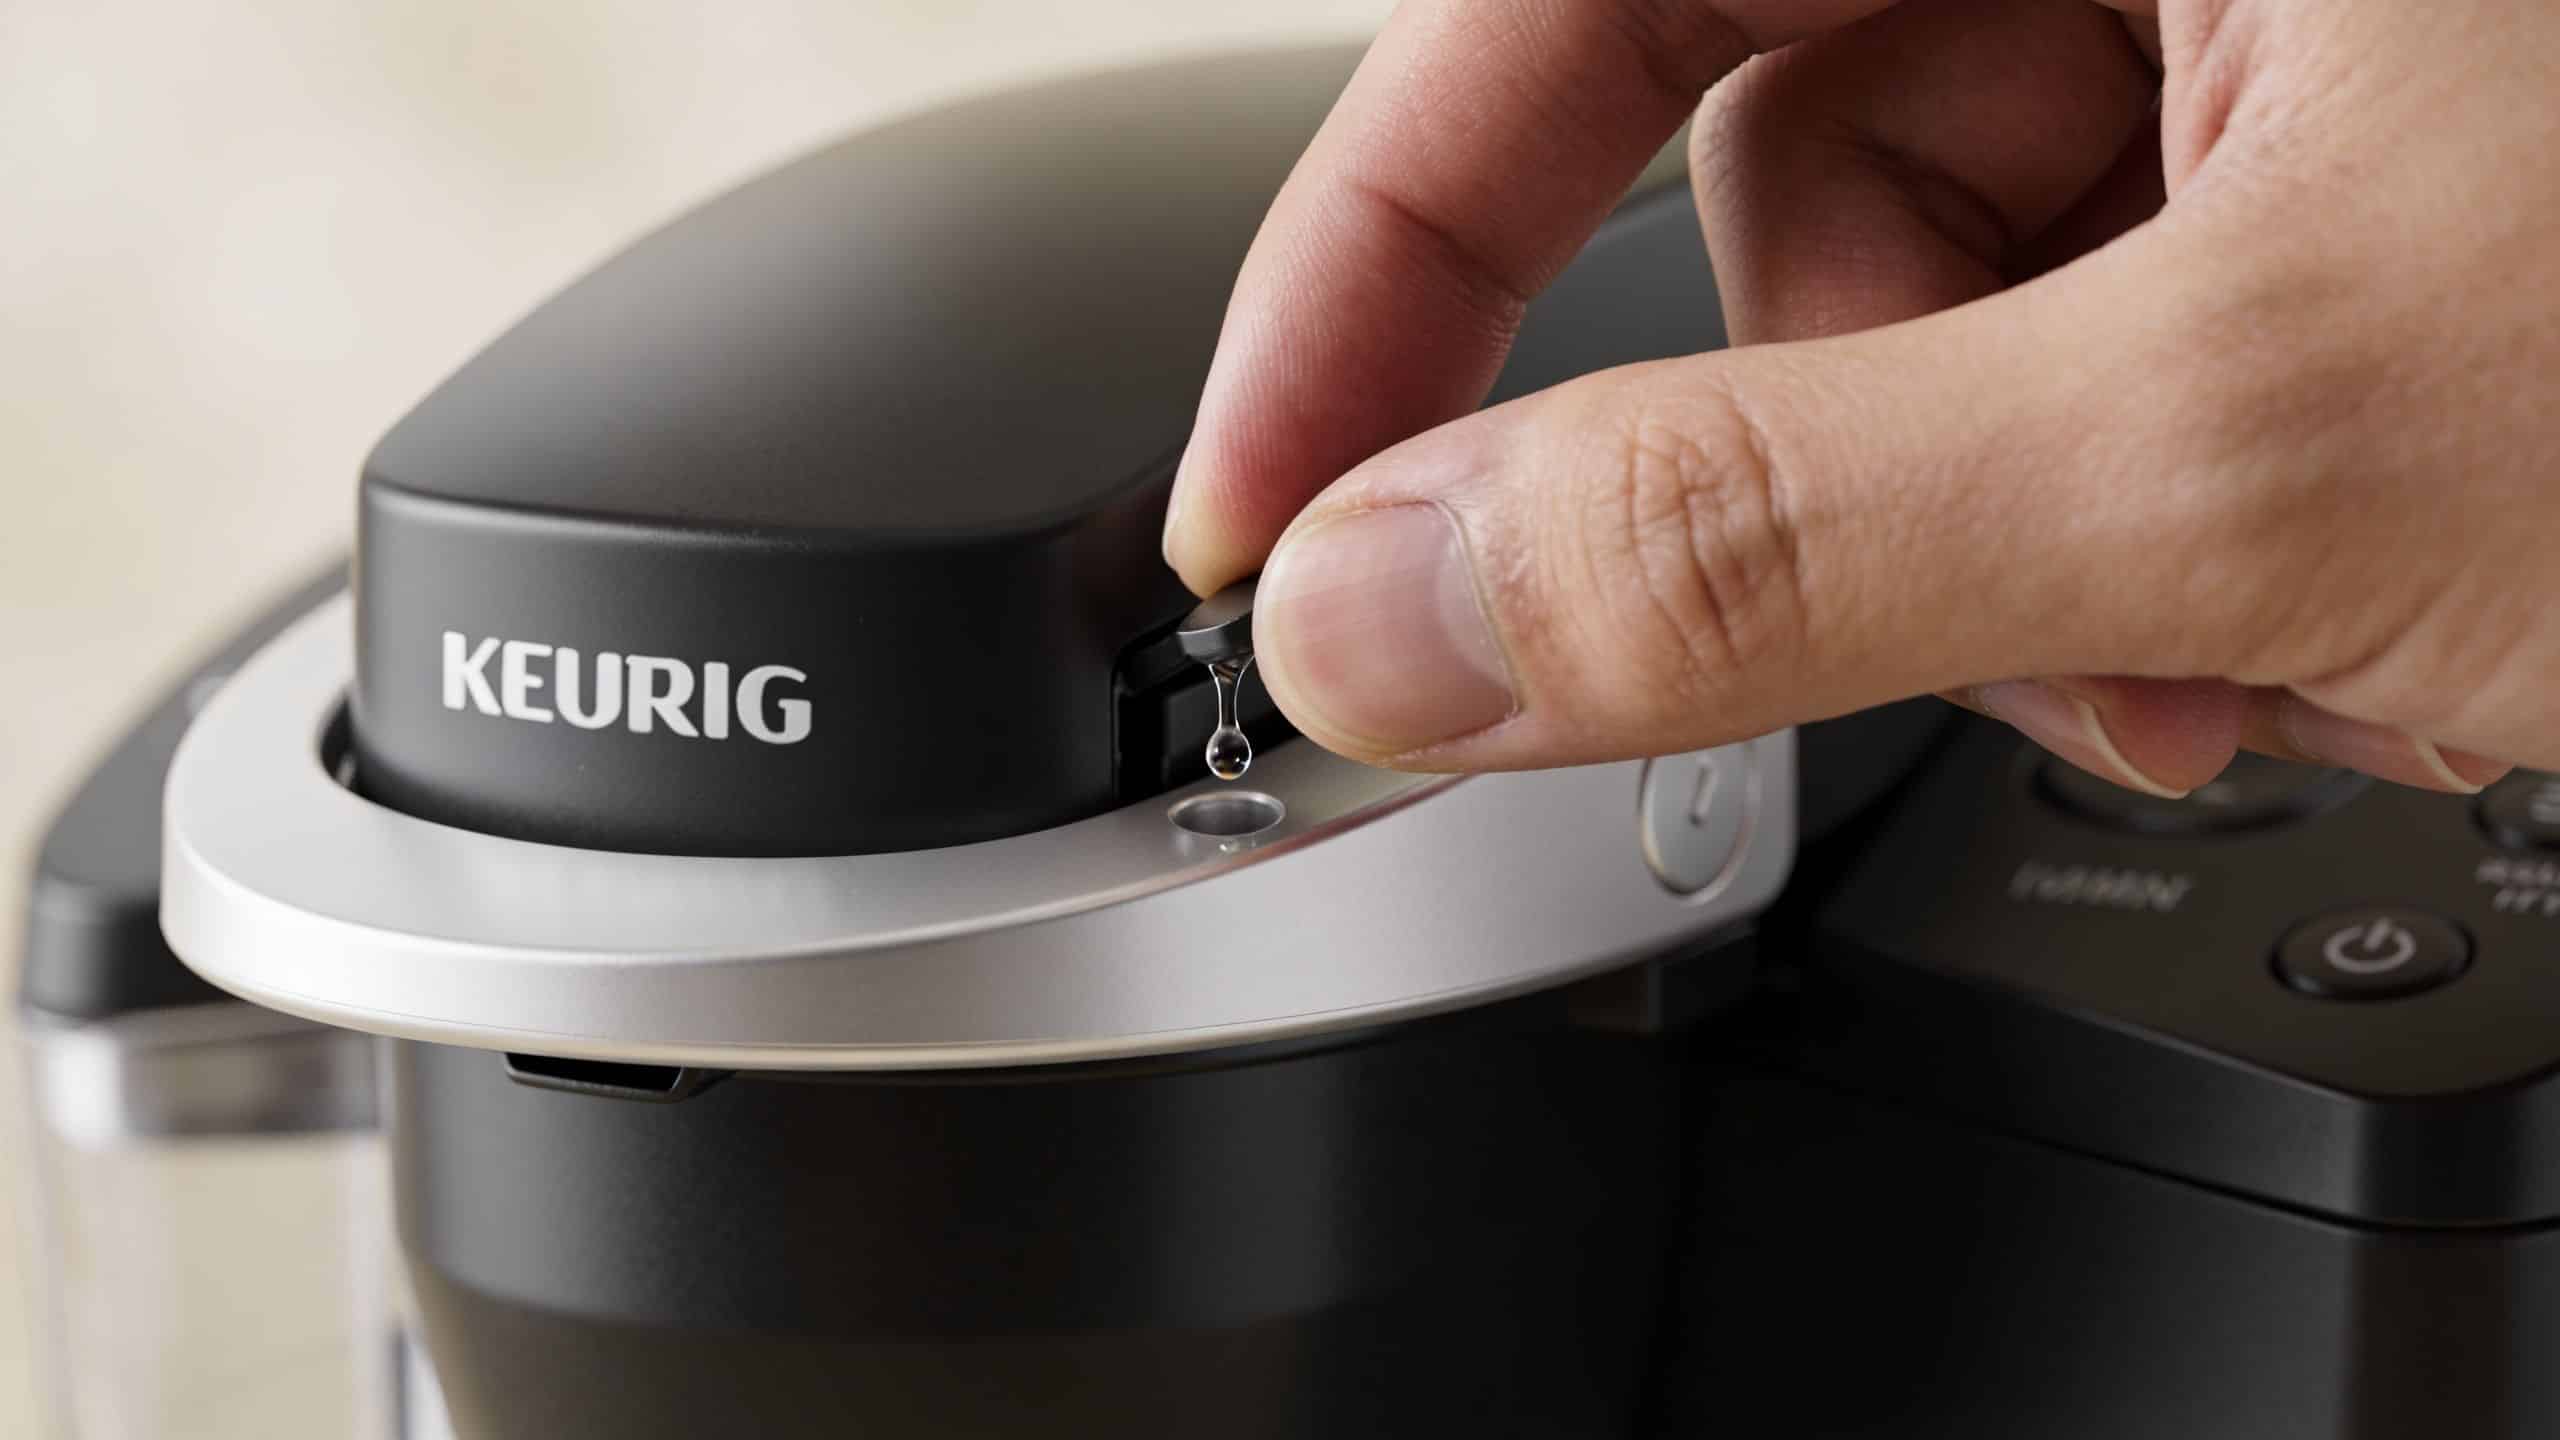
If the machine still brews slowly, the filter holder may not be the only issue. Mineral buildup can mimic filter-related flow problems. That’s a good time to use a descaling solution or cleaning tablets, especially if the brewer already had sluggish performance before the holder change.
Frequently Asked Questions About Filter Holders
How often should I replace the entire holder, not just the filter
Replace the charcoal filter on its normal schedule. Replace the holder when it shows wear, stops sealing well, or no longer fits securely. A holder in good shape can last a long time, but a cracked or loose one won’t improve with cleaning.
Can I clean my Keurig water filter holder
Yes. Rinse the holder components with clean water and clear any debris from the mesh. Avoid treating a damaged holder like a dirty one, though. Cleaning helps with residue. It doesn’t fix warping, loose tabs, or a failing seal.
If the holder feels sloppier each time you remove it, replacement is usually smarter than more scrubbing.
Do I have to use a water filter in my Keurig
The brewer can still run without a water filter in many cases, but the filter helps reduce taste issues tied to your incoming water. If your local water affects flavor, the holder and cartridge setup makes a noticeable difference in the cup and can help keep the system cleaner during normal use.
Is the holder or the filter causing the problem
Check the symptom. If you see charcoal specks, the filter may not have been rinsed enough. If the holder won’t click in, leaks around the edges, or feels loose in the reservoir, the holder is the more likely problem.
Enjoy Better Coffee Today
A bad filter holder creates problems that feel bigger than they are. Coffee tastes off. Water bypasses the filter. The reservoir fit gets finicky. None of that means you need a new brewer.
A careful keurig water filter holder replacement usually solves the issue fast. The key is matching the right holder to the right machine, preparing the new filter properly, and making sure the assembly locks in place the way it should. That’s what restores normal flow and cleaner taste.
If your current holder is cracked, loose, or no longer sealing consistently, replacing it is one of the simplest fixes you can make to improve your daily cup and avoid unnecessary machine frustration.
Shop the right replacement parts directly from PureHQ Inc. if you want a compatible Keurig water filter holder, matching charcoal filters, and maintenance accessories that help keep your brewer running clean.
