Coffee Machine Care
Coffee Filter Watercolor Guide for Stunning, Simple Art
Jun
You're probably looking at a stack of coffee filters and wondering whether this is about to become a fun little art break or one more soggy craft that ends in a muddy puddle on the counter. That hesitation is fair. Coffee filter watercolor looks effortless online, but the difference between bright, stained-glass color and a torn gray mess usually comes down to a few small choices.
That's why this version works better. Instead of treating coffee filter watercolor like a random splash-and-see project, treat it like a simple material with predictable behavior. Once you know how the paper handles water, how the colors travel, and how to support the filter while it's wet, you can get repeatable, good-looking results without buying specialty art paper or turning your kitchen into a cleanup zone.
Turn Your Coffee Filters into Vibrant Art
A lot of “easy” crafts fail for the same reason. The instructions stop at “add color and let it dry,” which sounds simple until the filter buckles, your red runs into your green, and the whole thing dries into something that looks more swamp than watercolor.
Coffee filter watercolor deserves better than that. The material itself does most of the visual work for you, but only if you stop fighting it. The filter is made to absorb liquid fast, so color spreads quickly and unpredictably if you flood it all at once.
One reason this craft shows up so often in classrooms is practical, not trendy. In this coffee filter watercolor demonstration, the filter's porous cellulose structure is what lets liquid color spread quickly, making it a low-cost way to show capillary action. That same source also notes that educators often use large round coffee filters with liquid watercolors, and sometimes stack 2 or 3 filters because the paper absorbs so much paint.
What usually goes wrong
Most failures come from one of these problems:
- Too much water at once and the filter weakens before you've finished painting.
- Too many colors touching and the blend turns dull instead of luminous.
- No support underneath so the wet paper sticks, folds, or tears when you lift it.
- Rushing the finish so colors keep moving when you wanted them to stop.
Practical rule: Coffee filter watercolor works best when you guide the spread instead of soaking the paper and hoping for the best.
Why this craft keeps people coming back
It's cheap, forgiving once you know the basics, and surprisingly versatile. The same painted circle can become a snowflake, flower, fish, suncatcher, or part of a hanging display. That mix of science and decoration is part of the charm. You get the little thrill of watching color move, plus something worth hanging up when it dries.
If you enjoy a craft that feels halfway between play and experiment, this one earns a permanent spot near the coffee maker.
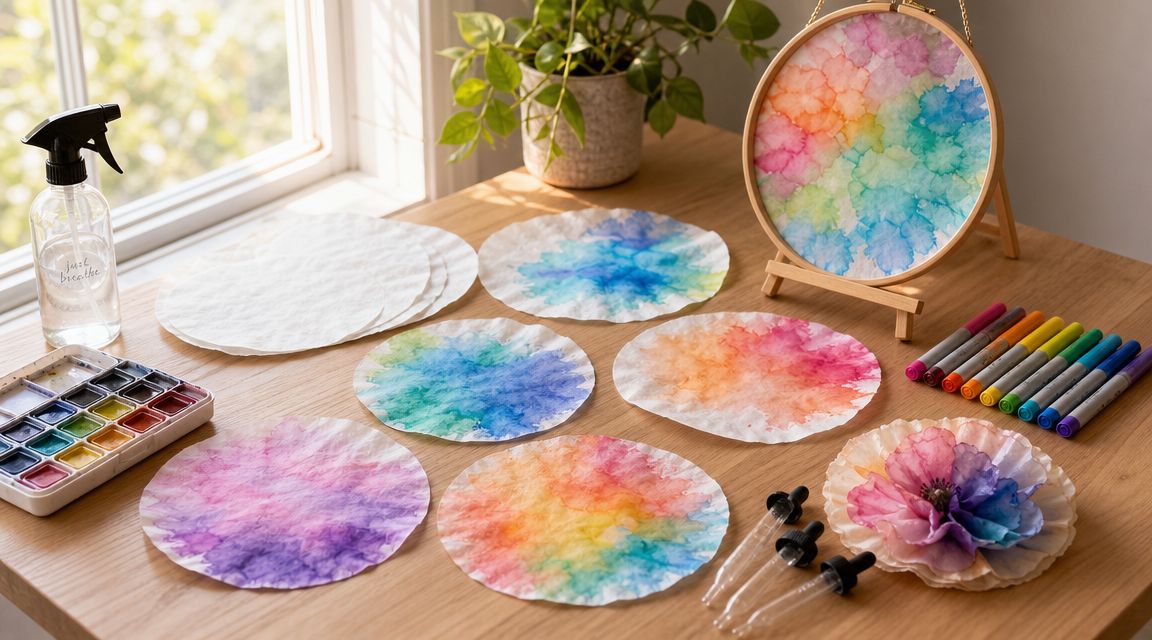
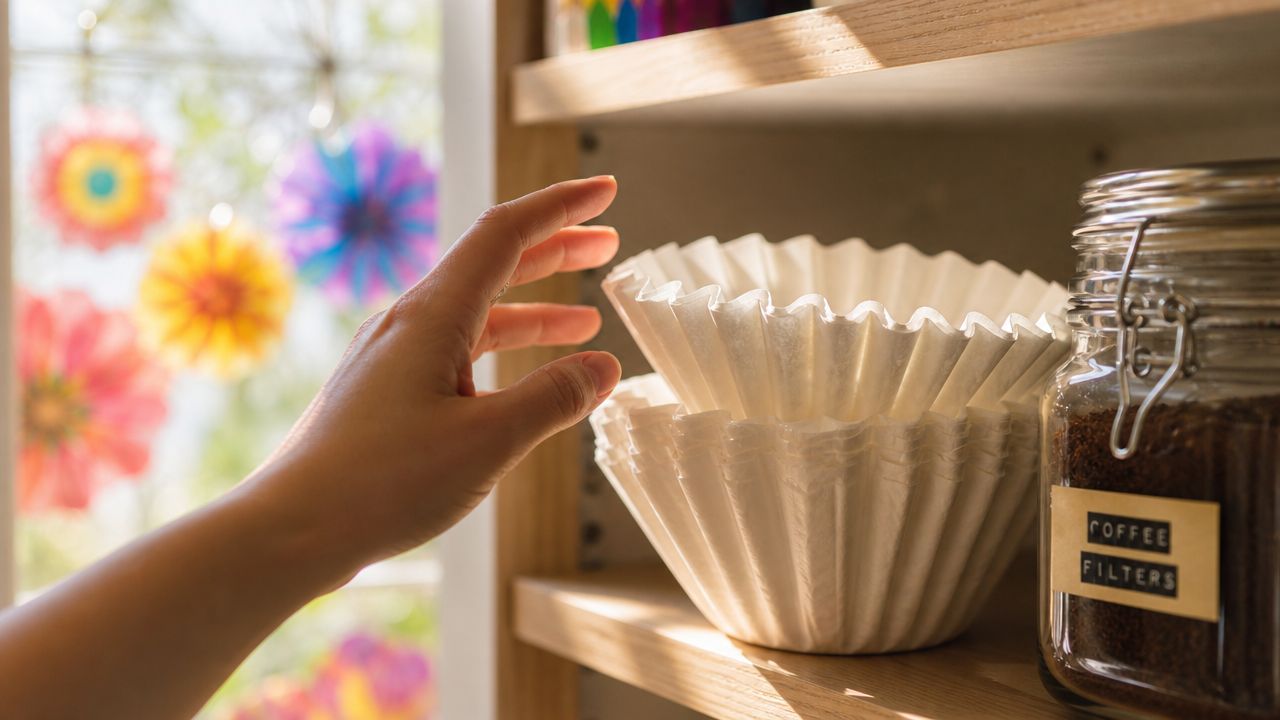
Assembling Your Coffee Filter Watercolor Supplies
You don't need a fancy craft cart for this. You need a short, smart toolkit. The goal is simple: choose supplies that give you enough control to enjoy the color spread without shredding the paper halfway through.
The basic toolkit
Start with these:
- Coffee filters for the surface itself
- Washable markers or liquid watercolor for color
- Water in a spray bottle, dropper, or small cup
- A protected surface such as a tray, parchment-lined sheet, or plastic mat
- Optional support tools like an extra dry filter underneath the one you're painting
If you prefer more structure, markers are the safer start. Draw first, then add water. If you want softer blends and bloom effects, liquid watercolor or diluted color applied by dropper gives you that flowing look faster.
What to use when
Here's the simplest way to choose your setup:
| Color Method | Best Part | Main Trade-Off | Good Fit For |
|---|---|---|---|
| Washable markers | More control over placement | Less fluid than liquid color until water is added | Beginners, kids, patterned designs |
| Liquid watercolor | Strong diffusion and soft blends | Easy to overdo and muddy | Abstract art, flowers, galaxy looks |
| Dropper application | Precise placement | Slower than spraying | Controlled blooms and color separation |
| Spray bottle | Fast coverage | Can flood the filter quickly | Tie-dye effects and soft backgrounds |
Coffee Filter Comparison for Crafting
| Filter Type | Pros for Crafting | Cons for Crafting | Best For |
|---|---|---|---|
| Standard white paper basket filters | Easy to find, absorb color well, budget-friendly | Can tear if overworked when soaked | Everyday crafts and practice rounds |
| Large round paper filters | Broad surface for painting and cutting | Still delicate when saturated | Snowflakes, flowers, suncatchers |
| Slightly sturdier paper filters | Easier to handle when wet | May cost more than basic filters | Wet techniques and repeated handling |
| Brown or natural filters | Interesting earthy tone | Colors look less bright | Rustic or muted projects |
You don't need special filters to make good art. Cheap paper basket filters absolutely work. The only real trade-off is handling. A slightly sturdier filter gives you more margin for error if you like wetter techniques.
A sturdy setup matters more than a premium filter. Support the paper well, and even generic filters can produce beautiful results.
One supply choice that improves results fast
Pre-wetting helps when you want soft diffusion instead of hard marker lines. A repeatable wet workflow for coffee filter watercolor recommends pre-wetting the filter and applying one diluted color at a time, and notes that the filter often becomes flat enough to lift in about 3 minutes without being completely bone-dry.
That handling point is useful because most tears happen when people lift too early or move a filter that's fully saturated and unsupported.
If you're also thinking about the practical side of coffee supplies around the house, this comparison of reusable coffee filters versus paper options is a useful companion read. Different jobs call for different filter materials, and crafting is one of those places where paper still shines.
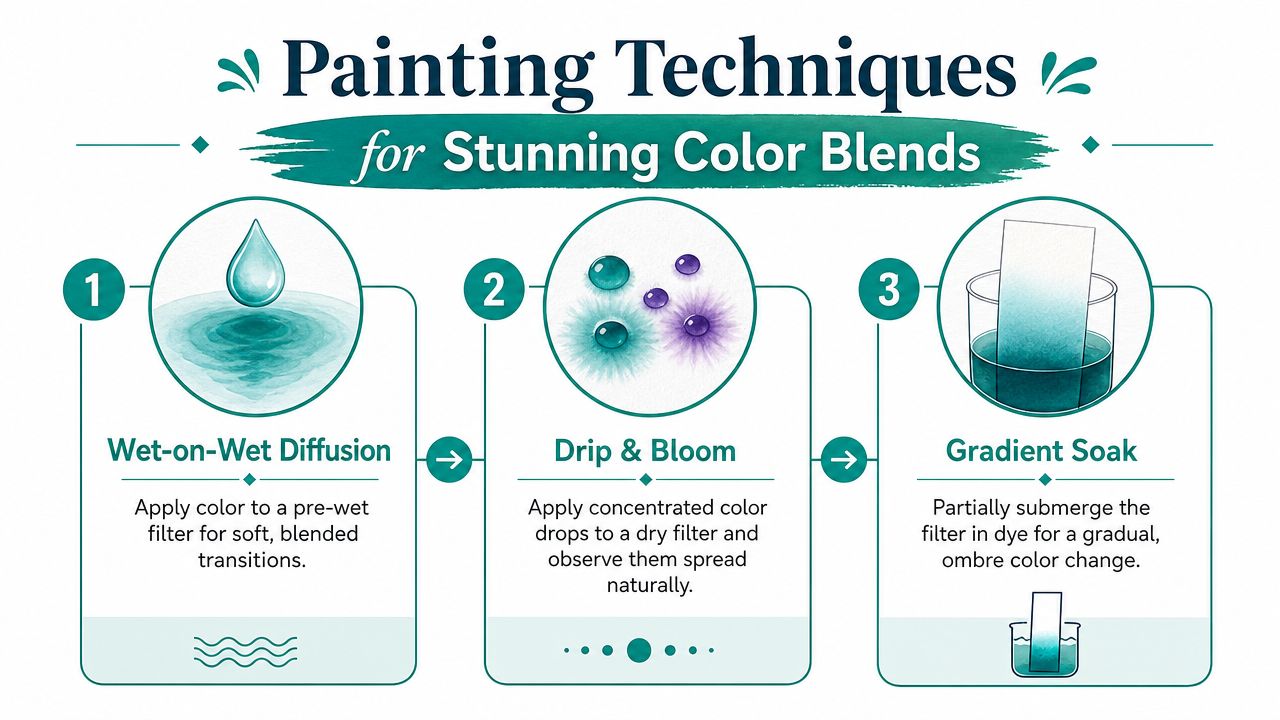
Painting Techniques for Stunning Color Blends
The fastest way to get muddy color is to treat all paint as if it behaves the same. It doesn't. Coffee filter watercolor rewards restraint. Use less liquid than you think, keep incompatible colors apart, and give each application a moment to spread before you add the next one.
Marker and mist
This is the least stressful method if you like a little predictability. Draw dots, rings, stripes, or loose abstract shapes onto a dry filter with washable markers. Then mist lightly.
The word that matters is lightly. You want enough water to wake up the ink, not enough to turn the whole filter into soup.
Use this method when you want:
- Defined starting shapes that soften at the edges
- Good color separation with less chance of instant muddiness
- A lower-mess setup for kids or quick projects
Wet-on-wet with droppers
For a classic watercolor feel, dampen the filter first. Not dripping. Just evenly moist. Then apply one diluted color in scattered spots and let the paper carry it outward before adding anything else.
If you stack too many colors too quickly, they collide before the first one has room to settle. That's when the surface goes dull.
A practical sequence looks like this:
- Dampen the filter so it's flexible, not flooded.
- Add one color in a few spaced areas.
- Pause and watch how far it spreads.
- Add a neighboring color only where you want a blend.
- Leave some white space if you want contrast and brightness.
Folding for symmetry
If you love snowflakes, flowers, and mandala-style patterns, paint after folding. A folded filter lets one cut or one color placement echo across the whole shape when you open it.
This method is especially useful when freeform painting feels too loose. It gives the finished piece structure without requiring precise drawing skills.
Keep complementary colors apart on folded designs. Symmetry won't save a muddy palette.
How to stop tearing and color bleed
This is the part most tutorials skip, and it's the part that saves the project. A hands-on guide focused on handling wet filters points to a practical fix for tearing and control issues: stack 2–3 filters together when using liquid watercolor, or place a second dry coffee filter underneath the wet one for stability.
That's one of the best upgrades you can make because it solves two problems at once. You get more support while painting, and you're less likely to stretch or puncture the wet top layer when moving it.
What works and what usually doesn't
Works well
- Applying color in stages
- Leaving breathing room between strong hues
- Using a dropper for placement
- Supporting the filter from underneath
Usually fails
- Saturating the entire filter before deciding on colors
- Scrubbing with a brush
- Piling dark colors into the same wet spot
- Lifting the paper by one edge while it's still fragile
If you like this kind of process-based craft, these inspiring art activities for children are worth bookmarking too. They lean into the same satisfying mix of color play, hands-on experimentation, and low-pressure creativity.
Creative Project Ideas for Your Artwork
Once the painted filters dry, they stop feeling like test pieces and start feeling like components. That's when coffee filter watercolor gets especially fun. You're not limited to a flat circle on the fridge. You can turn a stack of finished filters into decor that looks intentional.
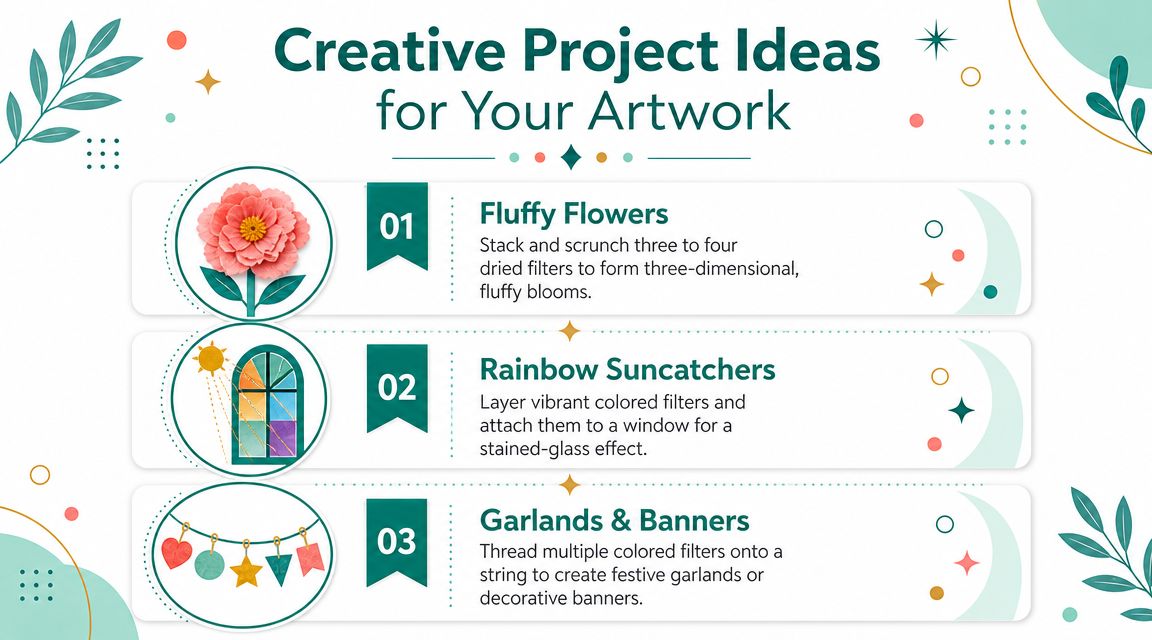
Flowers that don't look flimsy
Painted coffee filters make excellent flowers because the paper already has a petal-like softness. Layer a few dried filters, pinch the center, and secure the base with a pipe cleaner. Then separate the layers gently and fluff them outward.
The trick is not to overwork them after drying. Too much pulling makes the petals look crumpled instead of airy.
Suncatchers with less fuss
If your best filters have nice color variation in the center, turn them into window art. Trim away uneven edges if needed, then mount the painted section inside a paper frame or embroidery hoop.
This works especially well with filters that have clear zones of color rather than total saturation. Light passing through those lighter areas gives the piece that stained-glass effect people love.
Garlands and hanging displays
One afternoon of painting can fill a whole wall. A 2018 tutorial for watercolor coffee filter snowflakes and hanging decor suggests making 12–16 decorated filters for a wall hanging, which is a great reminder that this craft scales nicely from a single quick project to a larger installation.
Try these approaches:
- Quarter-fold banner pieces with a hole punched near the point and threaded onto string
- Layered circles overlapped slightly for a fuller hanging
- Alternating sizes and colors for a display that doesn't look too uniform
One painted filter is a craft. A coordinated batch becomes decor.
A few easy shapes that use imperfect pieces well
Not every painted filter needs to be your masterpiece. Some of the odd ones become the best finished projects because cutting and shaping hide uneven blends.
Good uses for less-than-perfect filters:
- Fish with one folded cut and a googly eye
- Snowflakes cut from folded, dry filters
- Wall rosettes made by pleating and layering
- Loose floral clusters attached to stems or wreath forms
If you like low-waste crafting in general, there's a nice practical connection here with kitchen habits too. Reusing materials where it makes sense and composting what you can keeps small routines from becoming bigger piles of waste. This guide on what to do with compostable coffee remnants fits that mindset well.
Drying Mounting and Sealing Your Projects
You finish a filter, love the colors, then ruin it in the last ten minutes. The paper sticks to the table, the red bleeds into the yellow, or a nearly dry edge tears when you lift it. Most coffee filter watercolor problems happen after painting, not during it.
Start by giving the filter a drying surface that will not grab it. A plastic lid, laminated tray, parchment-covered board, or silicone mat all work well. Skip paper towels and unfinished cardboard. They wick moisture unevenly, pull color out of the paper, and make thin spots more likely to tear when you peel the filter up.
Hands off matters too.
If you want brighter, cleaner color, let the filter dry flat until it no longer feels cool to the touch. Lifting and repositioning a damp filter is the fastest way to create muddy edges and little rips around the outer ring. For faster drying, improve the air around it with a fan on low instead of blotting the surface.
Best mounting choices
Mounting depends on what the piece needs to do, not just how it looks.
- For flat display, press the dry filter inside a heavy book between clean sheets of paper if it curls.
- For hanging art, attach it to cardstock, a paper frame, or a lightweight hoop with small dots of glue rather than a full glue layer.
- For dimensional projects, leave some of the natural crinkle in place. Flowers, butterflies, and layered decor usually look better with that texture.
Use less adhesive than you think you need. Too much glue soaks back into the filter, dulls the color, and can create translucent dark patches. A glue stick or tiny amounts of tacky glue usually gives better control than school glue spread across the whole piece.
Should you seal it
Seal only when the project will be handled, exposed to window light, or stored for a season and brought back out. For garlands, scrapbook pages, and one-day decorations, fully dried paper is often enough.
A light acrylic spray sealant adds protection without rewetting the color. Spray in thin passes from a distance and let the first coat dry before deciding if it needs more. Brush-on sealers and watered glue can work, but they carry more risk. They can reactivate pigment, flatten delicate texture, and leave tide marks if the paper gets too wet again.
If you enjoy practical, low-waste projects beyond crafting, reusable coffee filter habits that cut waste at home fit the same mindset.
Two common finishing mistakes
The first mistake is trying to flatten the filter while it is still fragile. Wait until it is fully dry, then press it if needed. You will get a smoother result with far less tearing.
The second is trying to rescue a damp, blotchy area by dabbing at it over and over. That roughs up the fibers and makes the spot look worse. Let it dry completely, then decide whether to trim it, layer it, or use that section in a cutout project where the flaw will not show.
A clean finish is what makes this craft look intentional. Dry it patiently, mount it lightly, and seal it only when the project needs the extra protection.
Your Next Creative Coffee Break
Coffee filter watercolor is one of those rare crafts that feels humble at the start and surprisingly polished at the end. You begin with something meant for brewing coffee, add a little color and care, and end up with flowers, window art, garlands, or paper pieces that don't look improvised at all.

The bigger lesson is practical. You don't need expensive watercolor paper to enjoy color diffusion and make something attractive. You need a material that behaves in a known way, a setup that supports it, and enough patience to stop before overworking it. That's why this craft keeps showing up in homes and classrooms. It's accessible, quick to repeat, and satisfying when you understand the trade-offs.
Keep the coffee theme going
If you enjoy finding more use in everyday coffee supplies, that same mindset often carries into the way people brew at home. Reusable accessories, better filtration, and straightforward maintenance all make the daily coffee routine feel less wasteful and more consistent. This piece on sustainable reusable coffee filters is a natural next read if you like the practical side of coffee gear as much as the crafty side.
A good creative habit also tends to pair well with a good maintenance habit. If you're already near the coffee station, it's a smart time to check whether your brewer needs fresh filters, pod liners, or descaling supplies so the next cup tastes as good as the last one.
For a quick visual break before you start your own batch, this video is a handy companion:
Keep a few extra filters nearby when you paint. The best part of coffee filter watercolor is that a “failed” first try usually teaches you exactly how to make the next one better.
If you're stocking up on coffee supplies anyway, take a look at PureHQ Inc. for reusable K-Cups, water filters, pod liners, and descaling solutions that help keep your brewing setup clean, consistent, and ready for your next creative coffee break.
