Coffee Machine Care
Your Complete Guide to Keurig Coffee Maker Maintenance
Mar
Is your Keurig brewer sputtering, leaking, or brewing coffee that tastes bitter and weak? According to a Tasting Table analysis, up to 60% of Keurig machines suffer from performance degradation after just two years, often due to preventable internal buildup. This isn't just about bad coffee; it's a warning sign that your machine is working overtime, risking permanent damage and potential leaks that affect roughly 25% of three-year-old units. The culprit is a silent saboteur: mineral scale from your water and oily coffee residue.
This gunk quietly clogs up the heating element, pump, and needles, forcing your machine to struggle. This leads to slower brews, lukewarm coffee, and an unpleasant, bitter taste that ruins your morning cup. You're left with a frustrating experience and the looming cost of replacing an appliance that should have lasted for years.
The solution is a simple, two-part routine: a quick weekly cleaning and a periodic deep clean. A consistent keurig coffee maker maintenance schedule can reverse these effects, restore your brewer's speed and temperature, and ensure every cup of coffee tastes fresh and delicious, just as it was meant to.
Why Your Keurig Coffee Tastes Different Now
Does your morning brew from your Keurig taste a little… off? That once-perfect cup slowly becomes weak, lukewarm, or just plain bitter. You're not imagining it. The culprit is a silent saboteur building up inside your machine: mineral scale and oily coffee residue.
This gunk quietly clogs up all the important internal parts, from the heating element all the way to the tiny needle that punctures the pod. As those pathways get narrower, your brewer has to work way harder, leading to slower brew times and coffee that just isn't hot enough. It’s a frustrating start to the day when your reliable machine lets you down.
The Hidden Cost of Neglect
Ignoring those early warning signs does more than just ruin your coffee; it actively wrecks your machine. Poor maintenance can shorten a Keurig's life by up to 50%. Your home's water quality plays a huge role, too. If you live in an area with hard water, that mineral buildup can cause significant wear on internal components. If you want to see just how much of a difference it makes, you can discover the full maintenance findings for yourself.
The good news is that the fix is surprisingly simple. A consistent maintenance routine can reverse these effects, get your brewer running like new, and make sure every cup tastes the way it's supposed to.
Key Takeaway: The two biggest enemies of your Keurig are mineral scale from your water and oily residue from coffee grounds. Both kill your machine’s performance and can cause permanent damage if you let them build up.
The Role of Water Filtration
Honestly, one of the best things you can do is use a good water filter. These small but mighty accessories are your first line of defense against the hard water minerals that cause all that trouble. A quality charcoal filter can capture up to 97% of chlorine, sediment, and other impurities before they even get a chance to enter your machine.
By filtering your water from the get-go, you’re directly fighting the main cause of scale buildup. This doesn't just make your coffee taste cleaner; it also means you can go longer between descaling cycles. To get the most out of this, it’s worth understanding the basics of how to handle your coffee maker water filter replacement. Swapping out that filter regularly is a small step that pays off big time in both machine longevity and coffee flavor.
Your Essential Weekly Cleaning Routine
Ever wonder why that amazing coffee you bought suddenly tastes… off? It’s not your machine giving up. It’s the slow, sneaky buildup of coffee oils and fine grounds that cling to the inside of your Keurig after every single brew.
In just a few days, this residue becomes a full-blown flavor-killer. It coats the pod holder and, more importantly, starts to clog the sharp needles that puncture your K-Cup and deliver hot water. Let it go, and you’re looking at stale, unpleasant coffee, slower brew times, and even water backing up.
The good news? A few minutes of weekly cleaning is all it takes to prevent this. It’s a simple habit that makes a world of difference, keeping your brewer in prime condition and ensuring every cup tastes as fresh as the first.
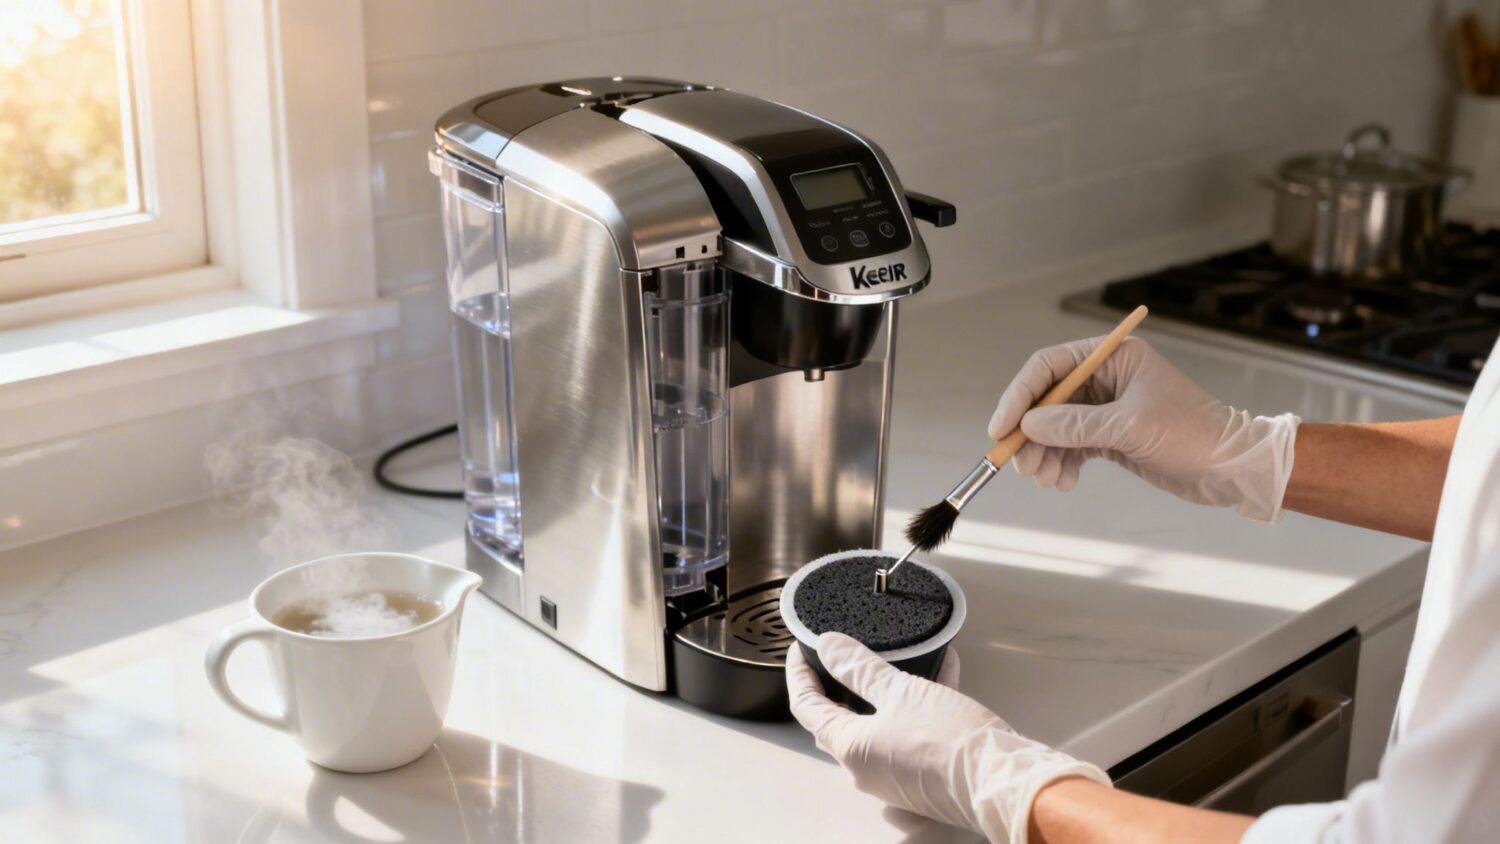
Cleaning the K-Cup Pod Holder and Needles
The heart of your Keurig is the pod holder assembly, and it’s ground zero for residue. First things first: turn off and unplug your machine. Safety first. Now, open the brewer handle, grab the top of the pod holder, and pull it straight up to remove it.
You can separate the holder into two pieces: the funnel and the holder itself, which houses the lower exit needle. While they're usually top-rack dishwasher safe, a quick scrub in warm, soapy water works just as well. Really get into the nooks and crannies where old grounds love to hide.
Pro Tip: That exit needle at the base of the pod holder is notorious for clogging with fine coffee grounds, leading to slow or partial brews. The fix? Straighten out a paperclip and gently poke it into the needle’s tube to clear out any gunk. This one trick solves a surprising number of brewing headaches.
Clearing the Entrance Needle
Don’t forget the needle on top! The entrance needle is on the underside of the brewer head—the part you lift to pop in a K-Cup. It gets just as gunked up with oils and grounds, restricting the water flow into the pod.
Grab that same paperclip. Carefully insert the end into the needle’s ports to dislodge any trapped grounds. Follow up with a quick wipe from a damp cloth to catch any loose residue. Taking ten seconds to clear both needles is a non-negotiable part of Keurig coffee maker maintenance that directly impacts how good your coffee tastes. For a deeper dive, check out our guide on how to clean your Keurig's filter and needles to keep everything flowing perfectly.
Maintaining Reusable K-Cups
If you’re using an eco-friendly reusable K-Cup, this weekly cleaning is non-negotiable. Oily residue clings to stainless steel and plastic alike. If you don't wash it, that oil will go rancid and make your next brew taste stale and bitter.
The best habit is to empty the grounds and rinse the pod right after you use it. Then, once a week, give it a proper wash with soap and water or toss it on the top rack of your dishwasher. Using high-quality stainless steel reusable pods is a game-changer for durability and flavor, preventing the plastic from degrading or absorbing old coffee tastes. For an even faster cleanup, try pairing them with PureHQ’s custom-fit paper liners.
| Feature | PureHQ Reusable Pods | Generic Plastic Pods |
|---|---|---|
| Material | Food-grade stainless steel mesh | Standard plastic with mesh |
| Durability | High; resistant to warping and stains | Low; can warp from heat and stain easily |
| Flavor Purity | Excellent; does not absorb coffee oils | Fair; can absorb oils, leading to off-flavors |
| Common Objection | “Are they hard to clean?” | “The hinge breaks after a few uses.” |
| Our Solution | The wide opening and smooth steel make rinsing simple. Dishwasher safe for deep cleaning. | The rigid design of our pods features a reinforced hinge built for thousands of uses. |
By folding these quick tasks into your weekly routine, you’ll keep your brewer running like new. To finish the job, just wipe down the machine’s exterior with a damp cloth and give the drip tray a quick wash in the sink.
Ready to upgrade your brewing experience? Shop PureHQ's complete collection of filters, reusable pods, and descalers now.
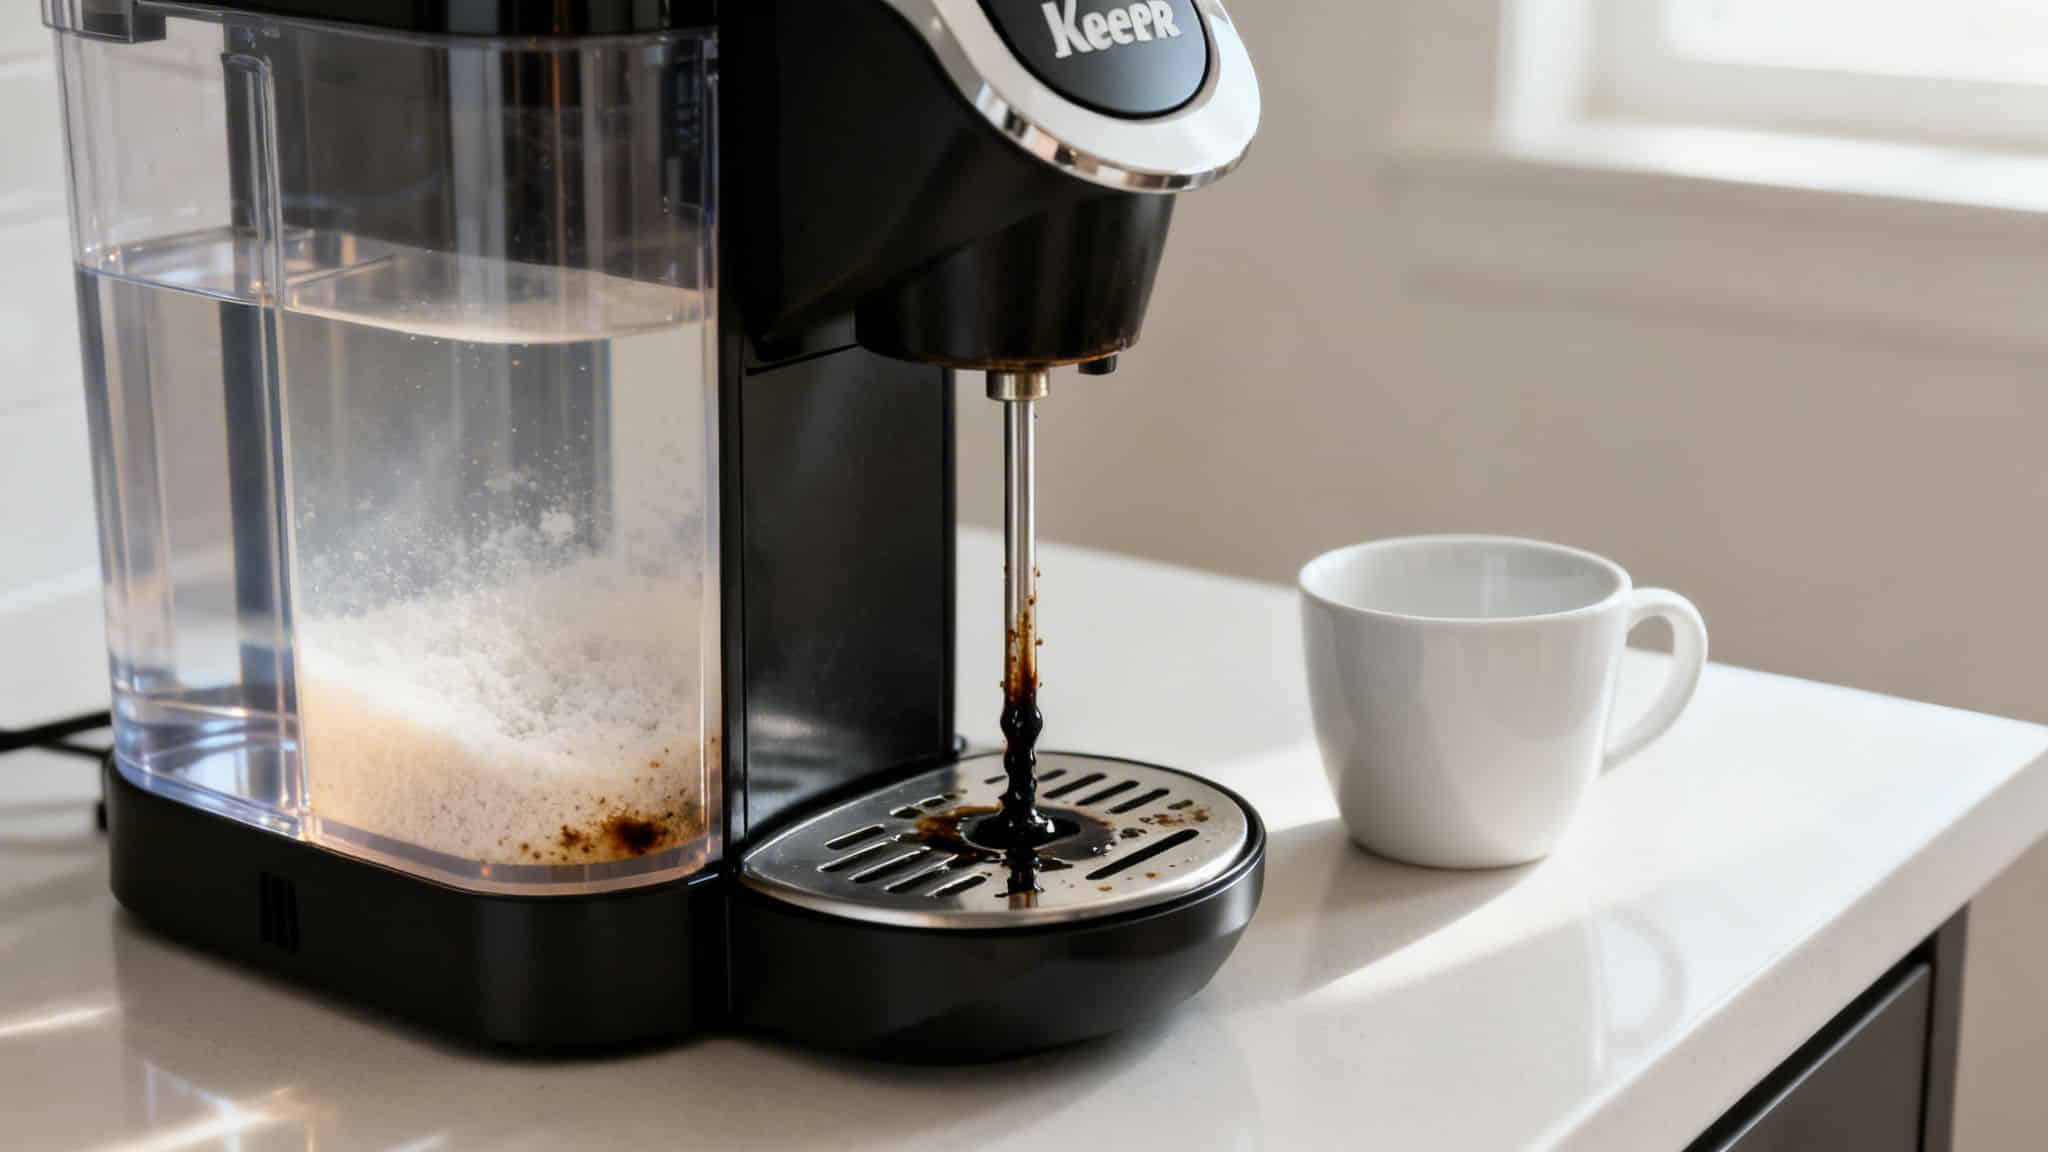
How to Properly Descale Your Keurig Brewer
That "descale" light is blinking again, isn't it? Or maybe your machine is groaning, taking forever to push out a full cup. That’s not just an annoying light; it's your brewer telling you it’s clogged with mineral scale.
This internal gunk, left behind by your water, acts like sludge in the machine's pipes. It chokes the flow of water, forcing the pump to work way harder than it should. The result? Your quick morning coffee ritual grinds to a halt. What was once a one-minute brew can suddenly take five minutes or more, and according to an analysis from Tasting Table, this slowdown affects a staggering 60% of machines after just two years if they aren't properly maintained. This neglect is a major cause of leaks in roughly 25% of three-year-old units as the internal seals fail under pressure. You can read the full analysis on Keurig longevity to see just how common these preventable problems are.
Choosing the Right Descaling Solution
The only fix is a thorough descaling, but you have to use the right stuff. You've probably heard that running white vinegar through your machine is a good "hack." While it’s a popular home remedy, it’s just not strong enough to break down the really stubborn, hardened mineral deposits. Worse, vinegar can be harsh on the delicate rubber gaskets and O-rings inside your brewer. Over time, its acidity can cause them to dry out and crack. And the worst part? That pungent, sour aftertaste that lingers for days. A much smarter approach is a universal descaling solution made specifically for coffee makers. These are engineered to be tough on scale but gentle on your machine's internal parts, and they get the job done without leaving any funky flavors behind.
The Descaling Process Step by Step
Ready to get your machine running like new again? The whole process is simple and usually takes about 30-45 minutes.
- Prep Your Brewer: First things first: turn off and unplug the machine. Empty the water reservoir and take out the water filter cartridge if you have one. Double-check that there isn't a K-Cup pod left in the holder.
- Add the Solution: Pour the entire bottle of descaling solution into the empty reservoir. Then, fill the empty bottle with fresh water and pour that into the reservoir, too.
- Run Cleansing Brews: Grab a large ceramic mug and place it on the drip tray. Power the machine on and run a large-cup brewing cycle. Dump the hot water and repeat this over and over until the machine tells you to "add water."
- Let It Sit: Once the reservoir is empty, let the machine stand for at least 30 minutes with the power still on. This is where the magic happens, giving the solution time to dissolve the toughest mineral scale inside the heating element.
- Rinse It Out: After the wait, empty and thoroughly rinse the water reservoir. Fill it to the max fill line with fresh, clean water. Now, run at least 12 large-cup brewing cycles to completely flush any leftover solution from the system.
Key Takeaway: Whatever you do, don't skip the 30-minute rest period. It's the most important step. If you rush it, the descaling solution won't have enough time to fully break down the mineral scale, and the whole process will be far less effective.
To see how this fits into your regular routine, this simple weekly flow can help.
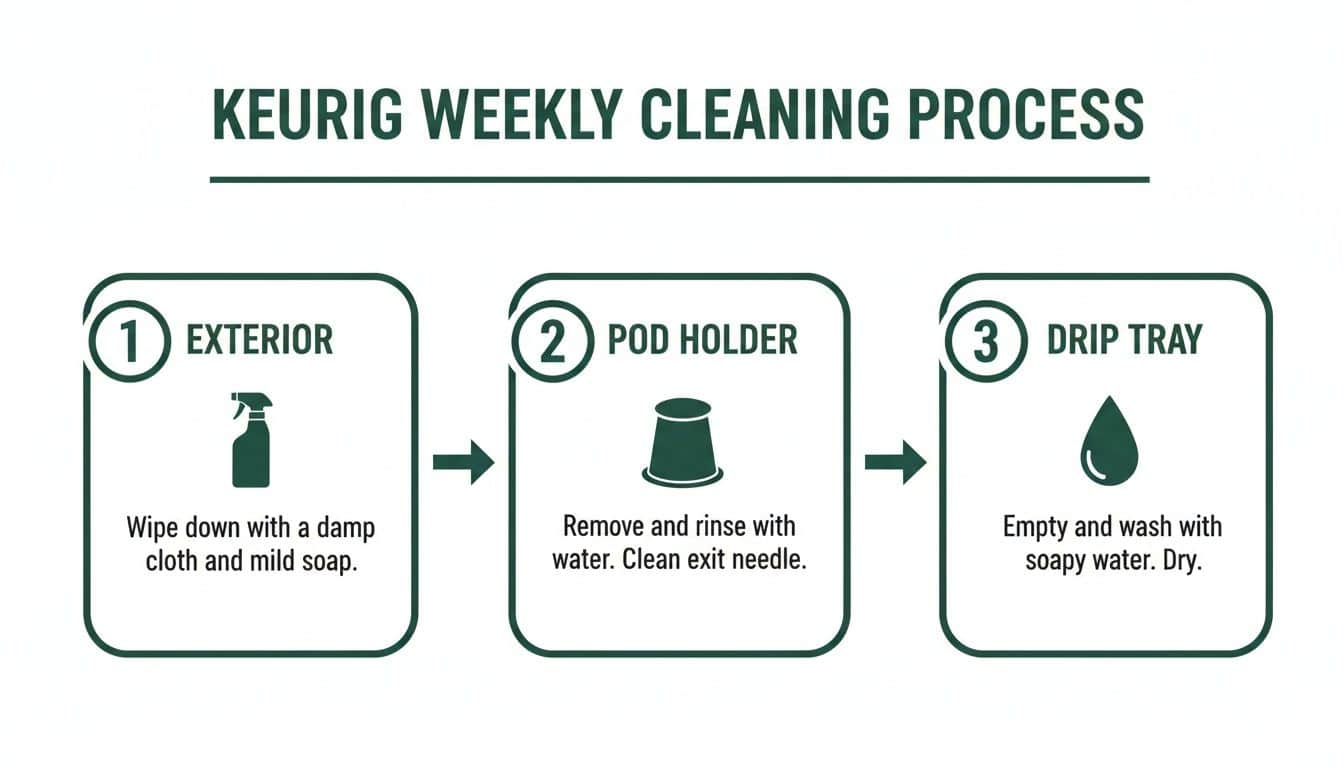
This graphic breaks down the three core weekly tasks—wiping the outside, cleaning the pod holder, and washing the drip tray—that stop surface-level grime from building up in the first place.
Universal Descalers vs Standard Options
When it comes to keeping your brewer healthy, not all products are created equal. A high-quality universal descaler is one of the most versatile tools a coffee lover can own.
| Feature | PureHQ Universal Descaling Solution | Standard or Single-Brand Solutions |
|---|---|---|
| Compatibility | Works with all Keurig models, plus Ninja, Breville, and Cuisinart machines. | Often brand-specific, forcing you to buy different products for different machines. |
| Effectiveness | Formulated to dissolve tough mineral scale without damaging internal parts. | Varies; some are less potent or use harsher chemicals. |
| Residue | Rinses clean with no lingering aftertaste to ruin your coffee. | Can leave a chemical or soapy taste if not rinsed extensively. |
| Common Objection | “Will a universal solution void my warranty?” | “It’s too expensive to buy a separate cleaner for each appliance.” |
| Our Solution | No. Using a quality third-party descaler does not void your warranty. Our formula is tested for safety and effectiveness across all major brands. | Our solution is an all-in-one product, saving you money and hassle. One bottle can maintain all your coffee and espresso makers. |
By using an effective, compatible descaler, you can bring your brewer’s speed and efficiency back without worrying about damage. For the best results, remember to use a quality charcoal water filter to slow down scale buildup between these deep cleans.
Ready to bring your coffee maker back to life? Shop PureHQ's Universal Descaling Solution and maintenance kits now.
Improving Coffee Flavor by Replacing Water Filters
If you've been cleaning your Keurig religiously but your coffee still tastes a little… off, the problem probably isn't your machine. It's your water. Your morning brew is over 98% water, so its quality has a massive impact on the final taste. Your tap water isn't just pure H₂O; it’s carrying a mix of minerals and chemicals from the municipal treatment plant.
The most common culprit is chlorine. While vital for keeping our water supply safe, it leaves behind a distinct chemical or "pool water" taste that can completely ruin a good cup of coffee. Those same dissolved impurities are also the main ingredients for the scale that clogs your brewer's internal parts, causing damage over time.
The Role of Charcoal Water Filters
This is where a good charcoal water filter becomes your coffee’s best friend. These little cartridges are your first line of defense, sitting right inside the water reservoir and trapping impurities before they can mess with your brew. A quality filter works through adsorption, where contaminants like chlorine and other funky-tasting compounds stick to the activated charcoal. It effectively strips out the stuff that creates bitterness and accelerates scale, leaving you with cleaner, smoother-tasting coffee.
Keurig recommends replacing the water filter cartridge every two months or after 60 tank refills. Forgetting this is one of the most common mistakes we see people make, and it’s a simple fix. Want to know what the other common slip-ups are? Check out our guide on the 7 mistakes you might be making with Keurig water filters.
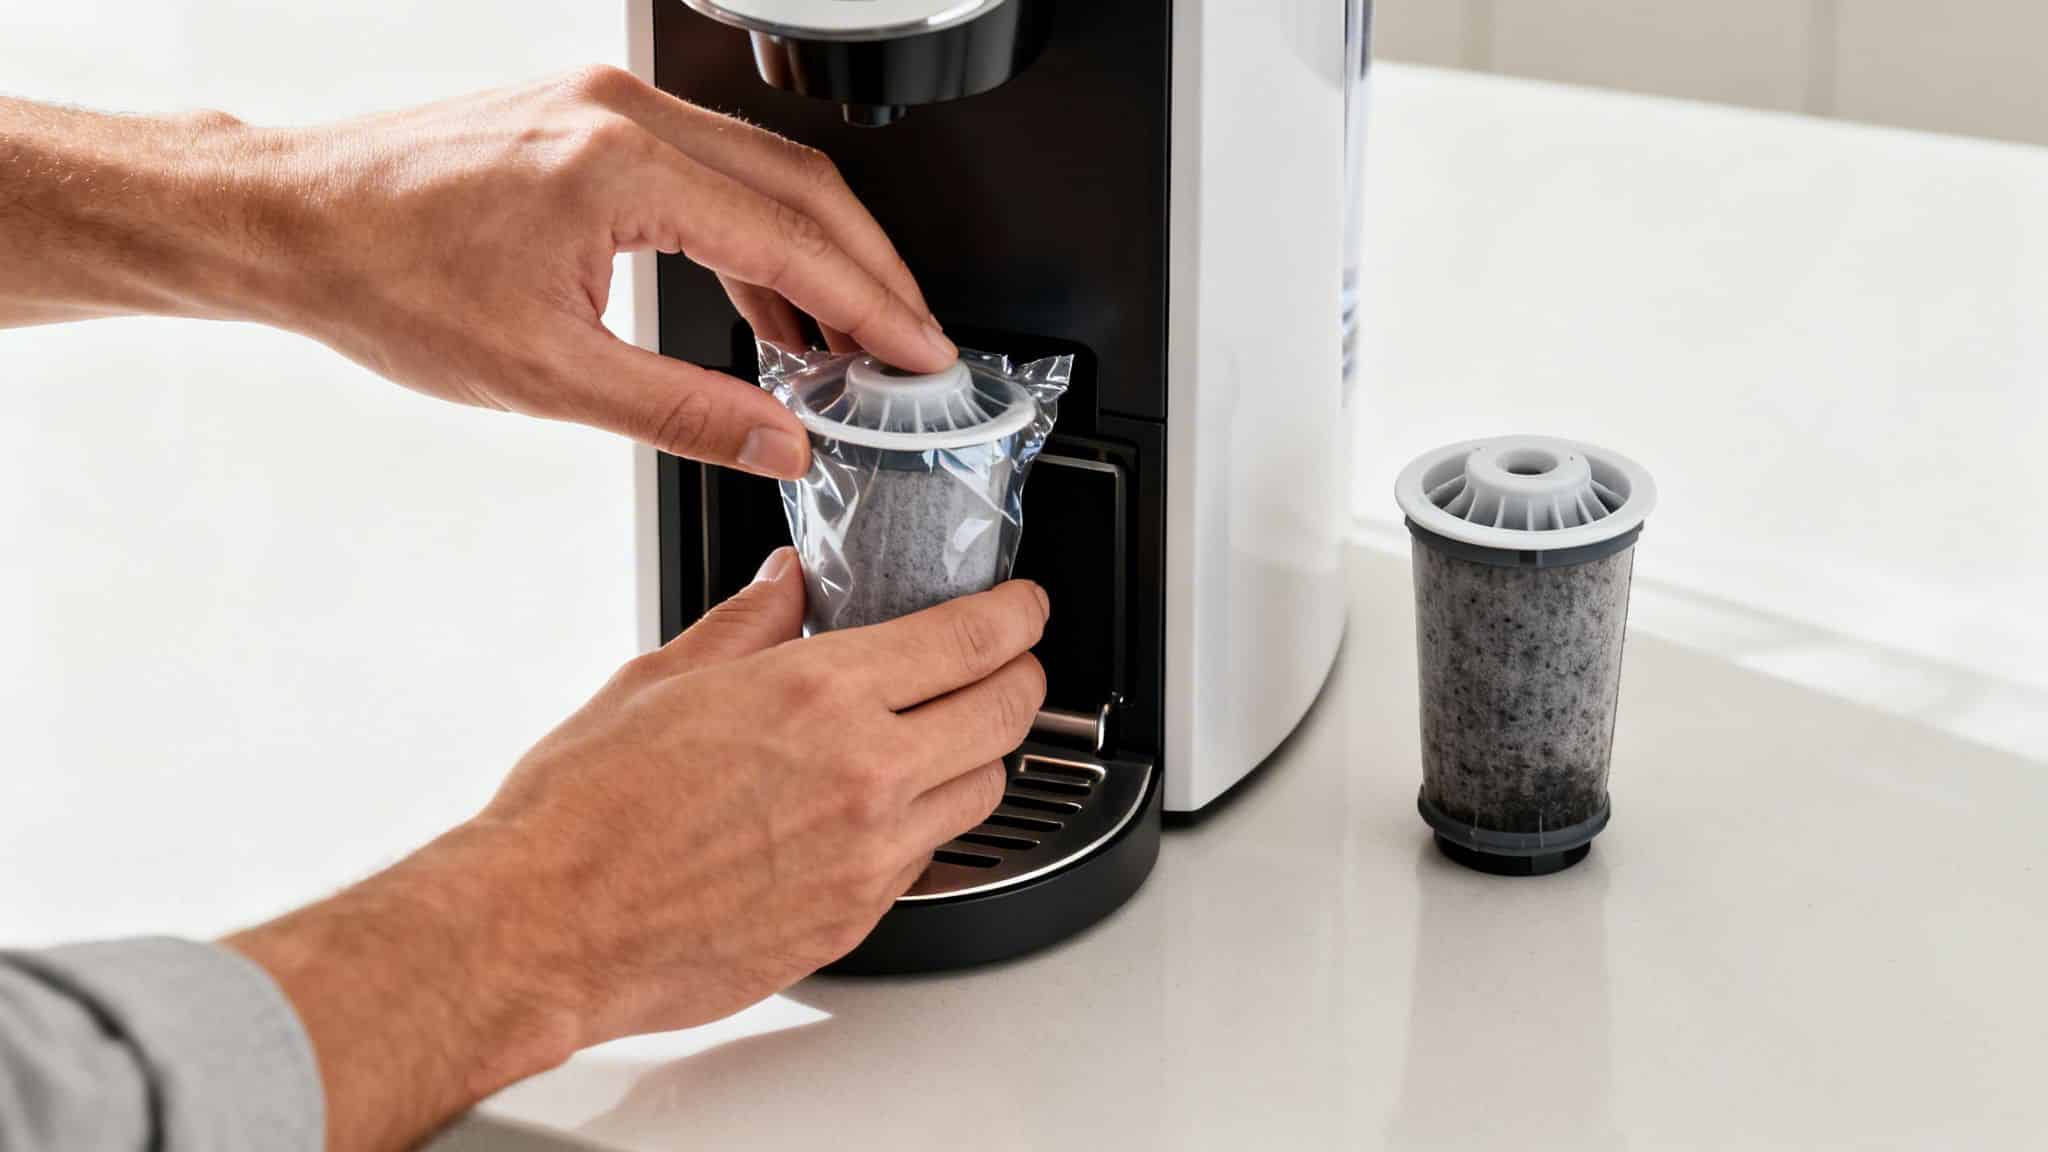
Installing a New Water Filter
Swapping out the filter is a quick and painless part of any good Keurig coffee maker maintenance routine.
- Prep the new filter. First, soak the new charcoal cartridge in a cup of fresh water for at least five minutes. This gets the charcoal activated and rinses away any loose dust.
- Find the filter holder. This is the tall, black plastic piece that sits inside your water tank. Just pull it straight up to remove it from the reservoir base.
- Swap the cartridge. Squeeze the tabs at the bottom of the holder to pop it open. Toss the old filter, give the holder a quick rinse, and pop the new, soaked cartridge in. Snap it shut.
- Set a reminder. Most filter holders have a little dial on top. Spin it two months ahead so you don't have to remember when you last changed it.
- Put it back together. Place the holder back into the reservoir, pressing it down firmly until it clicks into place. Fill the tank with fresh water, and you're ready to brew.
Using a premium filter ensures a perfect fit and maximum contaminant removal, which is key for both taste and machine health. Don't forget that a good descaling solution complements this by clearing out any minerals that do get through.
PureHQ Premium Filters vs Generic Alternatives
Let’s be honest: not all "compatible" filters are made the same. We've seen plenty of generic brands that use lower-grade charcoal or have poorly fitting housings that cause leaks and let unfiltered water sneak past.
| Feature | PureHQ Premium Filters | Generic/No-Name Filters |
|---|---|---|
| Material Quality | Made with micro-mesh material and fine-grain, coconut shell activated charcoal for maximum filtration. | Often use lower-density charcoal with fewer pores, leading to less effective contaminant removal. |
| Compatibility & Fit | Engineered for a precise, leak-proof fit in all specified Keurig models. | Prone to loose fits, which can cause unfiltered water to bypass the cartridge, defeating the purpose. |
| Customer Objection | "Will a third-party filter fit my new Keurig model correctly?" | "I’m worried about small charcoal particles leaking into my water." |
| Our Solution | We guarantee compatibility with the models listed. Our design ensures a secure seal, preventing leaks and bypass. | PureHQ’s superior micro-mesh and pre-rinsed cartridges prevent charcoal fines from escaping into the reservoir. |
At the end of the day, investing in a quality filter is a tiny price to pay for coffee that tastes noticeably better and a machine that lasts longer.
Ready to taste the difference a truly clean brew makes? Shop PureHQ’s water filters and elevate your coffee today.
Troubleshooting Common Keurig Problems
You’ve been good. You’ve done the weekly cleanings and even descaled your machine. Then one morning, it hits you with a stubborn error message or, worse, a puddle of water on your countertop.
Even a perfectly maintained Keurig can have a bad day. When it does, your entire morning routine can come to a screeching halt. That moment of panic is real. You start wondering if the machine is finally dead, mentally calculating the cost of a replacement. Is it clogged? Is a sensor fried?
The good news is, most of these issues look way more serious than they are. From baffling error lights to coffee that’s weirdly weak, you can usually get your brewer back in action in minutes—no service call needed.
Your Brewer Says "Add Water" But It’s Full
This is probably the most common—and infuriating—Keurig glitch. You fill the reservoir to the max line, yet the blue light just keeps blinking as if it’s bone dry. The problem isn't the water; it's the sensor that's supposed to detect it. Luckily, the fix is usually incredibly simple.
- Remove and Reseat It. Lift the reservoir straight up and off the brewer. Then, place it back down, pushing firmly until you feel a solid "click" as it locks into place.
- Clean the Sensor Area. If that didn’t work, a little grime might be blocking the magnetic sensor. Empty the reservoir and give it a good wash with warm, soapy water. Pay extra attention to the valve area at the bottom.
- Give It a Tap. Sometimes the magnetic float inside the reservoir just gets stuck. With the reservoir off the machine, give the side of it a few firm taps to jog it loose.
The Machine Is Leaking Water
A leaking Keurig looks like a complete disaster, but the cause is almost always one of two things. First, double-check that the water reservoir is seated correctly. If it's even slightly crooked, it will break the seal and let water drip out from the base. If the tank is secure, the leak is probably coming from clogged needles. When old coffee grounds block the exit or entrance needle, the pump still forces water into the K-Cup. With nowhere to go, that pressurized hot water backs up, overflows the brew chamber, and leaks down the machine. A quick but thorough cleaning of both needles with a paperclip, like we covered earlier, will solve this messy problem almost every time.
Keurig recommends a lifespan of 3 to 5 years, but real-world longevity depends heavily on your maintenance habits. Mineral buildup from hard water is a primary cause of machine failures, but using a quality water filter and following a regular cleaning schedule can make a huge difference.
Inconsistent or Short Brew Sizes
You hit the button for a 10-ounce brew, but your mug is only half full. This "short brew" is a classic sign of scale buildup. Over time, mineral deposits build up inside the machine's tubing, restricting water flow and messing with the sensors. The pump has to work harder to push water through and might shut off before it has dispensed the full amount. The only real fix here is a complete descaling cycle. Running a quality descaling solution through the system will dissolve that gunk and open up the internal pathways, letting your machine brew full, hot cups again.
While most issues are fixable at home, if you run into a problem that seems beyond basic troubleshooting, it never hurts to get a second opinion. There are some great online resources with tips for minor appliance repairs that can guide you until you need to call a pro.
Upgrading for Durability
One of the best ways to avoid future headaches is to choose high-quality accessories that are built to last. Many common complaints about reusable pods—like warping, messy cleanups, and a bad seal—are completely avoidable if you ditch the flimsy plastic.
| Feature | PureHQ Stainless Steel Reusable Pod | Standard Plastic Reusable Pods |
|---|---|---|
| Material & Durability | Built from food-grade stainless steel that resists warping, staining, and heat damage over thousands of uses. | Made from plastic that can warp or get brittle over time, leading to a poor seal and messy brewing. |
| Coffee Flavor | The non-porous steel doesn’t hold onto old coffee oils, so you get a fresh-tasting brew every time. | Plastic absorbs coffee oils, leading to a buildup of rancid flavors that can taint your fresh grounds. |
| Common Objection | “Won't a metal pod damage my Keurig’s needles?” | “The plastic hinge always snaps after a few months.” |
| Our Solution | Our pods are precision-engineered to align perfectly with the brewer’s needles, preventing any damage. | Our stainless steel design uses an integrated, durable lid that eliminates the weak point of a plastic hinge. |
Investing in a well-made reusable pod doesn't just cut down on waste; it gives you a more reliable and flavorful cup of coffee, helping you sidestep some of the most common brewing frustrations.
Ready to troubleshoot with accessories built to last? Shop PureHQ's collection of durable reusable pods and maintenance kits.
Your Keurig Questions, Answered
Even after you've nailed down a cleaning routine, some questions always seem to pop up. Think of this as your quick-reference guide for those moments when your Keurig isn't cooperating and you just want a good cup of coffee.
We’ve pulled together the questions we hear most often from Keurig owners. Here are the straightforward, no-nonsense answers you need.
Can I Use Vinegar Instead of a Descaling Solution?
This is the number one "hack" you'll find online, and honestly, it's a risky one. Here's the problem: vinegar is an acid, but it's often not strong enough to break down the really stubborn, hardened mineral scale that builds up over months. More importantly, its acidity can slowly eat away at the internal rubber gaskets and seals inside your brewer. Over time, they can become brittle and start to leak. And the taste? It's a real issue. The strong vinegar flavor can linger for a dozen or more rinse cycles before it's finally gone. A proper descaling solution is formulated to be tough on scale but gentle on your machine's internals, rinsing away cleanly without ruining your next brew.
How Often Should I Really Clean My Keurig?
Consistency is everything. If you want your brewer to last and your coffee to taste great, sticking to a simple schedule is the secret. Here’s what that actually looks like in the real world.
- Daily: Give the outside a quick wipe-down. Empty and rinse the drip tray. This takes about 30 seconds and prevents that sticky, gross buildup.
- Weekly: Take out the K-Cup pod holder and give it a proper wash. This is also the perfect time to clean the entrance and exit needles to remove fresh coffee oils before they turn rancid.
- Every 2 Months: Swap out the charcoal water filter in your reservoir. This is your machine’s first line of defense against chlorine and minerals that mess with flavor.
- Every 3-6 Months: Time for a full descaling cycle. If you know you have hard water, aim for every three months. If you're not sure, your machine will tell you—if it starts brewing slower or the coffee tastes bitter, don't wait for the light.
Key Takeaway: Your brewer gives you clear signals when it needs help. Slower brews, lukewarm coffee, or an "off" taste are all signs that it's time to descale. Don't ignore them!
My Reusable K-Cup Is Making a Mess. What Am I Doing Wrong?
Switching to a reusable pod is a fantastic move for your wallet and the planet, but a countertop covered in coffee grounds is enough to ruin anyone's morning. The mess almost always comes down to one of three simple mistakes. First, you might be overfilling the pod. Second, check your coffee grind; if it's too fine (like an espresso grind), water can't push through it properly. Finally, a weak seal on the pod itself can cause leaks. For a truly mess-free brew, we always recommend using disposable paper filters inside your pod. Pairing our durable reusable pods with PureHQ’s custom-fit paper liners is the ultimate solution—they trap all the sediment and make cleanup as easy as tossing the liner in the trash.
Why Is My Keurig Leaking Water from the Bottom?
Seeing a puddle of water under your brewer is definitely alarming, but it's usually not a fatal flaw. The very first thing to check is the water reservoir. Take it off and reseat it firmly, making sure you feel it "click" securely into the base. If the reservoir is snug and it's still leaking, the culprit is almost certainly severe internal scale buildup. When the machine's internal lines are clogged, the pump has to work harder, creating excess pressure. That pressure forces water out of the weakest connection points. Running a thorough descaling cycle is the best way to clear those blockages and relieve the pressure.
Ready to elevate your home brewing? Shop PureHQ's complete collection of filters, reusable pods, and descalers now.
