
Coffee Machine Care
Coffee Maker Parts: A Guide to Repair and Upgrades
Jul
Your coffee maker rarely dies all at once. Most of the time, a small part starts failing first. A gasket hardens. A shower screen clogs. A pod needle packs up with old grounds. Then one morning you get the symptoms everyone hates: leaking on the counter, bitter coffee, weak coffee, a slow brew, or a machine that sounds like it's working harder than it should.
That's why understanding coffee maker parts matters. Not just the obvious pieces you can see, but the wear parts that age in place and cause “mystery” problems long before a machine looks broken.
That Morning-Ruining Moment Your Coffee Maker Fails
You start the brew half awake, already counting on that first cup. Then the machine clicks, sputters, and gives you a weak stream, a puddle on the counter, or coffee that tastes flat, sour, or strangely bitter. The machine still has power. It still makes noise. That is what throws people off.

From a repair bench, these are rarely “dead machine” symptoms. They usually point to maintenance wear parts that have been gradually deteriorating for months. A seal gets hard from heat. A check valve starts sticking. A pod needle fills with coffee paste. A shower screen collects oil and scale until flow turns uneven. Those parts are small, cheap, and easy to ignore until one bad morning makes them impossible to miss.
What usually goes wrong first
The first trouble spots are usually hidden in the brew path, not the obvious removable pieces:
- Seals and gaskets: Heat cycles dry them out, pressure finds the gap, and leaks show up around the brew head or inside the case.
- Needles, screens, and narrow outlets: Coffee fines and mineral scale restrict flow, which leads to weak brews, overflow, or messy extraction.
- Valves and hoses: A sticky one-way valve or a hose connection starting to loosen can cause sputtering, long brew times, or water dumping in the wrong place.
- Filter-related parts: A neglected filter housing or old media can leave water tasting off. If you are not sure your pod brewer uses one, this guide on whether your Keurig has a water filter clears that up quickly.
I see the same pattern across drip, pod, and espresso machines. Owners replace the machine because the symptom looks dramatic, but the fault is often a tired gasket, a blocked outlet, or mineral buildup in a small passage.
The same logic applies to other household repairs. A lamp can look dead when the root cause is a small connection or socket issue, which is why practical repair guides like the Bulls Eye Repair lamp how-to are useful. Coffee makers behave the same way. One minor wear part fails, and the whole appliance starts acting unpredictable.
The fix is often simpler than the symptom
A pod machine that splashes or pools water often has a clogged entrance or exit needle. A drip brewer that backs up into the basket can have scale in the outlet path or a valve that is no longer opening cleanly. An espresso machine that leaks around the portafilter often needs a new group gasket, not a replacement machine.
Bad taste follows the same rule. Bitter coffee can come from old oils on the shower screen or basket. Sour coffee can point to low brew temperature, restricted flow, or both.
If the machine still turns on and tries to brew, start with the maintenance-specific wear parts. They are the most common source of “mystery” failures, and they are often the cheapest problems to fix.
Understanding Your Coffee Maker's Core Components
Every brewer, from a basic drip machine to a home espresso setup, does the same job. It stores water, heats water, moves water, and sends that water through coffee in a controlled way. Once you understand those jobs, troubleshooting gets easier fast.

Water system parts
Start with the reservoir. It seems simple, but it sets up everything downstream. If the tank doesn't seat correctly, if its valve leaks, or if scale and debris enter the line, the rest of the brew path suffers.
Then comes the heating element and pump. In espresso-style systems, temperature and pressure aren't loose targets. The HiBREW parts guide notes that a thermoblock runs in the 90°C to 96°C range for proper extraction, while the pump must deliver 9 bars (130 psi) to push water through compacted grounds. When temperature falls below that range, coffee tends to taste sour. When it runs above it, bitterness shows up fast.
Brewing path parts
After heating and pressurizing, the machine has to distribute water correctly. That's where the brew head, shower screen, filter basket, pod holder, or portafilter basket matter. These parts don't just hold coffee. They control contact time and water spread.
If distribution gets uneven, the coffee bed extracts unevenly too. One side runs fast, another stays dry, and the cup tastes hollow or harsh.
Practical rule: If your machine heats and pumps but the coffee tastes wrong, inspect the parts that touch water and grounds first. They're usually dirtier and more worn than owners expect.
Control and access parts
Buttons and indicator lights don't brew coffee, but they do tell you where to look. A blinking descale light often points to restricted internal flow, not a failed machine. A machine that powers on but won't complete a cycle may have a blocked brew path or a reservoir seating issue before it has a major electrical fault.
If you're comfortable opening household items for basic diagnosis, the mindset is similar to small appliance work in general. A clear repair walkthrough like the Bulls Eye Repair lamp how-to is a good reminder that simple devices often fail at a single connection point or replaceable component, not at every part at once.
For pod owners, water treatment deserves special attention because it affects both taste and internal buildup. This guide on whether your Keurig has a water filter is useful if you're trying to confirm what your machine should have installed and where neglect may be starting.
Essential Parts for Keurig and Ninja Pod Machines
Pod brewers are convenient because they hide complexity. That convenience depends on a handful of specialized coffee maker parts staying clean, aligned, and unobstructed. When one of those parts slips out of shape or clogs, the symptoms feel random even though the cause usually isn't.

The pod holder and needle area
On Keurig-style and Ninja pod systems, the pod holder assembly does more than hold a capsule. It positions the pod, helps puncture it, and directs water through a very restricted path. That means fine grounds and scale can create problems quickly.
The Ohio State explanation of pod coffee maker components notes that the pump forces pressurized water from the heater into the pod and raises water from 20°C to 85°C in under one minute. That fast cycle is convenient, but it leaves little margin for clogs. If the inlet or outlet needle is dirty, pressure backs up and the machine may drip, sputter, or brew weak coffee.
Common clues include:
- Water overflow around the pod: The exit path is restricted.
- Half-filled cup: The needle, pod seat, or internal line may be clogged.
- Grounds in the cup: The pod isn't seating cleanly or the puncture area is damaged.
- Louder brew cycle: The pump is working against restriction.
The parts people skip
The most ignored pod-machine parts aren't flashy. They're the water filter holder, the removable internal fittings, and the seals around the pod chamber. These affect taste and pump strain even when the machine still “works.”
A lot of owners also forget that pod systems have accessory ecosystems for a reason. The right filter insert, reusable pod, or cleaning item can solve repeat problems that cheap, sloppy-fitting accessories create. If you're comparing fit across models, this guide to Keurig coffee maker accessories gives a helpful model-by-model overview.
A reusable pod can also be a smart fix when disposable capsules are inconsistent. It gives you control over grind, fill level, and cleanup. If you go that route, fit matters more than novelty.
Here's a useful walkthrough for seeing the pod system up close before you start taking parts out:
What works and what doesn't
What works is regular rinsing of the pod holder, careful cleaning of the puncture area, and replacing filter-related accessories before taste falls off badly. What doesn't work is forcing a pod in, ignoring slow brewing, or using a warped reusable insert that doesn't seat properly.
If your machine suddenly tastes stale, this is also the right place to cross-check your accessories. Fresh water filtration and a proper descaling product often do more for pod brewers than owners expect, because those machines rely on narrow passages and rapid heating.
Key Parts for Drip and Espresso Machines
Drip brewers and espresso machines fail in different ways, but the frustrating symptoms often come from the same category of parts. Small wear items. The pieces that collect scale, coffee oils, heat damage, and flattened seals until the machine starts leaking, tasting sour, or brewing unevenly.
Drip machine trouble spots
On a drip brewer, the parts I check first are the spray head, basket holder, brew basket valve, and carafe lid or flow path. Owners usually blame the heating element when coffee turns weak or the basket overflows. In practice, restricted water spread and poor drainage cause many of those complaints.
A clogged spray head stops water from reaching the bed evenly. One side of the filter gets hammered while the other stays relatively dry. The result is thin, sharp coffee even with the right dose. If the basket holder sits slightly out of position, or the small valve under the basket sticks, brewed coffee backs up fast and spills where you can see it.
The carafe side matters more than people expect. Some machines rely on the carafe lid and basket interface to let coffee exit at the right rate. If that path is dirty, warped, or not seated fully, the brew basket can flood even though the pump and heater are doing their job.
Espresso wear parts that change flavor fast
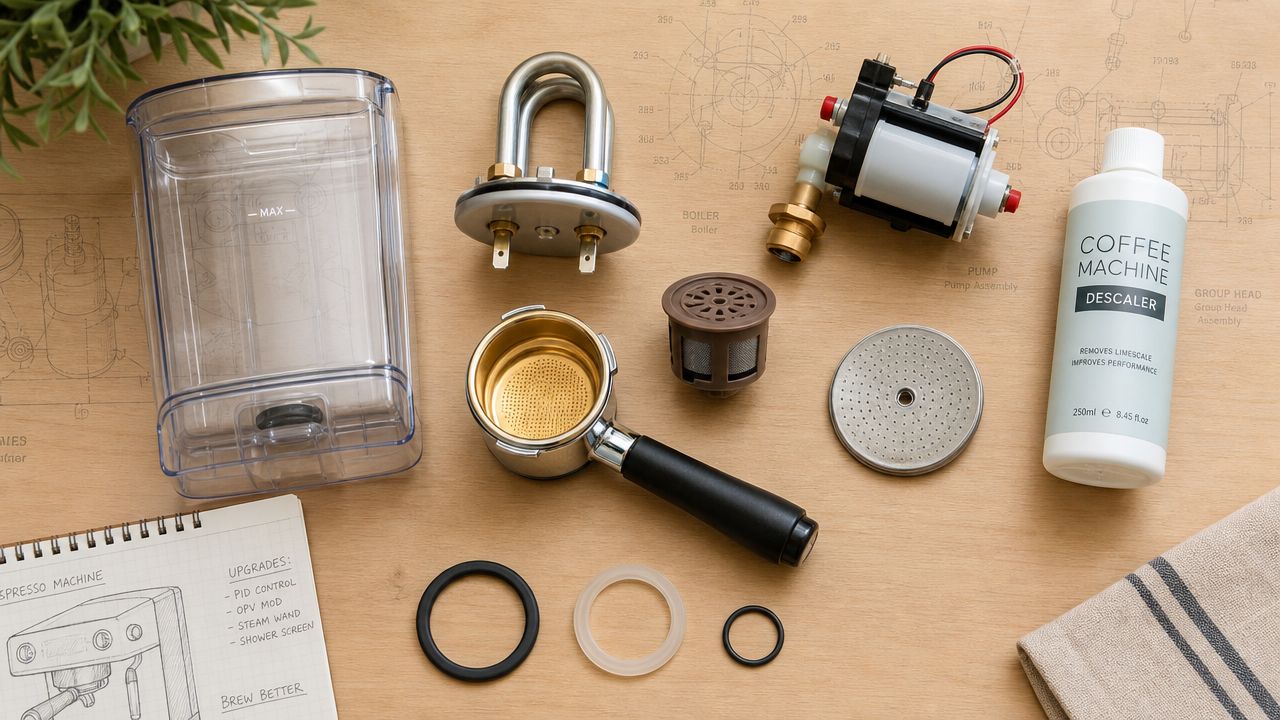
Espresso machines have more parts that look serious, but the repeat offenders are still the basic maintenance items. The group gasket, shower screen, portafilter basket, and steam wand tip cause a lot of mysterious problems long before a pump or control board fails.
The group head gets neglected because it feels permanent. It is not. The gasket hardens from heat, the shower screen loads up with oils and fine grounds, and scale inside the water path slowly changes flow. As noted earlier, mineral buildup can cut brewing efficiency enough to show up clearly in the cup. Flavor gets flatter, flow gets less predictable, and pressure behavior starts looking worse than it really is.
If an espresso machine leaks around the portafilter, check the gasket and shower screen before blaming the whole group head. Those are routine wear parts.
The steam wand is another common blind spot. A partially blocked tip can make milk texturing rough and noisy. It can also convince owners the machine has lost steam power when the actual problem is dried milk residue at the tip or scale in the wand path.
Watch these symptoms
A few patterns repeat in service calls:
- Leak at the group head: The gasket is worn, compressed, dirty, or installed incorrectly.
- Spraying or channeling shot: The basket is damaged, the shower screen is dirty, or water is hitting the puck unevenly.
- Weak steam or erratic frothing: The wand tip is clogged or scale is restricting flow.
- Drip brewer overflow: The spray head, basket valve, or carafe interface is slowing drainage.
- Bad taste with no obvious breakage: Old seals, stale oil buildup, and scale are affecting the brew path.
Traditional espresso systems also depend on stable pressure. The Pro Coffee Gear explanation of espresso machine parts points to approximately 9 bars as the standard pressure needed for proper extraction and balanced shots. If shots suddenly run fast, spray, or leak at the collar, inspect the wear parts around the group first. That is usually a cheaper and more accurate fix than assuming the pump is done.
When to Repair Replace or Upgrade Your Parts
Once you find the faulty part, the next choice matters as much as the diagnosis. Some coffee maker parts should be cleaned and reused. Some should be replaced with the exact fit. Some are worth upgrading if the original design was flimsy or wasteful.
Repair first when the part is only dirty
Always start with cleaning if the part is still physically sound. That includes pod holders, shower screens, filter baskets, spray heads, and steam wand tips. A lot of “broken” machines have a flow problem, not a dead component.
Repair makes sense when:
- The part is clogged but intact: No cracks, distortion, or burnt areas.
- The seal still feels elastic: Rubber hasn't gone brittle or flattened badly.
- The machine's symptoms appeared gradually: Gradual decline often points to buildup.
Replace when fit and sealing matter
If a gasket leaks, a basket warps, or a removable tray no longer seats correctly, replacement is usually better than improvisation. In such cases, people get tempted by the cheapest listing they can find. Sometimes that works. Often it creates a new problem.
The Visions Espresso parts guide says OEM replacement parts typically cost 20% to 40% more than non-OEM alternatives but offer a 50% higher compatibility rate and significantly longer lifespan. That matches what technicians see. The expensive part often hurts once. The bad-fit part keeps hurting.
Comparison of Replacement Part Options
| Attribute | OEM Parts | Generic Parts | PureHQ Premium Upgrades |
|---|---|---|---|
| Fit and compatibility | Usually the safest choice for exact replacement | Can be inconsistent, especially on seals and pod accessories | Designed for specific coffee machine accessory use cases where better materials or reusable formats matter |
| Upfront cost | Higher | Lower | Varies by accessory, often positioned as a long-term use item rather than a disposable substitute |
| Durability | Commonly strong when sourced correctly | Mixed. Some hold up, some deform early | Often a better choice when you want reusable or easier-to-clean alternatives |
| Best use case | Restoring the machine to original spec | Temporary fix or low-risk noncritical parts | Improving convenience, sustainability, or maintenance routines |
| Main risk | Paying more than you wanted | Poor fit, leaks, weak materials, compatibility headaches | Choosing an upgrade for the wrong model if you don't confirm fit first |
The objection most buyers have
The most common objection is simple: “I don't want to spend more on a part and still end up with leaks or a bad fit.” That's a fair concern.
Here's the practical answer. Spend more when the part controls pressure, sealing, or model-specific alignment. Save money only on low-risk items where exact fit doesn't define performance. For a group gasket, pod insert, or machine-specific filter holder, the wrong fit wastes more time than it saves money.
Cheap parts fail in annoying ways. They don't always stop the machine. They make the machine unreliable.
If you're already placing an order, it also makes sense to add maintenance items that prevent repeat failures. Water filters and descaling products are the two accessories that most often reduce return visits to the same problem.
Your Proactive Coffee Maker Maintenance Checklist
Most owners maintain the visible parts and ignore the wear parts that decide whether the machine leaks, seals, and extracts correctly. That's backward. The hidden pieces usually create the expensive headaches.
The Agaro guide on coffee machine parts notes that barista data from 2024 to 2025 identifies maintenance-specific wear parts such as gaskets, shower head screens, and portafilter tips as the top overlooked causes of machine failure. That lines up with what technicians see on the bench. Small parts degrade unnoticed, then owners blame the whole machine.

The checklist that prevents most mystery failures
- Descale the water path: Mineral buildup affects heat transfer and flow. If brewing slows, noise increases, or taste gets flat, descale before replacing expensive components.
- Inspect seals by touch, not just by sight: A gasket can look acceptable and still fail because it has gone hard.
- Clean the parts that distribute water: Shower screens, spray heads, and pod needles need direct attention.
- Rinse removable brew parts thoroughly: Coffee oils turn rancid and affect taste long before the machine looks dirty.
- Replace water filtration on schedule: Better inlet water helps taste and reduces internal buildup.
- Check trays and reservoirs for proper seating: A machine that isn't seated correctly can mimic a leak or pump problem.
What wear looks like in real life
A worn gasket often leaves coffee residue around a seal path. A dirty shower screen may show uneven staining or clogged openings. A pod needle problem often shows up as weak output or grounds where they shouldn't be. Steam tips clog at the smallest openings first, so weak or erratic steam is an early warning, not a surprise failure.
For a machine-specific cleaning routine, this practical guide on how to clean a coffee maker is a solid reference if you want a straightforward reset before buying replacement parts.
Maintenance works best when you do it before flavor drops off. Once the cup tastes bad, buildup has usually been there for a while.
What not to ignore
Don't focus only on the carafe, outer shell, and tank. Those are visible. The harder-working parts are deeper in the brew path. If you maintain only what you can see, your machine can still leak, brew unevenly, or produce stale-tasting coffee.
A good descaler and fresh water filtration are the two maintenance accessories most worth keeping on hand because they support the parts you can't easily inspect.
Take Control of Your Coffee Experience
A coffee machine stops feeling mysterious once you know what each part does. Leaks usually trace back to seals, fit, or blockage. Bad taste usually points to water quality, buildup, heat, or dirty brew-path parts. Weak brewing often starts with restriction, not total machine failure.
That changes how you spend money. Instead of replacing the whole brewer, you can inspect the likely failure points first. Instead of guessing, you can look at the group head, basket, pod holder, gasket, screen, spray head, or filter setup and make a smart call.
The best outcome isn't just saving a machine. It's getting back a cup that tastes clean, full, and consistent every morning.
If you're ready to fix the small parts that cause big coffee problems, shop PureHQ Inc. for reusable K-Cups, water filters, descaling solutions, gold-tone baskets, and other coffee maker accessories built to keep Keurig, Ninja, drip, and espresso setups brewing cleanly and reliably.

