
Coffee Machine Care
How to Use Keurig Reuse Cups for Better, Cheaper Brews

Sep
The alarm goes off, you reach for the Keurig, and a sealed pod disappears into the brewer before you're fully awake. The speed is hard to beat. The weak, watery cup, the growing container of spent capsules, and the recurring cost are harder to ignore.
Keurig reuse cups can solve much of that frustration, but only when the cup matches the brewer and the coffee bed is prepared correctly. The practical formula is simple: identify the brew head, choose a compatible reusable pod, use a consistent medium-fine grind, fill lightly, seal the rim, and clean the assembly after every brew.
The Morning Most Keurig Owners Already Know
The morning routine usually starts with convenience, not coffee quality. You lift the handle, drop in a disposable pod, press a button, and wait for a cup that may taste thin, stale, or overly bitter. The machine did its job. The pod gave you little control over the coffee inside it.
Reusable K-Cups change that balance. You can choose your own beans, adjust the amount of coffee, and brew grounds that aren't locked inside a branded capsule. You also avoid opening a new disposable pod for every cup, although the environmental result still depends on how consistently you reuse the cup, how long it lasts, and how you maintain the brewer.
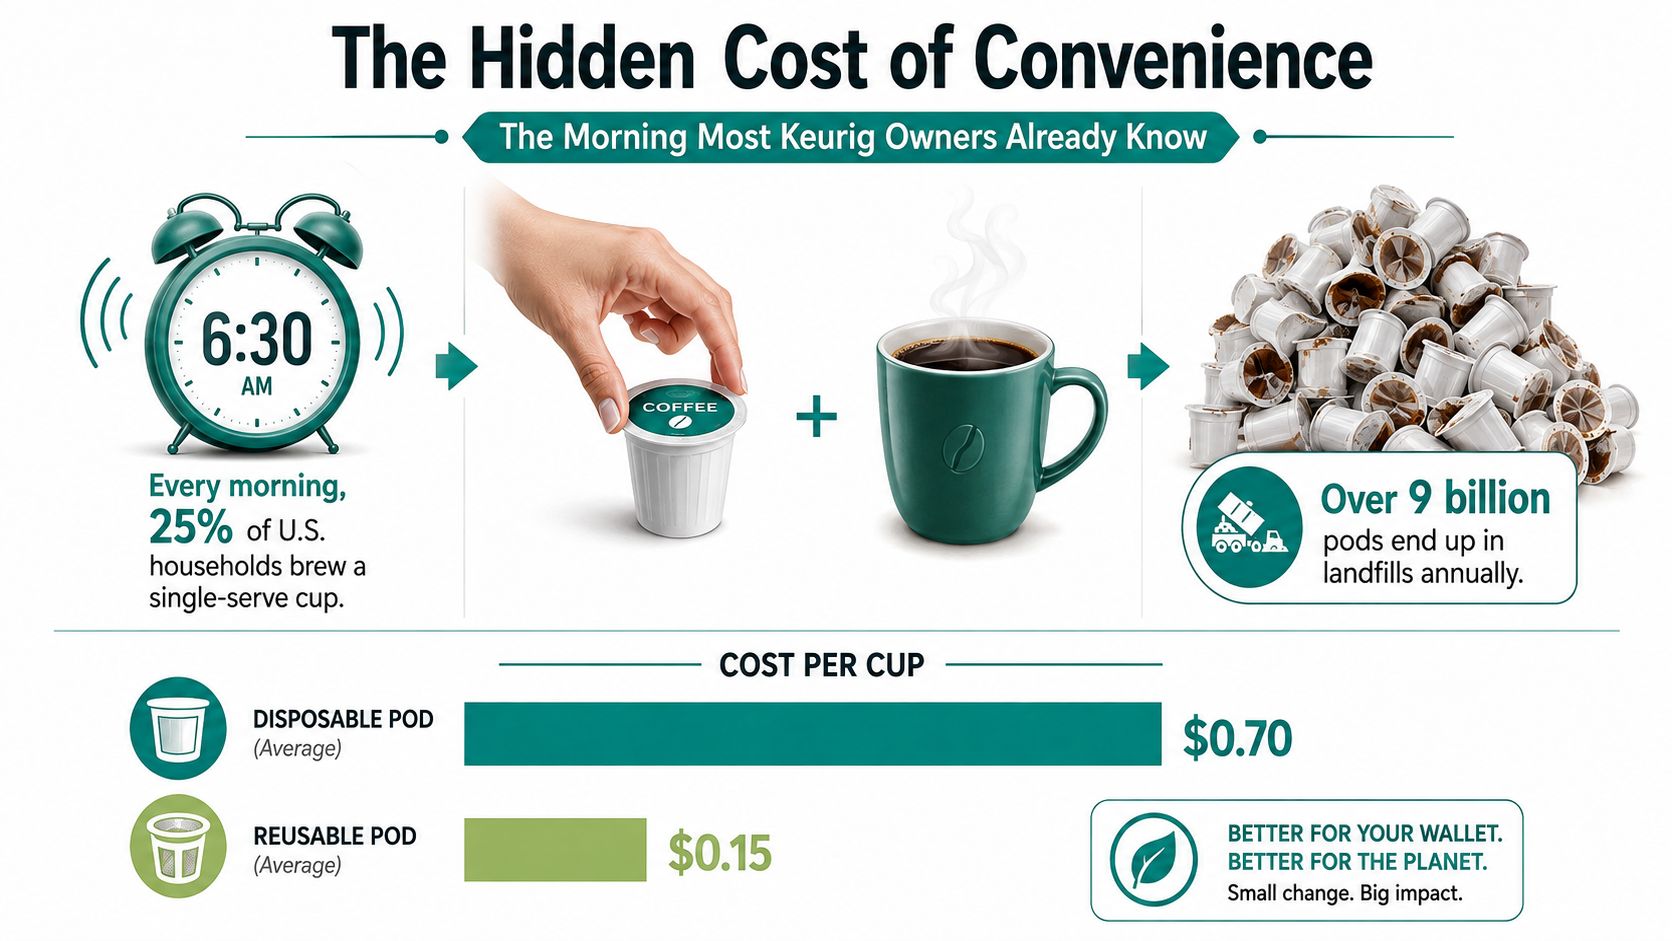
The scale of the disposable-pod system helps explain why refillable formats became so popular. One widely cited estimate reported that enough K-Cups sold in 2014 could circle the globe 10.5 times, while Keurig was on pace to sell 9.8 billion Keurig-brewed portion packs that year, as covered by The Atlantic's reporting on the K-Cup waste problem. Those figures describe the pressure created by single-use convenience, not a guaranteed result from switching one household to a reusable pod.
Why reusable pods became a serious alternative
Keurig launched its reusable My K-Cup in late 2005, discontinued it in August 2014 with the launch of the Keurig 2.0 brewing system, and restored compatibility in May 2015 after consumer backlash, according to the Keurig history overview. That sequence matters because it showed that many customers valued the ability to brew any ground coffee, even inside a closed-pod ecosystem.
The broader platform had a foundational patent filed on September 16, 1992, granted on July 5, 1994, and Keurig registered the K-CUP trademark by 2000, according to the same historical source. Later patent expirations allowed compatible and reusable formats to enter the market more openly.
Reuse also has a practical environmental argument. A life-cycle assessment discussed in The Atlantic's reporting found that a reusable cup needed 10 uses to outperform a single-use cup on environmental impact. That doesn't make every refill cycle automatically responsible. Washing, wasted brews, damaged pods, and machine maintenance all matter.
Practical rule: A reusable cup isn't an instant upgrade. It becomes one when the pod fits, the coffee bed extracts evenly, and you actually reuse and clean it.
The flavor learning curve is small but real. Too-coarse grounds produce a hollow cup, while too-fine grounds can slow the flow and push coffee through the seal. Overfilling creates messy brews, and underfilling leaves the water with too little coffee to extract.
For a useful primer on disposable pod construction before you switch formats, see what K-Cups are made of. The point isn't to turn a Keurig into a café espresso machine. The point is to make a repeatable cup with more control, less dependence on branded capsules, and a clearer relationship between your beans and the final drink.
Choosing a Reusable Pod That Actually Fits
Compatibility comes before grind size. A perfectly prepared coffee bed won't rescue a pod whose lid sits too high, misses the needle, or seals against the wrong part of the brew head.
Start with the exact brewer name printed on the machine or its label. Keurig's official My K-Cup Universal Reusable Coffee Filter page states that compatibility depends on the brewer model and excludes certain newer or specialty machines.
Classic and MultiStream systems need different attention. A K-Classic generally uses the traditional single-needle arrangement, while K-Supreme models use a MultiStream design with multiple water entry points. K-Duo versions can vary, so verify the specific generation rather than trusting the family name alone.
Compatibility check before the first fill
- Identify the model. Check the front badge, underside label, or purchase record.
- Inspect the brew head. One main puncture needle points toward a Classic-style pod. Multiple needles or ports indicate a MultiStream-style brewer.
- Read the pod listing carefully. Look for the exact model family, not only “universal.”
- Test the closure empty. The handle should close without force, and the pod should sit level.
- Inspect the seal. A cracked lid, loose screen, or uneven gasket can let water bypass the grounds.
| Keurig Model Family | What to Verify Before Use | Likely Fit Issue |
|---|---|---|
| K-Classic, K-Select, K-Compact | Traditional single-needle compatibility and pod height | Generic pods may sit poorly or leave grounds around the rim |
| K-Supreme and related models | MultiStream compatibility and correct lid geometry | A Classic pod may leak or distribute water unevenly |
| K-Duo | Exact generation and single-serve brew-head design | Older and newer versions may not accept the same reusable format |
| K-Mini and similar compact models | Clearance, pod height, and closure pressure | A tall cup can prevent the handle from locking correctly |
The model-by-model reusable K-Cup compatibility guide is useful when the outside of the brewer doesn't reveal enough. If closing the handle requires pressure, stop. Forcing the mechanism can damage the brewer or distort the pod seal.
Refilling, Tamping, and Sealing the Right Way
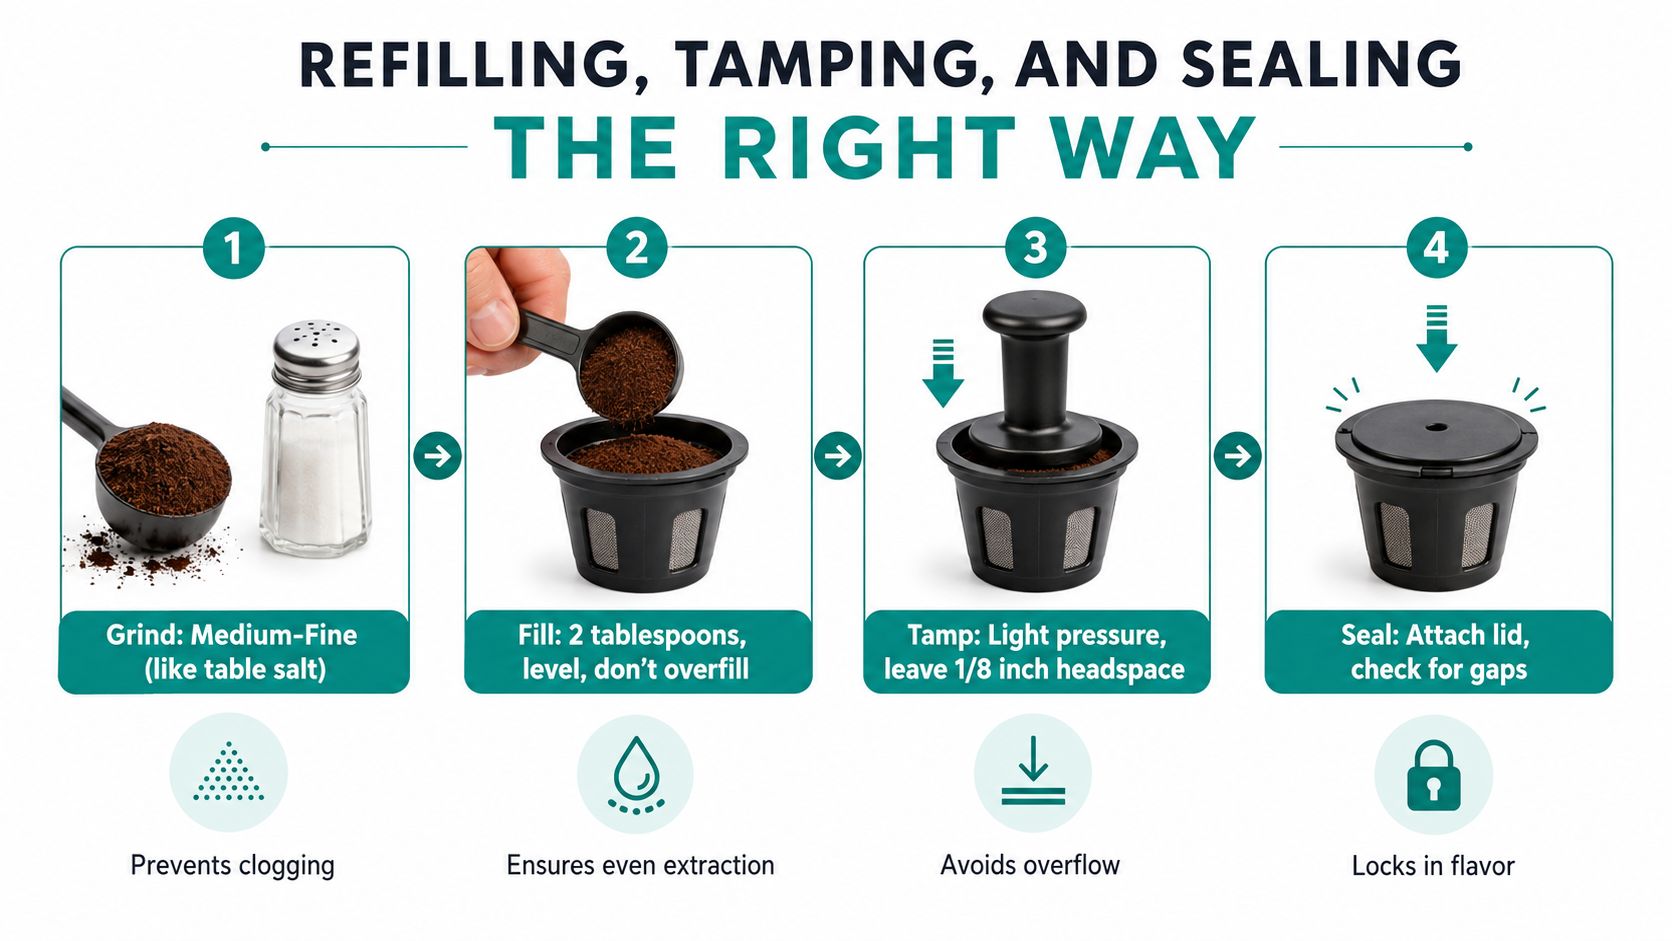
A reusable pod needs room for water to move through the grounds. Fill the basket to about two-thirds full, level it gently, and avoid pressing the coffee into a dense puck. A technical guide also notes that some high-capacity reusable pods hold about 12 grams of grounds, close to double a standard single-serve pod dose, as explained in these reusable K-Cup preparation tips.
Use a medium-fine grind, roughly resembling table salt rather than espresso powder. Too coarse lets water pass quickly without enough extraction, while too fine can clog the filter and make the brewer work against restricted flow.
A reliable refill sequence
- Fill: Add coffee until the basket reaches about two-thirds full. Don't heap grounds above the rim.
- Settle: Tap the pod lightly on the counter to even the bed.
- Level: Use the back of a spoon or the pod lid to create a flat surface.
- Tamp: Apply light pressure only. The coffee should remain permeable, not compressed into a hard brick.
- Seal: Attach the lid flush with the rim and remove every stray ground from the gasket.
- Brew: Start with a smaller cup setting when strength matters. Add hot water afterward if you want more volume.
That smaller-first approach improves extraction consistency because the water spends less time spreading through an overextended coffee bed. If you change beans, run a short hot-water rinse first to clear old oils and loose grounds. Don't assume a larger brew setting will create a stronger drink. More water often creates a weaker one when the coffee dose stays fixed.
This video demonstrates the physical refill and sealing sequence:
The rim deserves more attention than most guides give it. Grounds caught between the lid and gasket create a leak path, and a leak can carry coffee particles into the cup or drip tray. Wipe the edge before inserting the pod, then close the brewer without shifting the lid.
Stainless Steel vs Plastic Reusable K-Cups
Material affects how a pod behaves after repeated refill cycles. Stainless steel usually tolerates heat and scrubbing well, while plastic offers lower weight and often a lower entry price. Neither material fixes a compatibility mismatch or poor filling technique.
| Factor | Stainless Steel | Plastic |
|---|---|---|
| Heat tolerance | Resists warping and handles repeated heat exposure well | Can deform or become brittle if mishandled |
| Durability | Suits frequent use when the mesh and lid remain intact | Convenient but more vulnerable to scratches and wear |
| Taste neutrality | Less likely to retain oils when cleaned thoroughly | Can hold staining and flavor residue over time |
| Price | Usually costs more at purchase | Usually costs less and is easy to replace |
| Compatibility | Requires accurate lid and base geometry | Often available in model-specific shapes |
Stainless steel makes sense for a heavy daily brewer who wants a durable filter and doesn't mind rinsing mesh carefully. The trade-off is a higher upfront purchase and a cup that may feel hot immediately after brewing.
Plastic works well for occasional users, households that rotate between flavors, or anyone who wants a lightweight cup that's easy to handle. Scratches and retained oils become more noticeable when cleaning is inconsistent, so replace a cup when its lid, gasket, or filter no longer seals reliably.
Reusable versus disposable
Disposable pods win on speed and predictable portioning. Reusable pods win on coffee choice, dose control, and the ability to refill the same brewing chamber. Reusable formats also create their own work because you must empty, rinse, dry, and occasionally inspect the cup.
Independent life-cycle research compares reusable pods with other single-serve formats and emphasizes that environmental performance varies by pod design and brewing behavior. In one peer-reviewed assessment, recyclable aluminum had the highest potential environmental effects among the three pod types examined, as reported in the comparative pod life-cycle research. The sensible conclusion is not that one material solves everything. It's that disciplined reuse and efficient brewing matter more than a marketing label.
Cleaning, Sanitizing, and Storing Your Pod
A reusable pod carries wet grounds, coffee oils, and heat after every brew. Cleaning it immediately is easier than trying to remove dried residue later, and it protects the flavor of the next batch.
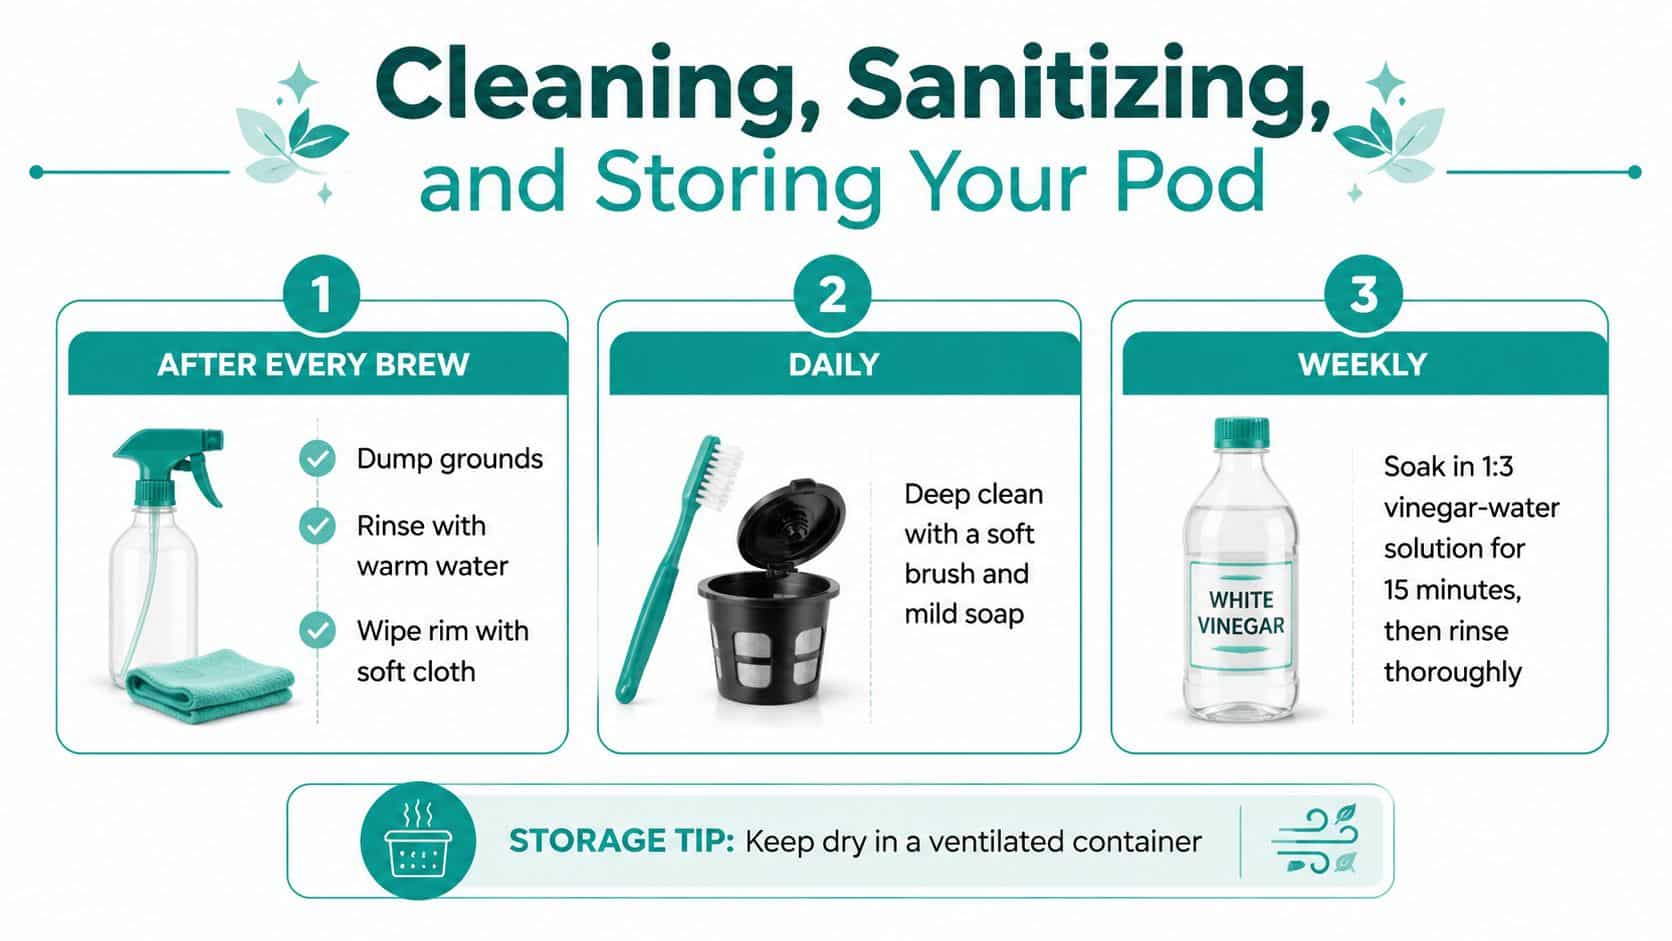
After brewing, dump the grounds, rinse the basket with warm water, and wipe the rim. During a daily cleaning, use a drop of mild dish soap and a soft brush around the mesh and lid grooves. Avoid abrasive tools that can damage a fine filter or scratch plastic.
A maintenance rhythm that fits real mornings
- After every brew: Empty the grounds, rinse with warm water, and wipe the sealing rim.
- Daily: Brush the mesh and lid grooves with mild soap, then rinse until no soap remains.
- Weekly: Soak the pod according to the material and manufacturer's instructions, rinse thoroughly, and air-dry it upside down.
- On the brewer's maintenance schedule: Descale the machine and clear the needles when mineral buildup or slow flow appears.
The exact vinegar ratio and soak time should follow the pod and brewer instructions. Don't assume a stronger solution cleans better. Concentrated acid, harsh detergents, or prolonged soaking can affect seals and leave an unwanted smell.
The brewer is part of the system
A clean pod can't compensate for a clogged exit needle. Scale or loose grounds can redirect water, making a compatible cup look defective. Use the brewer's cleaning tool where provided, and use a compatible descaler when the manufacturer recommends it.
Store the pod open or loosely covered so trapped moisture can escape. Rotating two cups is practical for households that brew frequently, because one cup can dry while the other is in use. For more cleaning guidance, use this reusable coffee-pod cleaning routine.
Storage habit: Never seal a wet pod inside a closed container. Moisture trapped around the mesh and gasket creates the conditions for stale odors and residue.
Troubleshooting Weak, Leaky, or Messy Brews
A reusable cup isn't automatically an environmental win if it causes repeated failed brews. Every failed extraction wastes water, coffee, cleaning effort, and time, while a poorly maintained brewer can create problems that look like pod incompatibility.
Weak coffee usually starts with too little coffee, an overly coarse grind, or a bed that allows water to bypass the grounds. A technical guide recommends a lighter fill to about two-thirds of the basket and a smaller brew volume first, then dilution with hot water if needed. If the coffee suddenly turns watery, inspect the gasket and filter before changing beans.
Leaks point to the seal. A lid may be misaligned, the rim may hold stray grounds, or a cracked plastic body may no longer compress evenly. MultiStream brewers add another fit variable because the water-entry pattern and lid geometry must match.
| Symptom | Likely Cause | Fix |
|---|---|---|
| Weak or watery coffee | Underfilled basket, grind too coarse, or excessive brew volume | Fill lightly to the recommended level, use a medium-fine grind, and brew a smaller cup first |
| Water around the lid | Misaligned lid, grounds on the gasket, or incompatible pod | Remove the grounds, reseat the lid, and verify model compatibility |
| Grounds in the cup | Poor closure, overfilling, damaged mesh, or mismatched needle design | Reduce the dose, inspect the filter, and use a pod designed for the brewer |
| Slow dripping | Grind too fine, compacted coffee bed, or clogged mesh | Use a slightly coarser grind, tamp less, and brush the filter clean |
| Water in the drip tray | Pod height or seal problem, or brewer-side needle buildup | Test an approved pod and clear the brewer's needle with its cleaning tool |
Don't blame the coffee first
Over-tamping can compress the bed so tightly that water finds a channel around it or forces slurry through a weak seal. Level the grounds instead of pressing hard, and reduce the dose if the lid touches the coffee.
The sustainability narrative also needs a reality check. Watchdog complaints have alleged that K-Cups marketed as recyclable still face contamination, small-size, and multimaterial barriers in curbside systems, as described in the regulator complaint reported by GlobeNewswire. Reuse can reduce dependence on disposable capsules, but it doesn't remove cleaning, replacement, or machine-maintenance trade-offs.
Your Reusable Cup Routine and What Comes Next
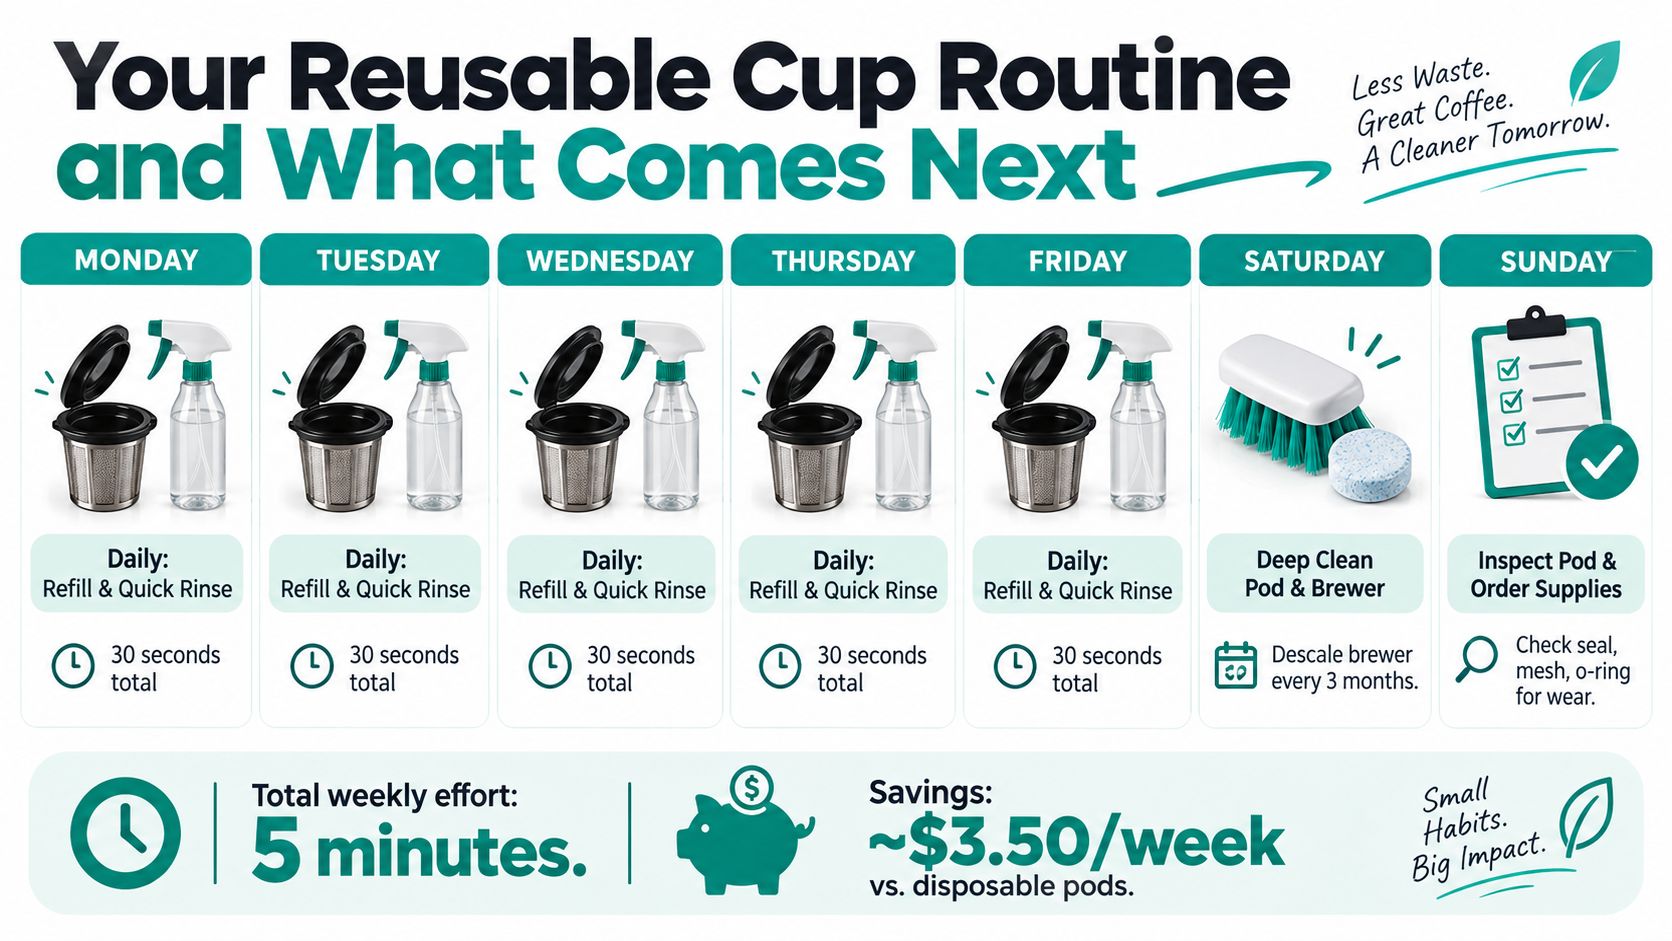
The easiest routine is the one that attaches maintenance to an existing habit. Empty and rinse the pod as soon as the coffee finishes. Let it dry in a ventilated place, and keep a spare cup available if the first one is still wet.
A simple weekly pattern keeps small problems from becoming morning failures:
- Monday through Friday: Refill with the same measured method, then dump and rinse the pod immediately.
- Midweek: Brush the lid, mesh, and gasket with mild soap and inspect the seal.
- Weekend: Clean the pod more thoroughly and maintain the brewer according to its instructions.
- Monthly check: Look for cracks, hardening, stretched silicone, loose screens, or a lid that no longer compresses evenly.
- Whenever flavor changes: Check the grind, water path, and machine condition before increasing the coffee dose.
Keep a small tally of refill cycles if you want to compare pod durability, and set a calendar reminder for brewer maintenance. A container for spent grounds also makes cleanup quicker and gives you a visible place to discard coffee before rinsing the basket.
Match the routine to the brewer
K-Classic and other traditional single-needle brewers generally need a Classic-style reusable pod. K-Supreme models require attention to MultiStream compatibility. K-Duo models demand an exact-generation check, while compact machines such as the K-Compact can be especially sensitive to pod height and handle clearance.
Official manufacturer documentation should be your first stop when the model is unclear. Community troubleshooting groups can help with unusual lid, needle, or generation-specific problems, but confirm advice against the brewer manual before forcing a pod into the chamber.
The same operational discipline applies in a small office or café breakroom. A basic cleaning checklist, refill tally, and supply reminder can keep reusable brewing from becoming one person's invisible chore. Businesses that want a broader way to encourage repeat customer habits can also review how Loyal Customer helps cafes, particularly when coffee service and retention efforts overlap.
PureHQ Inc. offers reusable K-Cups, stainless steel refillable pods, water filters, descaling solutions, and cleaning tablets for several Keurig systems, including K-Classic, K-Supreme, K-Slim, and K-Duo variants. Visit PureHQ Inc. to match a reusable pod and maintenance supplies to your exact brewer, then make the first refill part of a routine you can repeat.

