Coffee Machine Care
Espresso Machine Cleaning Kit: A Complete 2026 Guide

Jun
You bought good beans. You dialed in the grind. The machine warms up, the shot looks fine, and then the espresso lands in the cup tasting flat, bitter, or strangely dirty. That's the point where a lot of people blame the beans, the grinder, or themselves.
Usually, the machine is the problem.
Espresso equipment hides residue well. Coffee oils cling to the group head and portafilter, milk dries inside the steam wand, and scale slowly lines the water path. If you want to buy quality espresso roast, start with fresh coffee like this buy quality espresso roast, but don't expect even great beans to cover up a dirty brew path. A proper espresso machine cleaning kit fixes the part often ignored, which is the machine itself.
That Perfect Shot Gone Wrong The Problem with a Dirty Machine
You pull a shot that looks right. Good crema, decent timing, no obvious mistake. Then the taste is bitter, dull, or faintly dirty, like the machine dragged old coffee into the cup with your fresh dose.
I see this a lot.
The machine usually gives warning signs before it gives up. A semi-auto starts tasting harsh even with beans you trust. A super-auto loses clarity and gets a heavy, stale edge. A Breville may still brew on schedule, but the group head, basket, steam wand, and water path can all hold residue that changes flavor long before anything breaks.

What dirty residue does
Dirty machines cause different problems in different places, and that matters when you choose a cleaning routine.
- Old coffee oils turn rancid and leave a bitter, ashy finish.
- Milk residue dries fast, blocks steam tips, and throws off milk texture.
- Scale buildup restricts water flow, weakens steam, and can push brew temperatures out of line.
The trade-off is simple. Coffee oils need detergent. Scale needs descaler. Milk needs fast daily cleaning before it hardens. One product will not do all three jobs well, no matter what the packaging says.
Machine type changes the job too. Semi-automatic machines hide grime around the group head and need regular backflushing if they have a three-way solenoid. Super-automatics clean some internal parts on their own, but owners still need to deal with brew unit residue, milk systems, and scale. Breville machines sit in the middle. They are user-friendly, but they still punish lazy cleaning with sour shots, weak steam, and sticky baskets.
If you want to buy quality espresso roast, do it. Fresh beans help. They will not cover up a dirty brew path.
Why a cleaning kit matters
A good espresso machine cleaning kit gives each mess its own fix. That saves time, but its primary benefit is preventing the common mistake of using the wrong cleaner in the wrong place.
I have seen people descale a machine that needed detergent, then wonder why the espresso still tastes bad. I have also seen owners scrub milk crust off a steam wand while the underlying problem was scale choking steam power inside the boiler or thermoblock. The kit matters because espresso machines get dirty in layers, and each layer needs a different tool.
Clean first. Diagnose second. That rule saves a lot of wasted beans and bad shots.
Decoding Your Espresso Machine Cleaning Kit
A cleaning kit looks simple until you realize each piece solves a different problem. That's where many product pages fall short. They show a bundle, but they don't explain what each tool does, what it should touch, and what it should never touch.
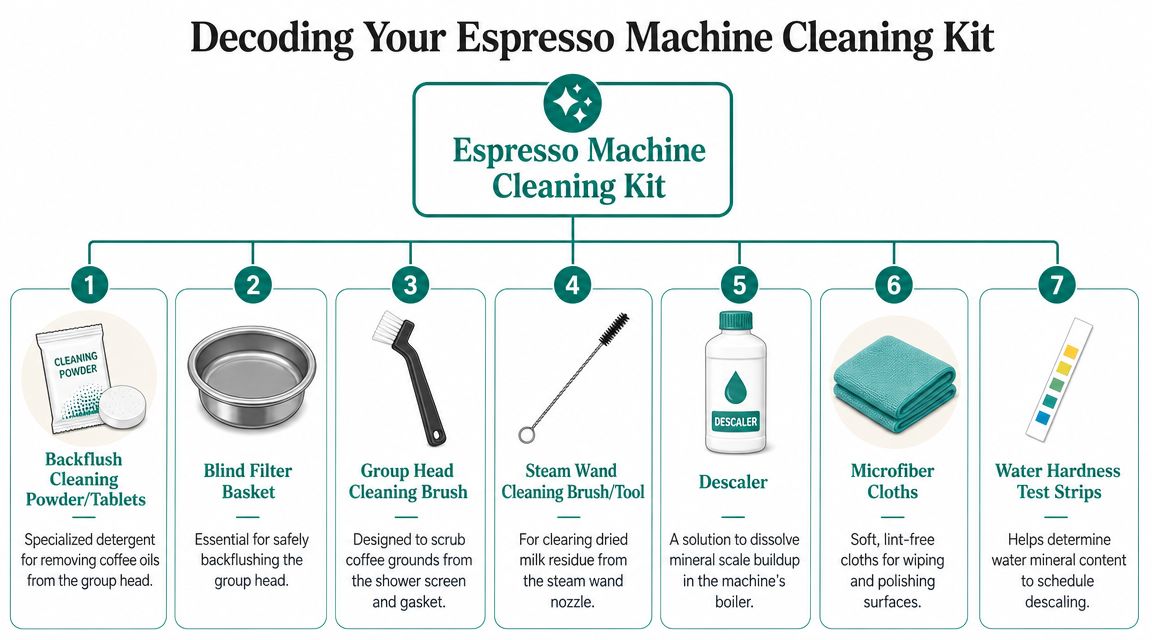
The parts that earn their place
Start with the basics.
- Blind filter basket. This is the part that lets you backflush a semi-automatic machine. It blocks the outlet so pressure pushes water and detergent back through the group head.
- Cleaning powder or tablets. These dissolve coffee oils that hot water alone won't remove.
- Group head brush. This scrubs the shower screen, gasket area, and the grime that sits just out of sight.
- Steam wand tool or brush. This clears dried milk from the steam tip and helps keep the wand flowing cleanly.
- Descaler. This is separate from backflush detergent. It targets mineral scale, not coffee oils.
- Microfiber cloths. These wipe surfaces without scratching.
- Water hardness strips. These help you decide how aggressive your descaling schedule needs to be.
Many machine owners assume one bundle covers everything. It often doesn't. Independent guidance notes that many cleaning guides give little machine-specific direction about which parts are safe to clean, or whether a kit is enough without a separate descaling product. That gap matters because people end up using the right chemical on the wrong problem. That point is discussed in this machine-specific cleaning guidance video.
A generic kit is like a bucket of random boat brushes. It may contain useful tools, but unless you know what each one is for, you'll either miss key areas or damage something that didn't need harsh treatment.
That same logic shows up outside coffee too. If you've ever looked through a guide to essential boat cleaning supplies, you've seen the same principle. Different surfaces need different tools, and one all-purpose item rarely handles everything well.
What many kits leave out
The weak point in many espresso machine cleaning kit listings is compatibility.
Some machines support backflushing. Some don't. Some need tablets for an automatic cycle. Some need a powder detergent and a blind basket. Some owners also need a separate grinder cleaner, because a shiny group head won't fix stale grounds packed into the grinder path.
Abrasive tools are another bad idea. They can scratch finishes, baskets, or exposed parts. Scratches hold onto grime. Then cleaning gets harder, not easier.
Your Step by Step Guide to Backflushing and Cleaning
Backflushing sounds technical, but it's straightforward once you know the rhythm. The main thing is using the right process for your machine type. A semi-automatic machine and a super-automatic machine don't want the same treatment.
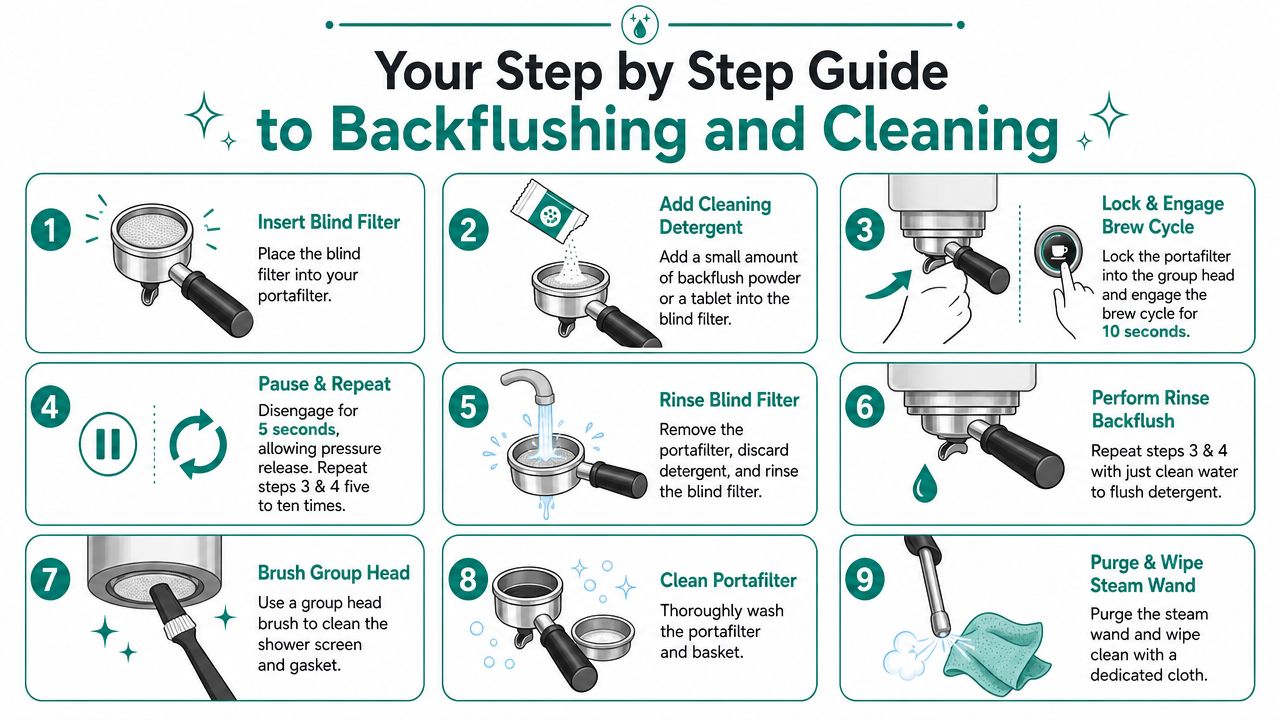
Semi-automatic and Breville machines
If your machine uses a portafilter and supports backflushing, this is the core job your espresso machine cleaning kit needs to handle.
For effective backflushing, published cleaning guidance recommends adding about 1/4 to 1/2 teaspoon of detergent to a blind basket, running the pump for 10 seconds, and repeating that cycle five more times before doing a final plain-water flush. The same guide also recommends soaking the portafilter, basket, and steam tip in hot detergent solution for about 30 minutes, then brushing the group head, shower screen, and gasket. That full workflow is laid out in Pro Coffee Gear's espresso machine cleaning guide.
Here's the practical version.
- Insert the blind basket into the portafilter.
- Add the detergent in the recommended amount.
- Lock in the portafilter and run the pump for the timed cycle.
- Stop the pump so pressure releases.
- Repeat the cycle until the detergent has done its work.
- Dump and rinse the basket thoroughly.
- Run water-only backflush cycles to clear detergent from the system.
- Brush the group head and gasket while everything is still loosened up.
- Pull a test shot and discard it.
Under-rinsing is one of the easiest ways to ruin the next espresso. If detergent stays in the brew path, you'll taste it.
Breville owners should pay attention to machine-specific instructions because basket style, cleaning prompts, and access points vary by model. This guide on cleaning a Breville espresso machine is useful when you want model-aware direction instead of generic advice.
A lot of people also scrub espresso gear too aggressively. The same way you need the right method to clean non-stick pans properly, you need the right brush and the right pressure on espresso parts. Hard scrubbing with the wrong tool can do more harm than the residue you're trying to remove.
Later in the process, this walkthrough may help if you want to see the sequence in action.
Super-automatic machines
Super-automatics clean differently. Many use a programmed cleaning cycle, and that cycle usually expects a tablet, not a scoop of loose detergent thrown into random places.
The mistake I see most often is owners trying to force semi-auto habits onto a super-auto. Don't do that. Use the machine's cleaning program, follow the prompt sequence, and use the cleaner format the manufacturer expects. If the machine has a milk system, clean that path separately and promptly. Milk doesn't forgive procrastination.
What to clean besides the group head
A proper routine covers more than the brew switch and portafilter.
- Portafilter and baskets need soaking and rinsing.
- Steam wand exterior needs wiping immediately after use.
- Steam tip openings need clearing before residue hardens.
- Drip tray and waste areas need regular cleaning because old coffee water smells fast.
- Grinder area needs periodic attention too, especially when shots start tasting stale even after brew-path cleaning.
One option in this category is a PureHQ cleaning brush or compatible cleaning consumable, which can fit into a broader home coffee maintenance setup along with descaling and filter supplies. That only helps if you pair the tool with the right routine.
How to Descale Your Machine for Peak Performance
Backflushing removes coffee residue. Descaling removes mineral buildup. They are not the same job, and one won't replace the other.
Scale is the quiet troublemaker inside espresso machines. It forms in the water path, coats internal surfaces, and can reduce stable performance over time. If your steam weakens, your water flow slows, or the machine starts acting inconsistent, scale belongs on the suspect list.
What proper descaling includes
A full descale needs to travel through the whole system. If your machine has separate brew and steam circuits, both need attention.
One maintenance guide advises running descaling solution through both the brew circuit and the steam circuit, allowing a 15 to 20 minute dwell time, and then flushing the system with at least two full tanks of fresh water to remove chemical residue. It also notes that dual-boiler machines can end up incompletely descaled if one side gets attention and the other doesn't. That process is outlined in Meraki Tech's guide on how to clean an espresso machine.
If a machine has two separate paths, clean both paths. A half-descale is just delayed maintenance.
A sane way to approach it
Use the machine's instructions first. Then apply common sense.
- Mix the descaler as directed by the product
- Run part of the solution through the brew side
- Run the rest through the steam side if your machine has one
- Let it sit for the recommended dwell time
- Rinse with plenty of fresh water
- Taste and smell the rinse water if needed before brewing again
If you're unsure about the order for your model, this guide on how to descale an espresso machine gives a helpful overview.
Filtered water also reduces how often you need to descale. That doesn't remove the need for descaling forever, but it usually makes maintenance more manageable and more predictable.
PureHQ Cleaning Kits vs Standard Alternatives
A premium kit doesn't matter if it only adds fancy packaging. It matters if the tools are appropriate, the fit is reliable, and the chemistry matches the job.
The biggest buyer objection is usually price. Fair enough. A cheap kit looks smarter until a poor-fitting blind basket leaks pressure, a flimsy brush sheds bristles, or the detergent leaves you wondering whether the next shot will taste like coffee or cleaner.
While interest in biodegradable cleaners is growing, buyer questions remain practical. People want to know whether plant-based formulas remove oils as effectively as conventional detergents and whether they leave residue that affects taste. That concern is raised in this discussion of biodegradable cleaner tradeoffs. Marketing language doesn't answer that by itself.
PureHQ Complete Cleaning Kit vs Generic Alternative
| Feature | PureHQ Kit | Generic Kit |
|---|---|---|
| Tool selection | Curated around routine machine maintenance and related coffee equipment care | Often bundled broadly with limited explanation |
| Compatibility guidance | Better choice when you want brand-specific support materials nearby, including water care content like this guide to the best water filter for an espresso machine | Often sold as “universal” with little detail on machine fit |
| Detergent and descaling approach | More likely to be paired with matching maintenance products from the same seller ecosystem | Often unclear whether descaler is included or separate |
| Brush quality and finish safety | Usually a safer bet when the seller specializes in coffee accessories | Varies widely |
| Value over time | Better for owners who want repeatable maintenance rather than one-off cleanup | Better for bargain hunting, but quality can be inconsistent |
When generic is fine and when it isn't
Generic works when the item is simple and the fit is obvious, like microfiber cloths.
Generic becomes risky when the part has to seal properly, contact food surfaces safely, or match a machine's cleaning method. That includes blind baskets, detergent formats, and anything tied to a model-specific cleaning cycle.
Your Cleaning Schedule and Final Checks
Monday morning shot, same beans, same grind, and the cup still tastes flat or oddly bitter. A lot of the time, the problem is not your recipe. It is yesterday's oils, old milk residue, or scale starting to interfere with heat and flow.
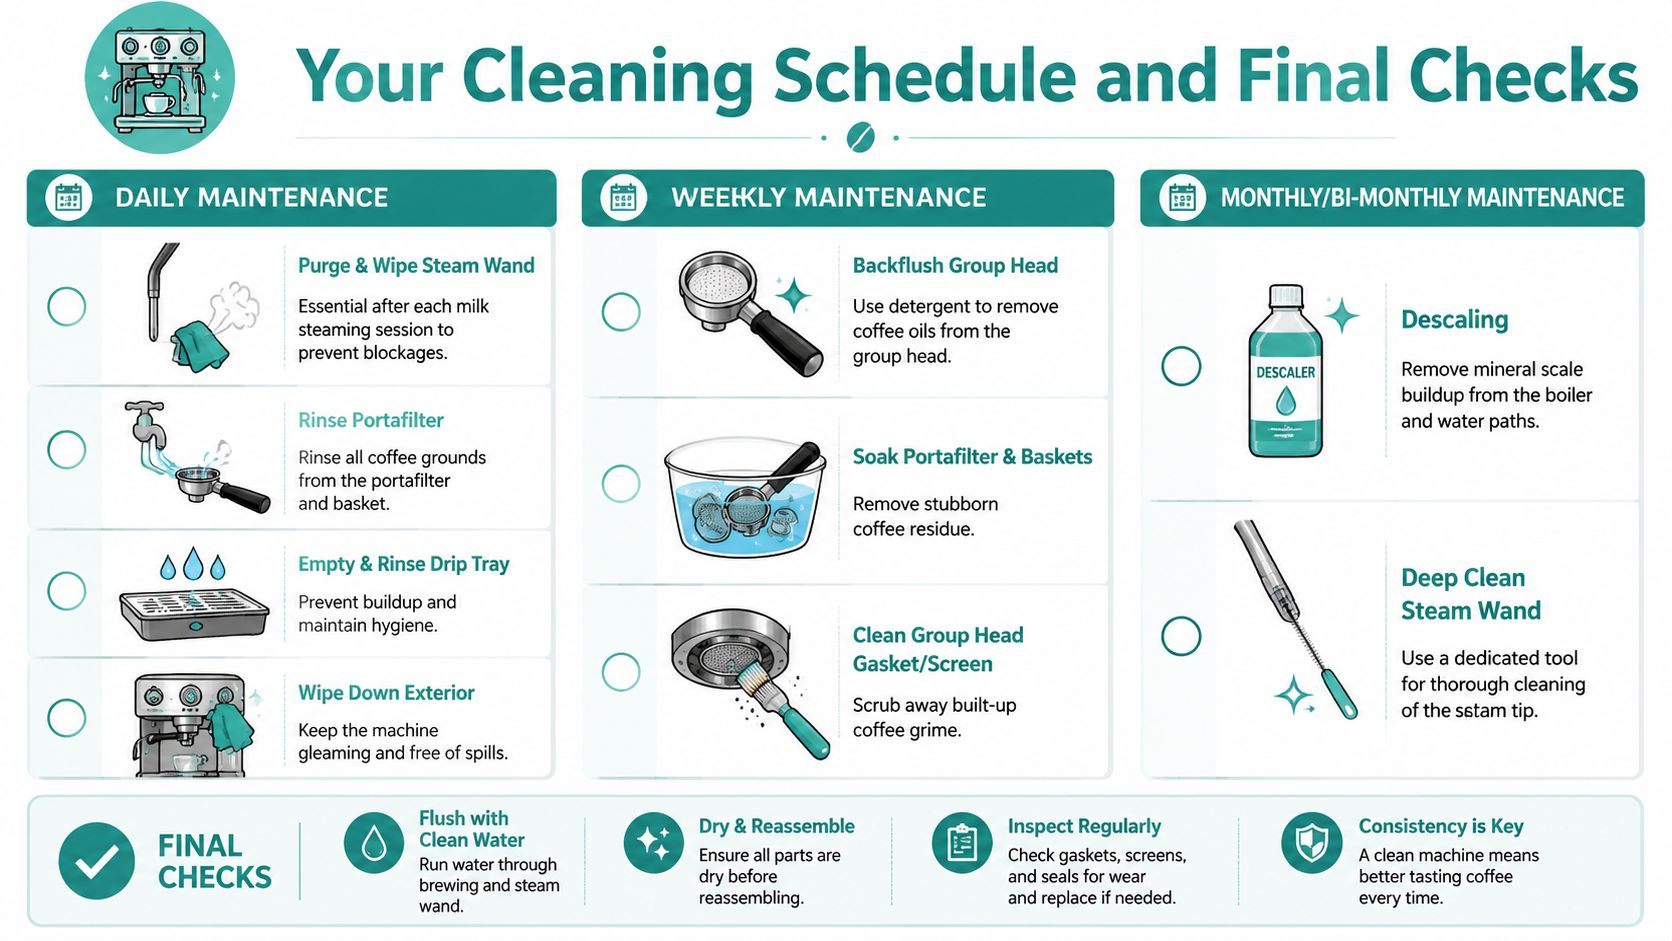
The routine that keeps machines honest
Good maintenance is less about heroic deep cleans and more about keeping residue from building up in the first place. The schedule should match the machine you own and the water you feed it.
Semi-automatic machines need the most hands-on attention. After each session, purge the group briefly, wipe and purge the steam wand, rinse the basket and portafilter, and empty the drip tray if needed. Every week or two, pull the shower screen if your machine makes that easy and check the gasket area for coffee paste. Use detergent backflushes on a regular schedule if the machine has a three-way solenoid and supports blind-basket cleaning.
Super-automatic machines are different. They usually handle some rinsing on their own, but that does not mean they stay clean by magic. Empty and rinse the dreg bin and drip tray often, clean the milk system exactly when the machine asks for it, and do not skip brew unit cleaning if the brew group is removable. A super-auto saves labor during drink making, but it asks for more discipline with prompts and milk-path cleaning.
Breville owners need to pay attention to the machine's alerts without treating them as the whole job. The clean-me light is a prompt, not a full maintenance plan. Keep up with daily wiping and purging, run the cleaning cycle when called for, and descale based on your water, not wishful thinking. Breville machines are convenient, but their smaller passages can show neglect pretty fast.
A practical baseline works like this:
- After each session: purge brew water, wipe the wand, purge the wand, rinse the portafilter or brew parts, and clear obvious waste.
- Weekly: inspect the shower screen, basket, gasket area, and steam tip for buildup.
- Every few weeks: run a detergent backflush on machines designed for it.
- As needed for your water and machine type: descale or use the maker's descaling cycle.
- About once a year: replace wear parts such as the group gasket, shower screen, or other seals your machine uses.
Cleaning agents matter here too. Powder detergent is usually the better choice for backflushing and removing coffee oils. Liquid milk cleaners work better in steam wands and milk circuits. Descaler is for mineral buildup only. People get into trouble when they expect one product to do every job.
Final checks before you blame the beans
Before changing grinders, beans, or brew ratios, do a fast reality check.
- Smell the empty portafilter: stale or rancid smell means old oils are still present.
- Watch the steam wand flow: sputtering or uneven steam often points to residue in the tip.
- Taste and smell the rinse water: any chemical smell means the machine needs more flushing.
- Look at the shower screen and gasket area: dark paste around the group is old coffee, not harmless staining.
- Check your water plan: filtered water cuts scale problems, but very soft or poorly balanced water can create its own issues.
A clean machine does not guarantee a perfect shot. It gives your coffee a fair test. Shop PureHQ Inc. if you need espresso cleaning supplies, descaling support, or water-care accessories that fit the way you maintain your machine.
