Coffee Machine Care
Coffee Machine Performance Restoration: A Complete Guide

Jun
Your coffee maker usually doesn't fail all at once. It slips. The brew gets thinner. The temperature drifts. The machine starts sounding strained, or it dribbles instead of pouring. It's commonly called “breaking,” but in the shop I treat it differently. I treat it as lost performance.
That shift matters because the fix changes with the symptom. A weak cup can come from scale, old coffee oils, a clogged outlet, bad water flow, or simple user misdiagnosis. If you jump straight to descaling every time, you waste effort and sometimes miss the actual fault. If you replace parts too early, you spend money and still get bad coffee.
Good performance restoration starts with one question. What exactly changed?
That First Sip Is Supposed to Be the Best Part of Your Day
You fill the reservoir, press brew, and wait for the familiar sound. Instead, the machine sputters. Coffee comes out in a hesitant stream, or worse, it tastes flat and lukewarm. On a rushed morning, that feels bigger than it should. The cup is bad, your routine is off, and now you're wondering if the machine is finished.
Most of the time, it isn't finished. It's dirty internally, restricted somewhere in the water path, or losing heat transfer because minerals and oils have built up where you can't see them. That's why I prefer the phrase performance restoration over “repair” for many home machines. The machine often still works. It just isn't working well.
What a tired machine usually feels like
A declining coffee machine tends to show itself through experience first, not through an obvious broken part.
- Brew quality slips: Coffee tastes weak, hollow, or oddly bitter.
- Flow changes: The stream pulses, slows down, or stops and starts.
- Heat gets inconsistent: One cup is acceptable, the next is barely hot.
- Noise increases: Pumps sound harsher when they push against restriction.
A coffee machine rarely asks for help politely. It usually complains through taste, temperature, and flow.
That matters because a machine that still powers on gives you a chance to restore it before the problem hardens into something more expensive. A clogged needle is not the same problem as scale inside a heating path. A dirty brew group is not the same as a failing pump. You get better results when you stop treating every bad cup like the same fault.
Why this is worth fixing properly
Home brewers often replace a machine after a run of disappointing cups because they assume “old” means “done.” In practice, plenty of machines can come back with the right sequence of cleaning, descaling, flushing, and inspection.
What works is targeted effort. What doesn't work is panic-cleaning everything without a diagnosis, or running descale solution through a machine that really has a clog in one small spot. If you want your mornings back, start with the symptom. The fix follows from there.
Why Your Coffee Machine Is Quietly Declining
Coffee machines live between two constant contaminants. Water leaves minerals behind. Coffee leaves oils behind. Those deposits don't stay harmless for long.
Hard water scale builds on heating surfaces and inside narrow water passages. Coffee oils cling to baskets, needles, brew paths, and valves. Together they reduce flow, interfere with heat transfer, and make extraction erratic. The machine still “runs,” but the cup tells you it isn't healthy.
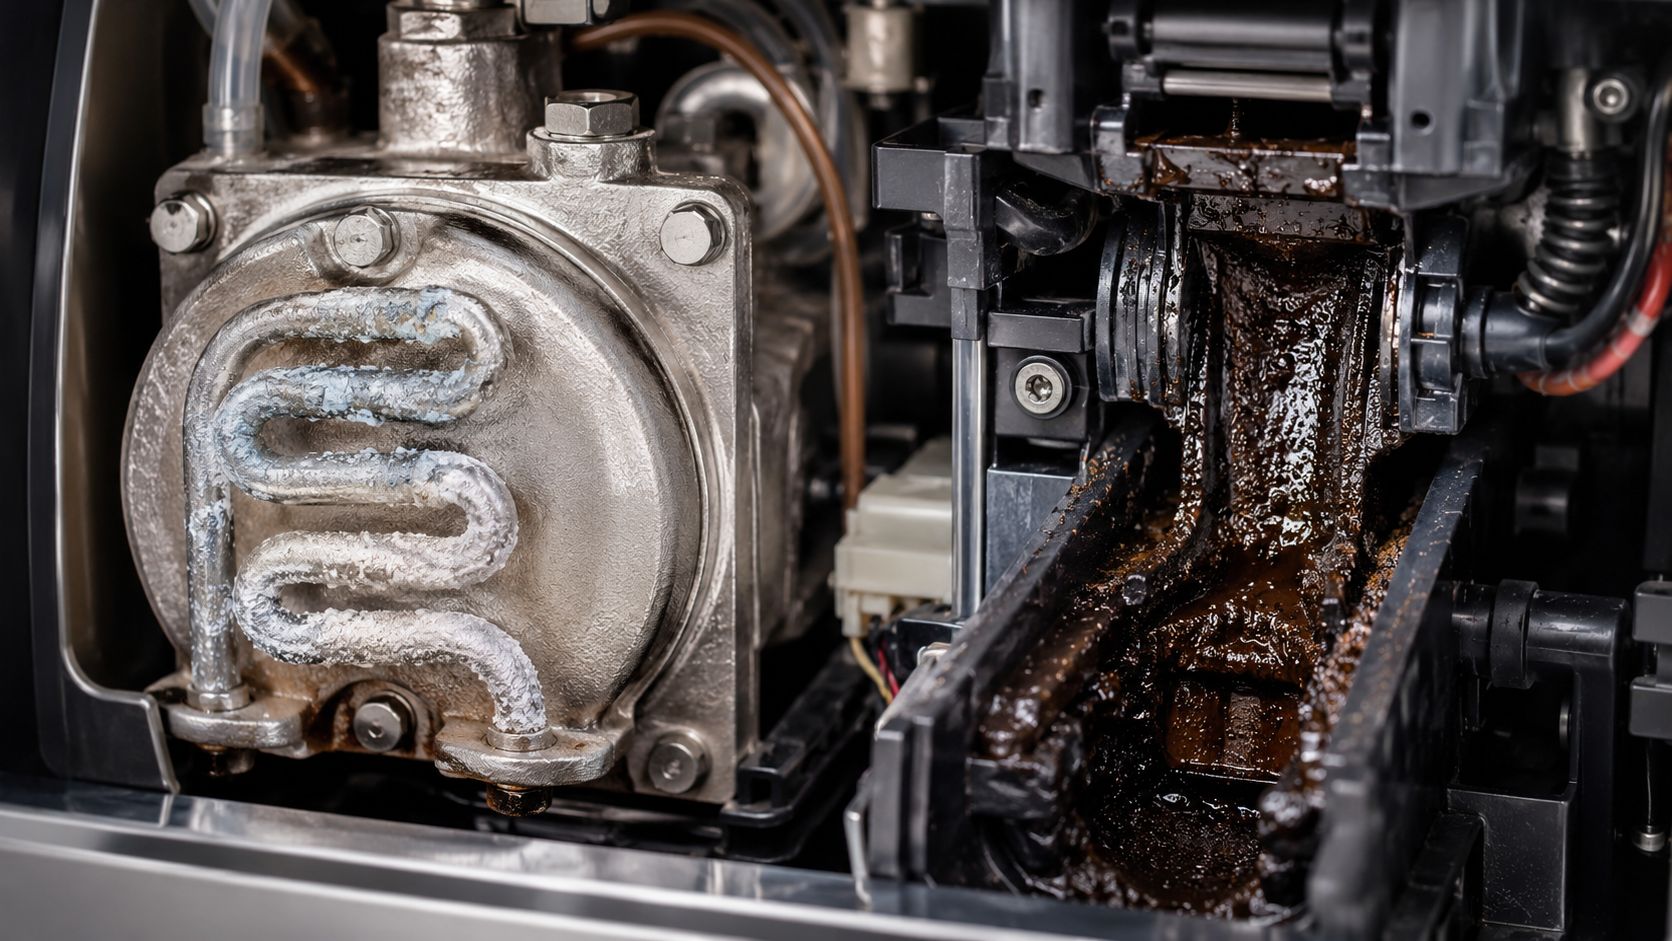
Scale doesn't need much room to cause trouble
In small appliances, the vulnerable spots are usually tight ones. A little mineral buildup in a narrow line, a valve, or a heating channel can change brew behavior fast. You see the symptom at the cup. The actual restriction may be deep inside the machine.
That's why “it still turns on” isn't a meaningful health check. Machines can run for a long time while performing badly. By the time the owner decides to act, the internal condition is often worse than expected.
Practical rule: If flow and temperature both get worse, don't assume age. Assume buildup until inspection proves otherwise.
Waiting for failure is the expensive approach
The biggest mistake I see is waiting until the machine is nearly unusable. Once that happens, the odds of a perfect comeback drop. A ScienceDirect paper on repair outcomes for coffee machines reports a 50–55% repair success rate, which means nearly half of attempted repairs fail to restore full performance.
That number should change how you think about maintenance. If you ignore decline until the machine reaches the repair bench, you may already be past the easy stage. Scale can become severe. Heating problems can compound. Flow restrictions can mask deeper wear.
The hidden cycle that ruins otherwise decent machines
Here's the usual pattern:
- Water quality starts the problem: Minerals settle where water heats and slows.
- Residue adds a second layer: Coffee oils trap debris and foul taste.
- Performance symptoms appear: Slow brewing, weak extraction, strange noises.
- The owner guesses: Random cleaning, maybe a descale, maybe nothing.
- The machine degrades further: Restriction and heat instability keep stacking.
This is why I push prevention hard. A domestic machine often gets discarded as “worn out” when it has really been neglected into poor performance. Restoration is still possible in many cases, but it gets less predictable the longer scale and residue stay in place.
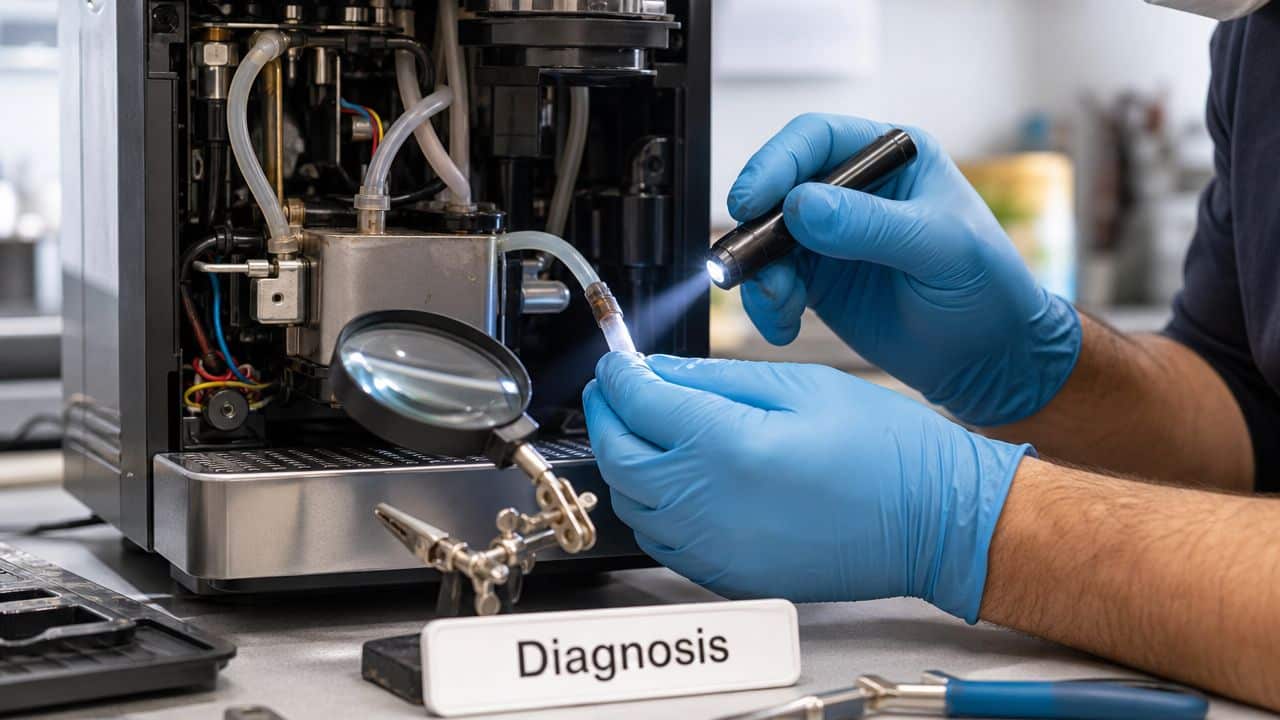
Diagnosing the Problem Like a Pro
The best restoration work starts before you open a cleaner or descale bottle. You need to separate one symptom from another. Differential diagnosis sounds technical, but the idea is simple. Match the behavior you see to the most likely cause before you start fixing anything.
That matters because a 2025 National Coffee Association study discussed in an expert troubleshooting video reports that 68% of home espresso machine failures are misdiagnosed by users, leading to unnecessary part replacements. Good restoration begins with pressure, extraction, and heating diagnosis, not guesswork.
Match the symptom before you choose the fix
If the machine brews slowly but the coffee is still reasonably hot, I suspect a restriction first. If the brew volume is normal but the cup is lukewarm, I lean toward heat-transfer loss or temperature control issues. If flavor swings from sharp to dull without any recipe change, the problem may be uneven flow or unstable brewing conditions.
A good quick check is to compare three things:
- Flow behavior: steady stream, pulsing stream, drips, or partial cup
- Heat behavior: normal, inconsistent, or clearly underheating
- Taste behavior: weak, bitter, sour, or muddy
If you want a deeper understanding of how brewing consistency affects the cup, this short guide on coffee machine temperature stability is worth reading alongside your troubleshooting.
Brand-specific patterns I watch for
Different machines tend to misbehave in different ways.
| Machine type | Symptom | Likely first suspect |
|---|---|---|
| Keurig | Partial cup or slow drip | Needle clog or outlet obstruction |
| Ninja DualBrew | Weak brew or odd flow | Residue buildup in brew path or water delivery |
| Breville espresso machine | Poor extraction or unstable shots | Scale, gasket wear, or restricted water path |
Keurig owners often overcomplicate a simple clog. Ninja users sometimes treat flavor loss as a coffee issue when the machine really needs cleaning. Breville owners can mistake pressure problems for bean problems and keep adjusting grind when the machine itself needs attention.
Don't diagnose with hope. Diagnose with sequence. Check flow, then heat, then residue, then parts.
A quick triage you can do at home
Use this order before you commit to a full teardown or replacement part:
- Start with visible exits: Needles, shower screens, pod puncture points, and outlet spouts clog first.
- Check the brew pattern: A machine that drips or stalls usually has a blockage before it has a catastrophic internal failure.
- Taste the output critically: Flat and dirty flavors often point to old oils long before they point to a failed component.
- Listen to the machine: A strained pump tells a different story than a silent heater.
You don't need to become a technician overnight. You do need to stop treating every symptom like “time to descale” or “time to replace the machine.”
Your Step by Step Restoration Process
Once you've identified the most likely type of problem, the work gets simpler. Clean what is dirty. Descale where scale is likely. Flush thoroughly. Then verify with a test brew.

Start cold and empty
Unplug the machine first and let it cool. Remove pods, loose grounds, beans, the water reservoir, drip tray, and any removable brew parts. If you're working on an espresso machine, remove the portafilter and basket. If you're working on a pod machine, clear the pod holder area completely.
This isn't just a safety habit. It also keeps old coffee debris from washing back into the system while you clean.
Clean external brew-contact parts first
Wash the parts that regularly touch coffee. That includes baskets, pod holders, drip trays, carafes, portafilters, and removable shower screens if your machine allows access. Use warm water and a cleaner appropriate for coffee oils.
If these parts stay dirty, the machine can taste bad even after a successful descale. That's one reason people think descaling “didn't work” when residue is the problem.
If the cup still tastes stale after cleaning internals, inspect every part that physically touches brewed coffee. Old oils can survive where scale never existed.
A short visual walkthrough can help if you want to compare your process to a standard cleaning routine.
Clear clogs before you descale
This is the step many people skip. If the machine has a localized clog, descale solution may not solve it because the liquid can't move properly through the blocked point.
For Keurig 2.0 brewers, a repair video on partial cups and slow dripping identifies clogged needles as a primary cause. The fix is straightforward. Unplug the machine, remove the reservoir, and use a straightened paperclip to clear both the top entrance and bottom exit needles.
For other machines, the equivalent check is the outlet path. Inspect shower screens, puncture points, and narrow discharge holes. If you see packed grounds or oily residue, remove that first.
Run a proper descale, not a half attempt
Now descale the machine according to the machine type and the descaling product directions. Single-serve brewers usually need repeated brew cycles. Espresso and drip machines may have a dedicated descale mode or require manual cycling and soaking.
Keurig states that descaling every 3–6 months helps maintain the heating element and internal water-contact parts, which helps prevent slow or incomplete brews caused by mineral buildup. That interval is a solid baseline if your water tends to leave scale.
If you want a fuller maintenance routine with machine-specific examples, this guide on how to clean a coffee maker is a useful companion.
Rinse until the machine tastes like water again
Descaling isn't finished when the machine stops smelling acidic. It's finished when repeated fresh-water cycles remove residual solution and the brew path runs clean. This matters for taste and for internal component protection.
After rinsing, brew water only. Smell it. Taste it. Watch the stream. You're looking for three signs of a successful restoration:
- Flow returns to normal
- Output temperature stabilizes
- Taste loses the chemical or stale note
If one of those is still off, go back to diagnosis. Don't assume another descale will solve every remaining symptom.
Choosing Your Maintenance Arsenal Wisely
Restoration brings a machine back. Maintenance keeps it there. The accessories you use matter more than people think, especially when the goal is to reduce scale, keep brew paths clean, and avoid the small fit problems that create leaks and frustration.
That issue shows up constantly with off-brand accessories. The common objection is simple: “A generic part is cheaper, so why pay more?” Fair question. The answer is that compatibility problems don't always announce themselves immediately. A filter that fits loosely, a reusable pod with poor sealing, or a weak basket can create inconsistent brewing long before it obviously fails.
Lifespan starts with water and routine
A machine's life is tied closely to how well you control buildup. Bean Around Town notes that commercial coffee machines can last 5 to 15 years with rigorous maintenance, while domestic models typically last 3 to 5 years. The same source points to poor maintenance, especially failure to prevent hard-water mineral deposits, as a major reason home machines fall short.
That's why I look at accessories as maintenance tools, not add-ons. Water filtration reduces the mineral load before it becomes internal scale. Reusable pods and baskets that fit correctly reduce mess, improve flow consistency, and make cleanup less annoying, which means people do maintain the machine.
PureHQ Premium vs. Generic Accessories
| Feature | PureHQ Accessories | Standard/Generic Alternatives |
|---|---|---|
| Fit and compatibility | Built for specific Keurig, Ninja, and related use cases | Fit can vary, which may affect sealing or insertion |
| Material consistency | Designed for repeated use and regular cleaning | Build quality can be inconsistent |
| Cleaning experience | Easier to keep on a routine when parts are designed for coffee use | Rough edges, awkward shapes, or poor mesh can hold residue |
| Water management | Filtration-focused options help reduce mineral burden in the machine | Some alternatives prioritize low cost over filtration quality |
| Long-term maintenance value | Supports a prevention-first routine | Can solve the immediate need but add variability later |
If you're deciding between replacing accessories or replacing the machine, it also helps to find the best easy-to-clean coffee maker and compare your current setup against designs that are less fussy to maintain.
The objection I hear most often
People worry about leaks, fit, and compatibility with third-party accessories. That concern is valid. A bad aftermarket part can absolutely cause trouble.
What works is choosing accessories from a brand that focuses specifically on compatibility and cleaning routine, then matching the part to your exact brewer model. What doesn't work is buying the cheapest option with a vague “fits most” promise.
For machines that need regular scale control, a dedicated descaler also matters. This guide on the best descaler for a coffee machine is useful if you're weighing universal versus machine-specific cleaning products.
One practical combination makes sense for many homes. Use quality water filters to reduce mineral load from day one, and keep reusable K-Cups or refillable pods in rotation if you want better control over grounds and waste. Those two accessories support both taste and easier upkeep without complicating the routine.
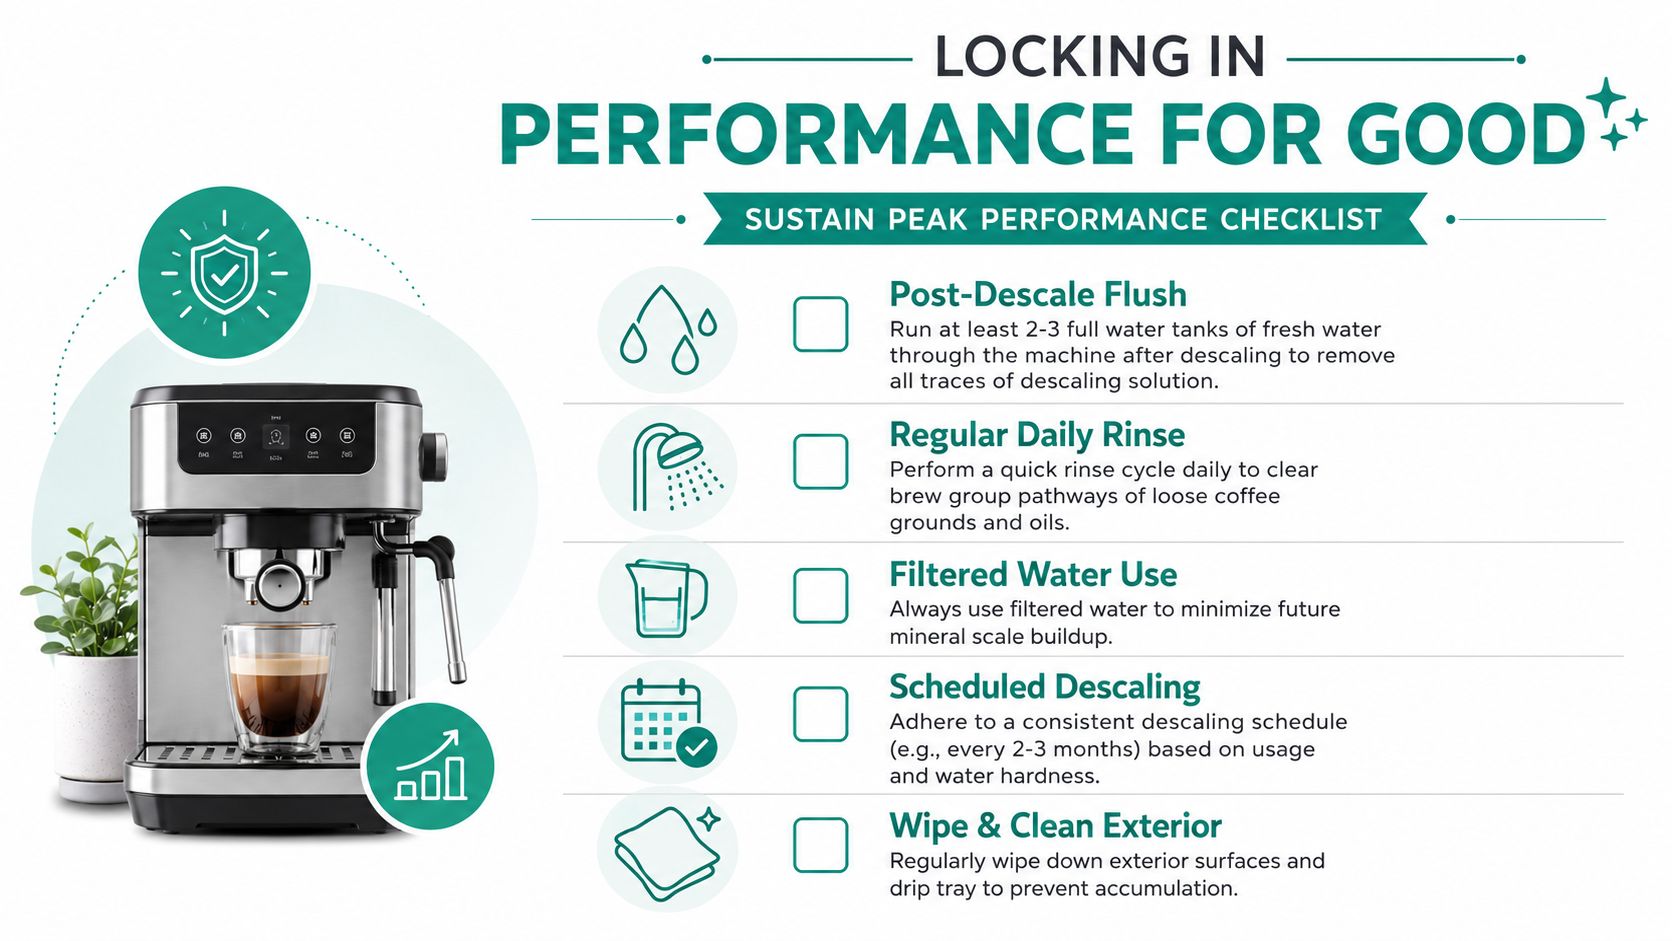
Locking in Performance for Good
A restored machine still needs one final proof. It has to brew clean water cleanly, then make a cup that tastes right. If the first test coffee still has chemical notes, stale flavors, or odd flow, the job isn't done.
The rinse step is where many home users quit too early. For Keurig brewers, PureHQ's Keurig maintenance guide states that you must run at least 12 large-cup brewing cycles with fresh water after descaling to fully flush residual solution from the system and protect taste. That's not excessive. It's what a complete flush looks like.
The maintenance rhythm that actually works
You don't need a complicated spreadsheet. You need a repeatable habit.
- After brewing: Rinse or purge brew-contact areas so loose grounds and fresh oils don't sit.
- Each week: Wash removable parts thoroughly and inspect exits, screens, and pod puncture points.
- On a set schedule: Descale before symptoms become obvious, not after the machine starts struggling.
Clean on schedule, not on frustration. Performance restoration is easier when buildup never gets a head start.
The payoff is simple. Better flow, steadier heat, cleaner flavor, and fewer “maybe it's dying” mornings. Diagnose first, clean with purpose, rinse thoroughly, and keep the routine boring. Boring maintenance makes excellent coffee.
If you want the filters, reusable pods, descalers, and cleaning accessories that make this routine easier to keep, shop PureHQ Inc. and build a maintenance setup that keeps your machine brewing at its best.
