
Coffee Machine Care
Parts of a Coffee Pot: A Complete Guide
Jul
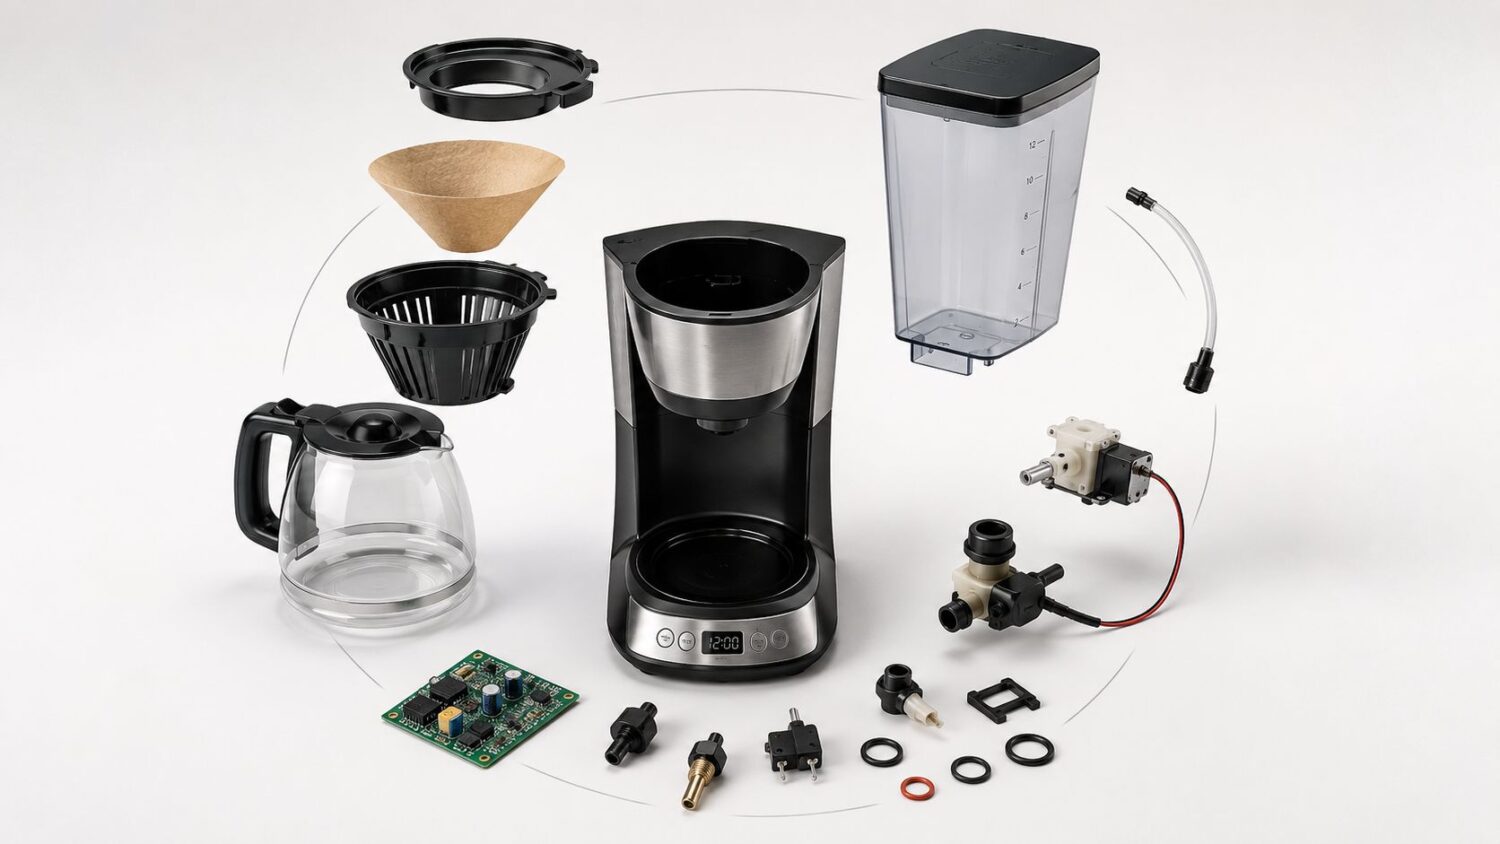
Your coffee tastes off, the machine sounds strained, or a drip forms under the counter, and the first blame usually lands on the beans. In practice, the problem is often a worn gasket, a clogged showerhead, a misaligned brew basket, or a neglected reservoir. Those small parts do the work, and when one of them drifts out of spec, taste, flow, and safety all slip at once.
Understanding the parts of a coffee pot helps you diagnose the actual bottleneck instead of swapping coffee, buying a new machine, or guessing at cleaners that don't match the material. If you're troubleshooting at home, a practical starting point is the troubleshooting advice in Pure HQ's coffee maker guide, which pairs well with a broader maintenance mindset. For a quick framework on the water side of the system, read the Agents.Md page from Just Cook It, then come back to the hardware itself.
Why Your Coffee Maker Might Be Failing You
A machine can look fine and still brew badly. I see this most often when someone says the coffee turned bitter, the cycle slowed down, or the counter stays wet after every run. The beans get blamed first, but the issue is usually mechanical, and the coffee maker is telling you that through taste, sound, or leaks.
The hidden failure point is usually a part, not the whole machine
The common mistake is treating all coffee makers like sealed boxes. They aren't. Water has to move through a reservoir, pass a heating element, spread through a showerhead, and exit through a brew basket or portafilter-style path before it ever reaches the cup. If any one of those parts is dirty, warped, loose, or cracked, extraction changes and the cup follows.
A machine with a clogged path can still “work,” but it works poorly. A basket that doesn't sit flat can channel water unevenly. A gasket that no longer seals can create drips, pressure loss, and cleanup headaches. That's why understanding the visible and hidden parts matters more than buying a stronger roast or a fancier bag of grounds.
Practical rule: if the coffee changed before the beans did, inspect the machine first.
A lot of owners also miss the maintenance bottlenecks because they clean the carafe and call it done. Residue collects where water meets heat and metal, especially around the brew path. That's why a brewed-path mindset pays off. The best troubleshooting habits also make routine care easier, and the PureHQ filter and maintenance overview is useful if you want to connect symptoms to parts without dismantling the whole appliance.
Why part literacy saves money and taste
Knowing the job of each component helps you decide what to clean, what to replace, and what to leave alone. It also keeps you from over-treating one material with the wrong chemical, which can shorten the life of seals, plastics, and glass. A machine that gets the right maintenance on the right component usually tastes better and lasts longer.
That matters because coffee problems stack up. A small leak becomes a stain under the cabinet. A little scale becomes slow brewing. A little residue becomes a bitter cup. Once you can name the part causing the problem, the fix gets much more straightforward.
The Evolution of Coffee Pot Components
Coffee pots did not start out with one fixed shape. They changed as makers tried to solve three practical problems, getting water and grounds to meet in a controlled way, keeping sediment out of the cup, and making heat easier to manage. Early brewing vessels used separate chambers, and later percolators refined the path so boiling water could cycle through the grounds until the drink reached the desired strength. Historical accounts credit Jean Baptiste de Belloy with the first drip coffee pot around 1800, where ground coffee sat in an upper container, brewed liquid collected below, and a cloth filter separated the chambers source.
By 1880, U.S. makers such as Duparquet, Huot & Moneuse Co. were already producing coffee pots with muslin-bottom tops, which shows that filter-and-pot construction had become industrialized in major markets. By 1889, Hanson Goodrich had patented the first true percolator design, using a perforated filter basket and recirculating boiling water through the grounds. That design gave users more consistency, but it also built in the bitter over-extraction problem that later filtration methods were meant to reduce.
Paper filters, glass, and electric heat changed the whole system
The 20th century pushed coffee makers toward cleaner filtration and more repeatable heating. Paper coffee filters were introduced in 1908, and the first drip coffee maker using blotting-paper-style filters appeared that same year, reducing the bitterness that percolators often produced source. That shift also moved the brew basket, filter cone, and drip path into the center of coffee design, because those parts now did the work of keeping grounds out of the cup and water moving evenly through the bed.
In 1915, Corning Glass Works introduced a Pyrex coffee pot marketed as “Flint”, which brought heat-resistant glass into mass-market coffee ware. Then in 1954, the first electric drip coffee maker appeared, moving brewing away from manual heating and toward countertop appliances that could regulate the process more consistently source. Those changes explain why modern coffee makers share the same basic anatomy even when the exterior styling changes. The visible parts, the reservoir, basket, spout, carafe, gasket, and screen, are only half the story. The small pieces hidden inside, the valves, grooves, seals, and mating surfaces, decide whether the machine brews cleanly or starts leaving behind stale residue, leaks, and off flavors.
A lot of the maintenance headaches come from those hidden details. A gasket that loses its shape can let water bypass the brew path, a valve that sticks can slow flow, and narrow grooves can hold old coffee oils long after the carafe looks clean. If you want the cup to stay consistent, the machine needs regular attention to both water quality and those small wear points, which is why guides like PureHQ's water quality advice for coffee makers matter in practice.
The important takeaway is direct. The parts we use today came from a long series of fixes for flow, filtration, and heat. Once you know that history, the present-day failures make more sense. A coffee maker does not just go bad, one of the old engineering problems comes back through a worn seal, a clogged screen, or a scaled valve.
Understanding the Water Path and Brew Chamber
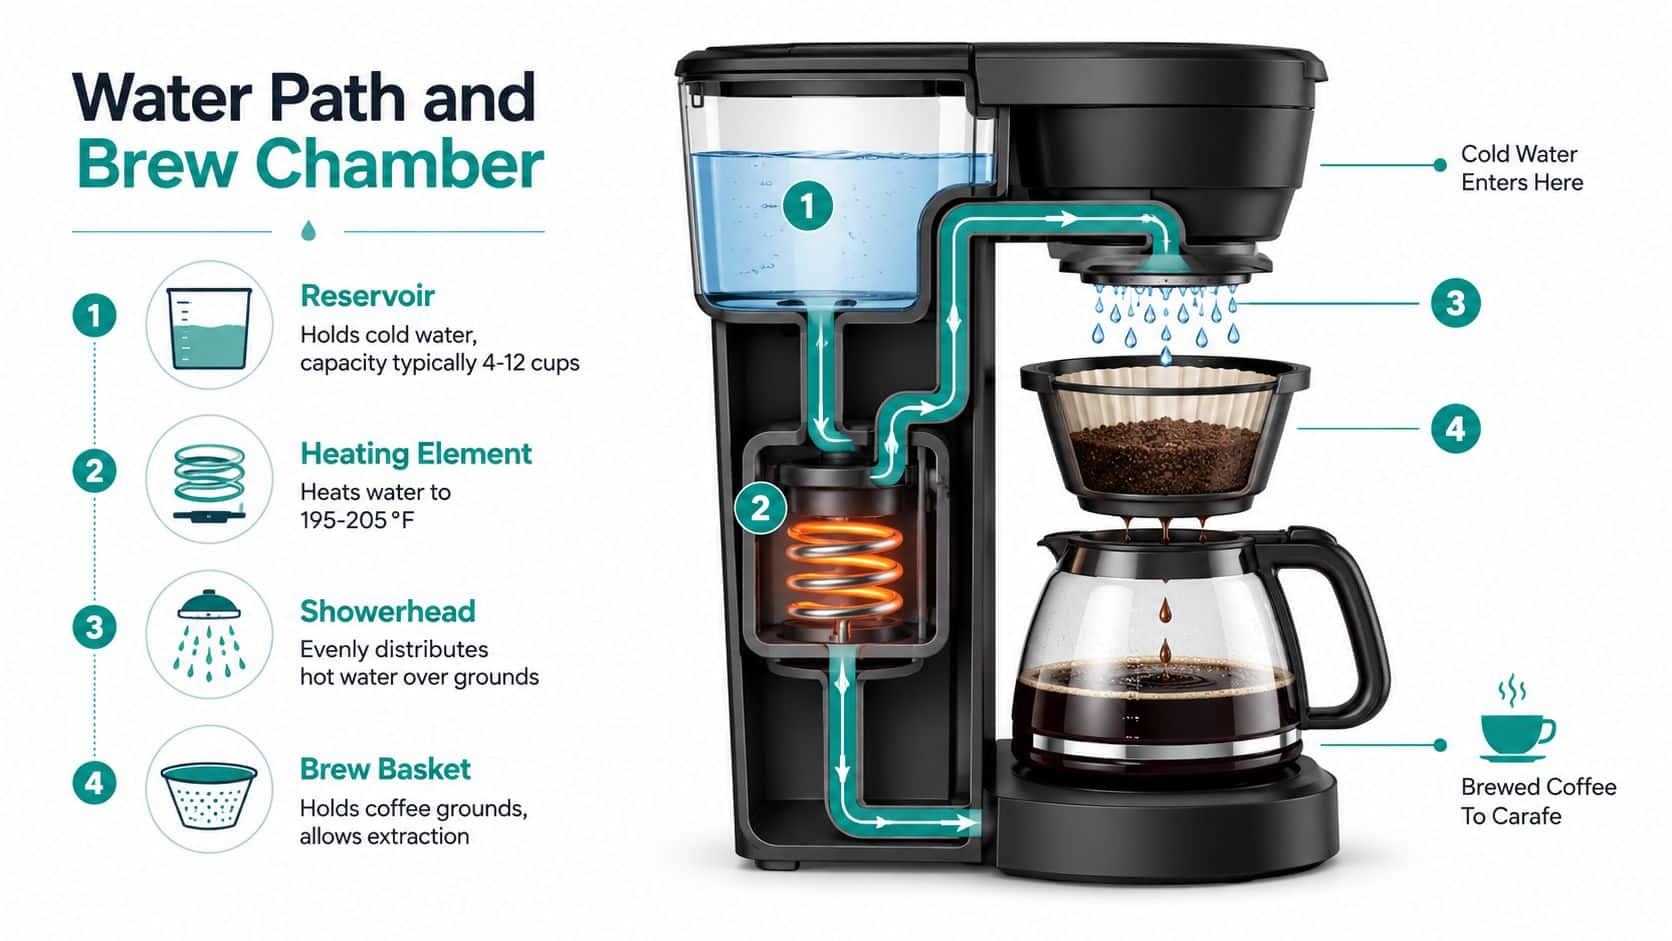
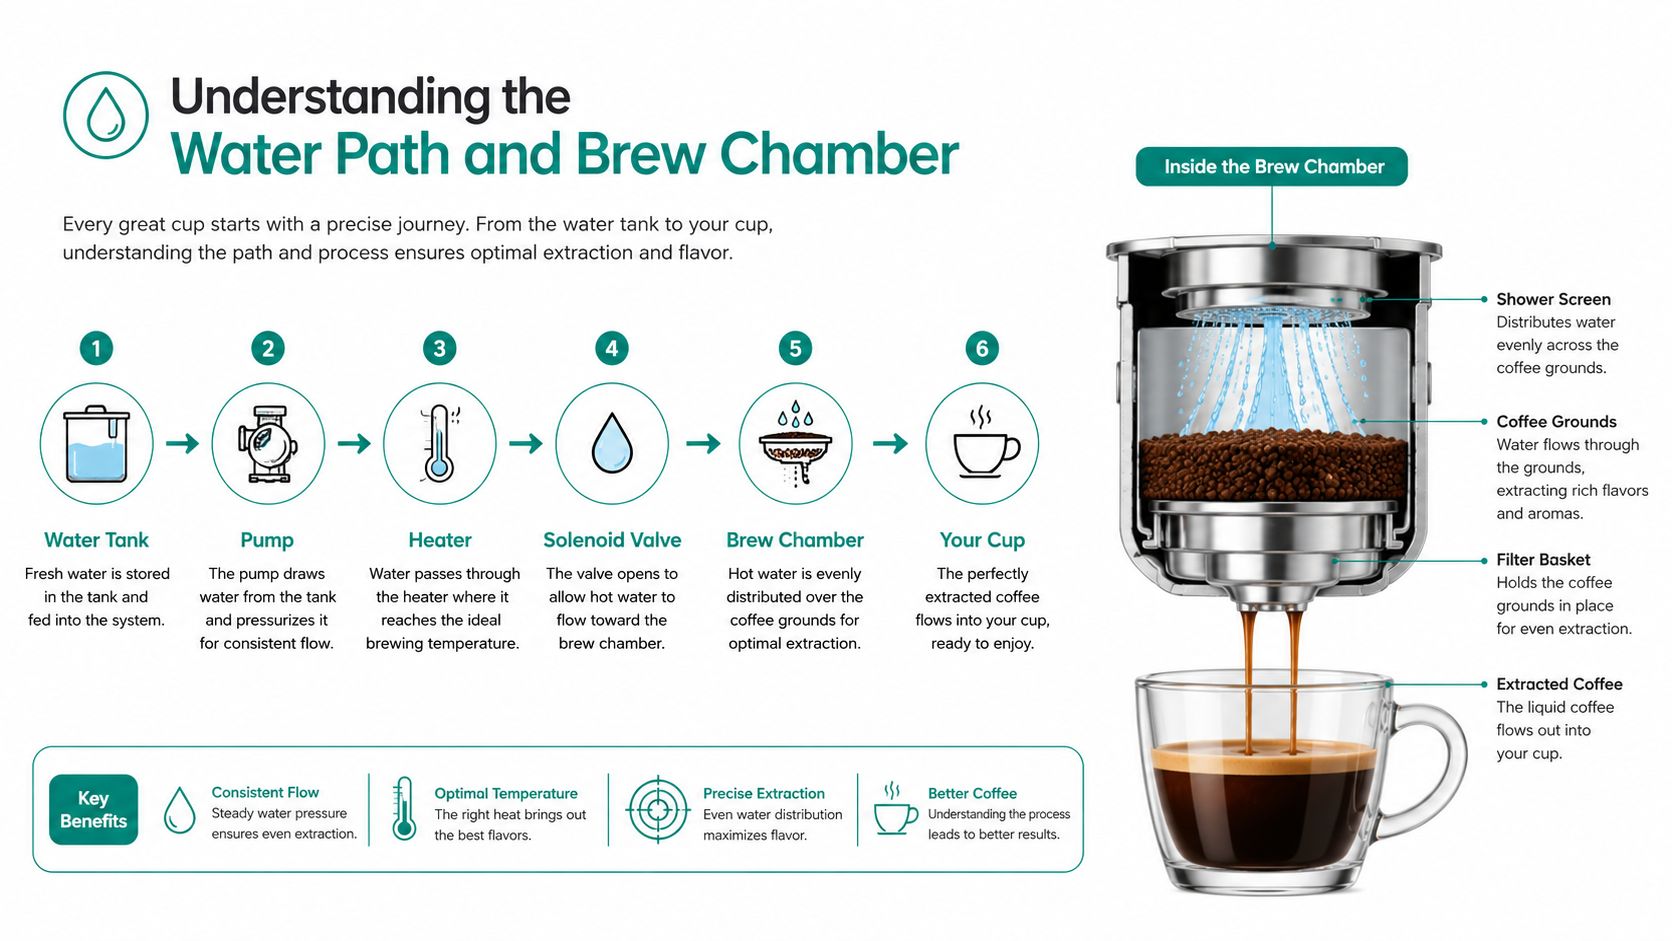
Water flow is the heart of the machine, and it's where most brew problems start. A reservoir feeds water into a heated tube or boiler, the machine raises that water to brewing temperature, and the showerhead or group head spreads it across the grounds source. If that path is uneven, blocked, or loose, the brew goes sideways even when the machine still turns on.
Reservoir, heater, and showerhead work as one system
The reservoir does more than hold water. It sets the starting point for the brew and, when it's left dirty, it becomes a source of stale odors and residue. Independent maintenance guidance says the reservoir should be emptied and rinsed after each use, and that the showerhead and brew basket housing deserve cleaning because they collect residue source. That advice matches what I see in service work, if the water path isn't kept clear, the machine can't deliver a clean cup.
The heating element or boiler matters because water temperature and heat stability affect extraction. For espresso-style machines, commercial setups commonly target brew-water temperatures around 190°F to 205°F (88°C to 96°C) for proper extraction source. That temperature band matters less as a number to memorize and more as a reminder that unstable heat can create sour, weak, or harsh coffee.
The showerhead is the part many people overlook. Its job is to distribute hot water evenly across the coffee bed so the grounds saturate consistently. If it's scaled or misaligned, water channels through one area, leaving part of the bed under-extracted and another part overworked.
Brew basket fit decides whether water behaves
The brew basket is a container, but it also acts like a flow control point. It has to sit squarely, hold the grounds in place, and let water pass at the right rate. A loose fit can create side-channeling, and even a small mismatch can make the cup taste thin or uneven.
A clean path isn't just about flavor, it's about control.
That's where alignment matters. A replacement basket, showerhead, or portafilter-style part that sits off-center can make a machine behave as if it has a brewing flaw, when the issue is fit. If your water quality is inconsistent, the machine can only do so much, and PureHQ's water quality guide is a solid companion when you're trying to separate plumbing problems from brewing problems. Good flow begins with clean water, correct placement, and a basket that properly matches the machine.
Premium vs Generic Parts for Critical Components
A coffee maker can seem fine right up until a small part starts to drift out of spec. A carafe lid is usually forgiving, but a gasket, filter basket, or showerhead controls fit, sealing, and flow, so the cheapest replacement often recreates the problem you were trying to solve.
| Part Type | Premium Features | Generic Risks | Long-Term Value |
|---|---|---|---|
| Filter basket | More consistent fit, steadier flow, better resistance to warping | Uneven extraction, grounds overflow, loose seating | Better brew repeatability and fewer do-overs |
| Gasket | Better sealing, improved heat resistance, less deformation | Leaks, pressure loss, messy cleanup | Helps protect the machine and reduce recurring failures |
| Showerhead | More even distribution, tighter alignment, easier cleaning access | Channeling, weak saturation, clogging | Supports more consistent flavor over time |
| Reusable filter or liner | Better edge fit, easier rinse-out, more predictable drainage | Puck collapse, bypass, compatibility issues | Cleaner brewing path and less waste |
Brew-water temperature also gives you a useful reference point when you are comparing parts and machines. If you want a simple companion resource while choosing replacement parts, find the best temp for coffee helps readers think about heat without treating every brewer like the same device. The right temperature still depends on the brewer, but a better part helps the machine hold the range it was designed to deliver.
The objection is usually about leaks or fit, not price
Generic parts look attractive because they cost less and often match the original part in photos. The problem usually shows up after installation. A basket that does not seat correctly can tilt, a gasket that is too soft can leak, and a showerhead with poor distribution can make the whole brew path inconsistent. Those failures cost time, grounds, and sometimes the machine itself.
Premium parts earn their keep by reducing those annoyances. They are not magic. They hold shape better, align more cleanly, and survive repeated heat and wash cycles with less drift. In a small office or a busy kitchen, that difference shows up fast because the same part gets used over and over.
What I'd prioritize first
If you are deciding where to spend extra, start with the parts that affect sealing and flow. The basket, gasket, and showerhead are the pieces most likely to create visible problems when they are poor quality or worn out. A good carafe is nice, but a stable brew path changes the cup every day.
PureHQ also sells activated charcoal water filter replacements for Cuisinart coffee makers and reusable K-Cups for Keurig Mini Plus machines, which fits the same logic, better filtration and a better seal usually beat a loose, one-size-fits-all shortcut. The accessory has to match the machine and the brew path, or the savings disappear in cleanup and inconsistency.
Small Design Features That Make a Big Difference
The small features inside coffee gear usually get ignored because they don't look important. Grooves, ridges, seals, and valves don't make a machine prettier, but they decide how pressure moves, where water drains, and whether a brewer stays safe. In service work, those are the details that separate a working machine from one that only seems to work.
Grooves and channels guide water, they don't just decorate plastic
On a dripper, grooves create channels that help coffee flow and drain source. That matters because water needs a controlled path, not random pooling against the walls. If the groove pattern is shallow, damaged, or blocked by residue, drainage can slow down and extraction can drift.
The same idea shows up in other brewing parts. Small ridges can help keep a filter from sealing flat against the wall, which gives water room to move. Too much sealing creates stagnation. Too little support lets the filter collapse. The part doesn't need to be dramatic to matter.
Gaskets and valves are safety parts as much as brewing parts
A moka pot has three major chambers, the lower boiler, the filter funnel or basket, and the upper collector, plus a safety valve that helps prevent over-pressurization source. It also relies on a gasket and filter plate to seal the system. That means the parts often overlooked are the ones that keep pressure controlled and keep coffee from spraying where it shouldn't.
A worn gasket can cause leaks and pressure loss. A tired valve can turn brewing into a safety concern. In practical terms, if the pot starts hissing oddly, leaking at the seam, or behaving inconsistently, the gasket and valve deserve attention before the whole pot gets blamed.
Practical rule: if a seal looks flattened, cracked, or glazed, replace it before chasing flavor problems.
A percolator uses a different set of parts, but the same logic applies. The base heats water, the stem carries it upward, the basket holds grounds, and the lid helps retain heat and reduce splashing source. When the stem bends or the basket warps, the cycling action suffers. When the lid no longer fits well, the machine loses heat and makes a mess.
I'd also watch the espresso portafilter assembly, which usually includes the handle, basket holder, and basket, while the group head retains the shower screen and gasket to seal and spread water evenly source. That sealing interface matters because a bad fit can leak before extraction even finishes. Reusable parts and replacement seals pay off, especially in machines that get tightened, heated, and washed every day.
Maintenance Schedules for Every Coffee Pot Part
Cleaning the parts you can see does not keep a coffee maker healthy if the water path stays dirty. Coffee oils cling to baskets, mineral scale builds inside tubes and heaters, and residue settles in the showerhead and around gaskets. Maintenance has to follow the part, not just the calendar, because the hidden buildup is usually what changes taste first and shortens part life next.
What to clean often and what to descale on schedule
The reservoir should be emptied and rinsed after each use, especially if the machine sits unused for part of the day source. The showerhead and brew basket housing also need regular attention because they collect residue where hot water meets metal and plastic. If those spots start to smell stale, buildup is already affecting the brew path.
Descaling is the other half of the job. Maintenance guidance from PureHQ's coffee machine maintenance checklist points to a schedule that depends on water hardness and use, and that practical detail matters because hard water leaves scale in the heating path first. Brewing slows before many owners realize anything is wrong, and by then the narrow passages are already working harder than they should.
Vinegar can help, but it can also become a problem
Vinegar gets recommended because it is cheap and easy to find. Used carelessly, it can leave odor and residue behind, which is what happens when someone runs one short cycle, rinses once, and assumes the machine is clean. That shortcut often leaves the same film that caused the problem in the first place.
A cleaner made for the machine's material and internal passages is the safer routine choice. Descaling solutions and cleaning tablets are a better match for modern coffee makers because they are designed to remove mineral scale without leaving a vinegar smell or a lingering film. If you want a brew path that is easier to keep clean from the start, choose a hassle-free coffee brewer gives you a useful way to compare designs with maintenance in mind.
A practical maintenance rhythm by part
- Reservoir: Empty and rinse after use, then dry the inside if the machine will sit for a while.
- Brew basket and filter holder: Wash after every brew, since these parts trap oils and fine grounds that can go rancid.
- Showerhead: Wipe and clear residue regularly so the spray stays even and does not channel water to one side.
- Gasket and seals: Inspect during cleaning for flattening, cracks, staining, or a hard surface that no longer sits well.
- Water path and boiler area: Descale on a schedule that matches your water hardness and usage, since scale narrows passages and stresses heaters.
- Carafe and lid: Clean daily so old coffee oils do not taint the next batch.
If you want a checklist format to keep on the counter, PureHQ's coffee machine maintenance checklist is a useful companion. In many kitchens, the win is not doing more, it is cleaning the parts that trap buildup before they start affecting flavor, flow, and heat transfer.
Troubleshooting Common Part Failures
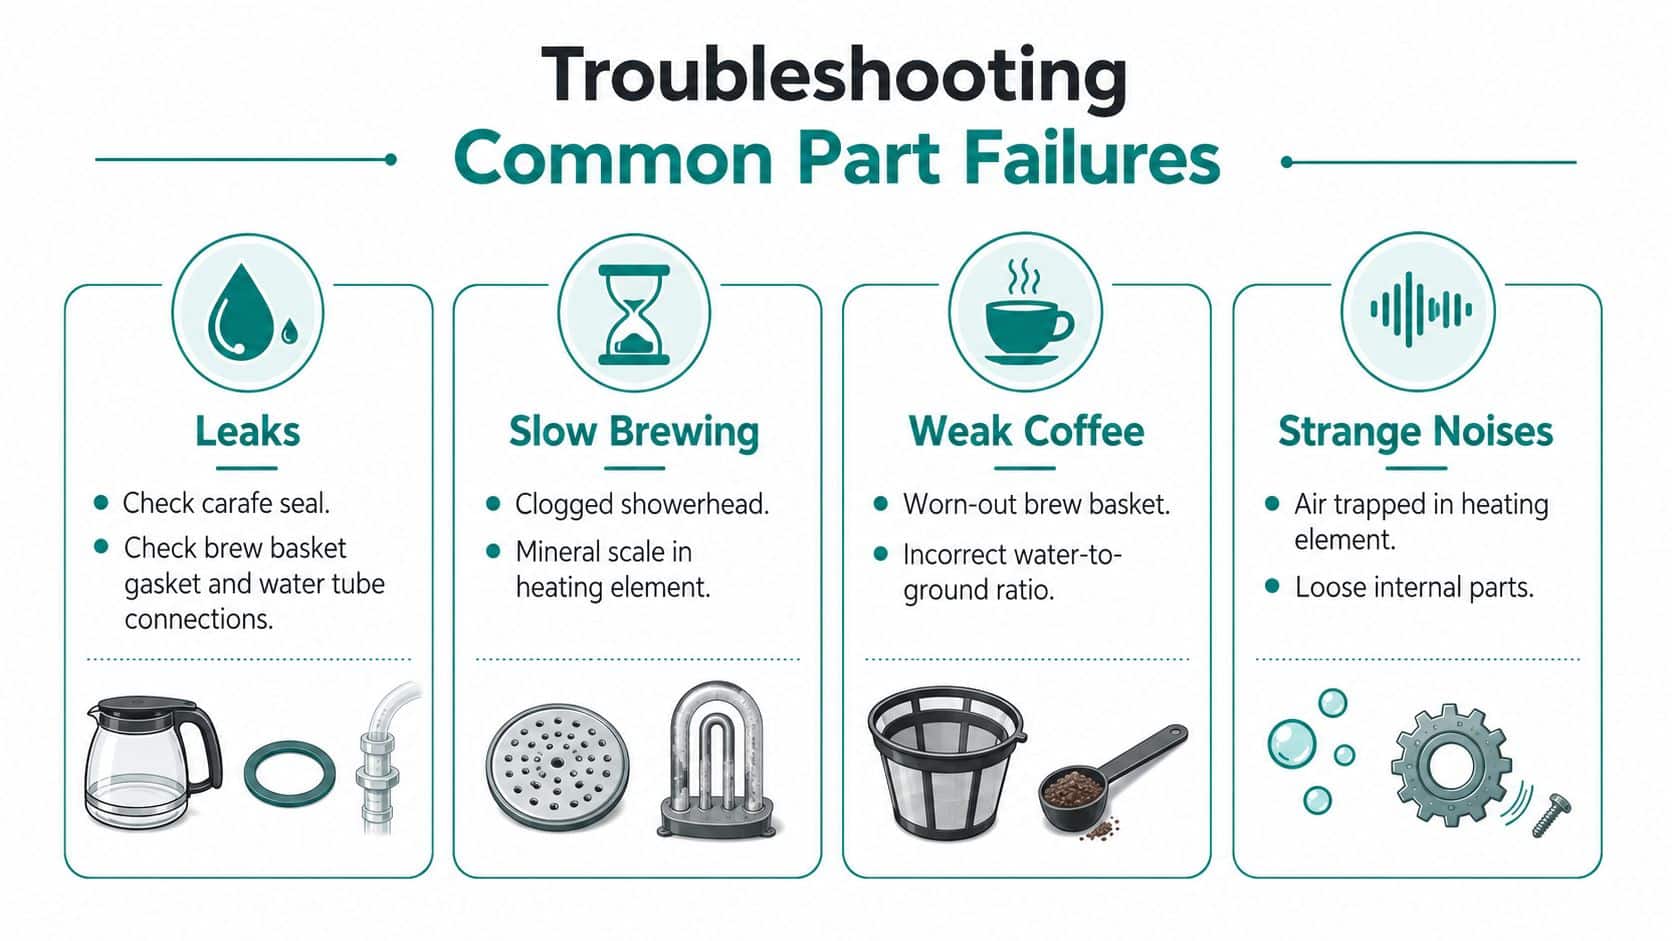
When a coffee maker acts up, the symptom usually points to a specific part. A leak rarely comes from nowhere. Slow brewing almost always means flow restriction or scale. Weak coffee usually means the water isn't meeting the grounds correctly, or the basket isn't holding the bed the way it should.
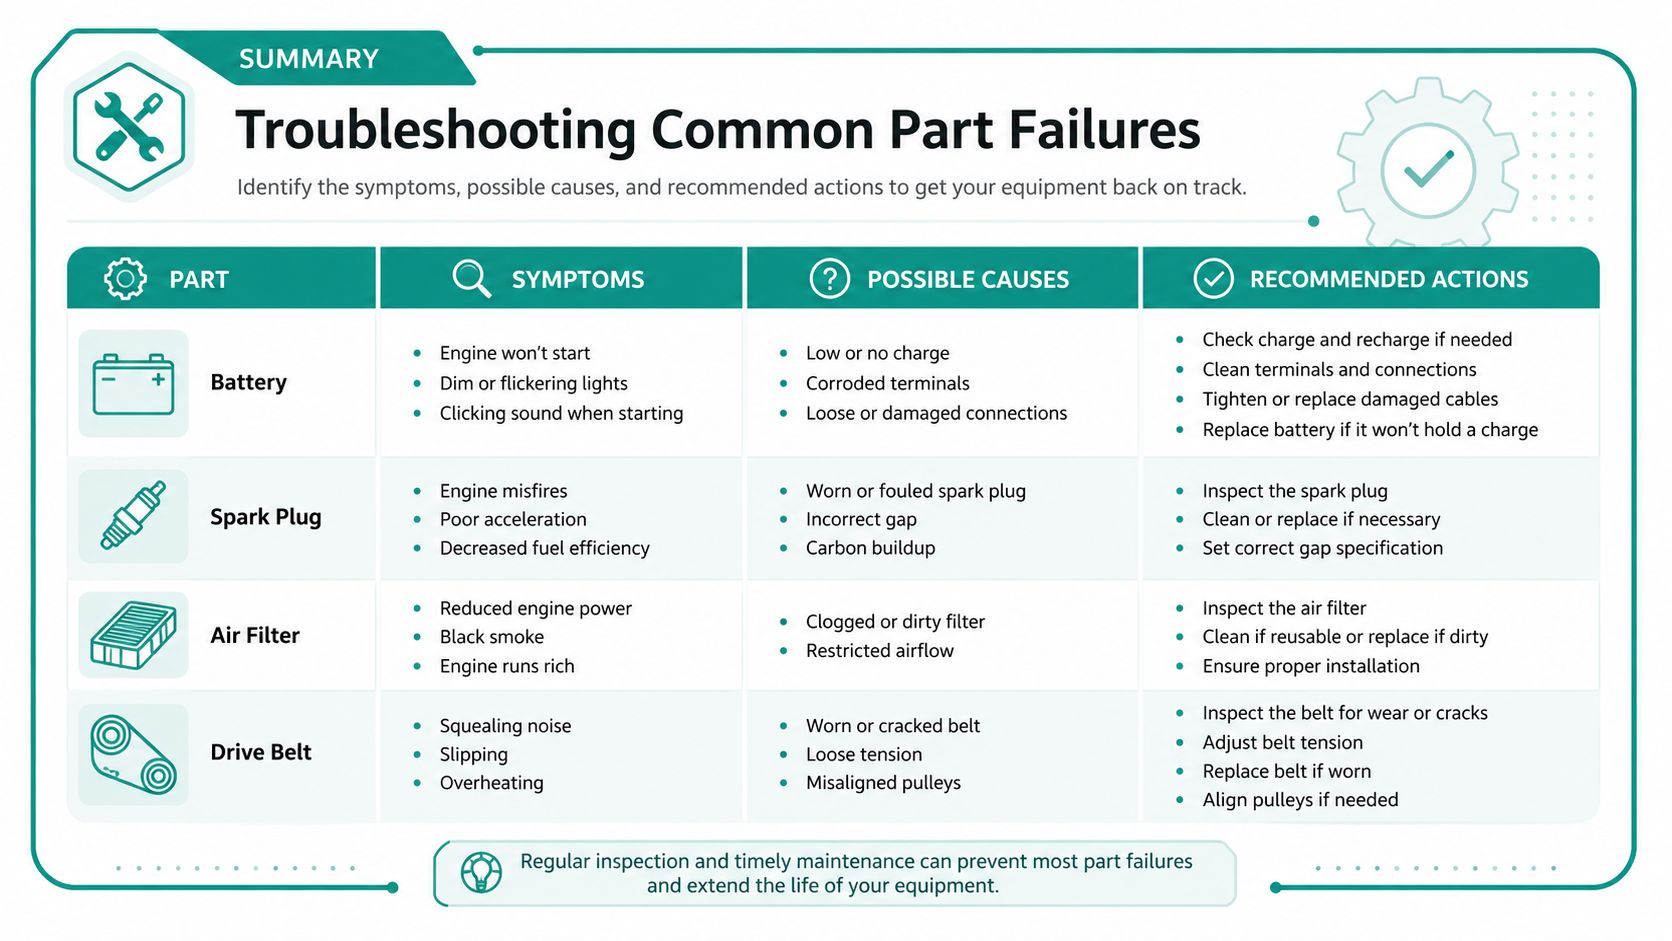
Match the symptom to the likely part
Leaks usually point to the carafe seal, brew basket gasket, or water tube connections. Check for flattening, cracks, or debris before assuming the whole machine is failing. If the leak appears only during brewing, pressure and fit are usually the first suspects.
Slow brewing often points to a clogged showerhead or mineral scale in the heating path. Start with a descale cycle, then inspect the spray holes and narrow passages. If water still moves sluggishly after cleaning, the heater or tubing may need service.
Weak coffee often comes from a worn basket, a poor filter fit, or a water-to-ground mismatch. If the part that holds the grounds flexes or bows, water can slip around the coffee bed instead of through it. That makes the cup taste thin even when the beans are fine.
Strange noises can come from air trapped in the heating element or loose internal parts. Clicking, gurgling, and rattling each mean something different, so don't ignore the pattern. A loose panel is one thing, but recurring noise during heat-up can point to scale or a tired internal component.
If a replacement part fixes the symptom for a week and then the problem returns, the fit or the underlying scale issue probably wasn't solved.
When replacement beats another cleaning cycle
Replace a part when it's visibly warped, cracked, hardened, or no longer holds its shape after washing. Gaskets and seals are especially worth replacing early because they fail subtly before they fail dramatically. A basket that no longer sits squarely can be more trouble than it's worth, even if it still looks usable.
If the machine still leaks after a new seal, or still runs hot, slow, or noisy after a proper descale, professional repair is the safer move. At that point, the issue is no longer the accessory layer, it's the machine itself.
Upgrade Your Brew with PureHQ Accessories
The easiest upgrades are the ones that target the parts most likely to fail. Better filtration, cleaner water paths, and replacement accessories for the brew side usually do more for daily coffee than cosmetic add-ons. That's the logic behind using reusable K-Cups, water filters, descaling solutions, and other maintenance parts that match the brewer you already own.
PureHQ Inc. focuses on coffee machine accessories that support that kind of practical upkeep. If your setup needs cleaner water, a better fit, or a simpler cleaning routine, the right accessory can solve the problem before it becomes a repair. Match the part to the machine, keep the brew path clean, and the cup usually follows.
If you want to keep your machine brewing cleanly, visit PureHQ Inc. and shop the accessories that match your brewer. You'll find practical parts for maintenance, filtration, and everyday replacement needs, so you can spend less time fighting leaks, scale, and fit issues, and more time making a cup that tastes right.

