Coffee Machine Care
Keurig Filters Instructions: A Complete Guide for 2026
Apr
You’re probably here because your Keurig still brews coffee, but it doesn’t brew coffee that tastes right. The cup is flat, bitter, chalky, or oddly dull, and replacing the pod didn’t fix it. In most kitchens, the problem isn’t the coffee at all. It’s the water, and just as often, it’s a filter that was never installed correctly, never replaced on time, or never matched to the brewer in the first place.
That’s why good keurig filters instructions need to do more than say “soak and insert.” The part most guides skip is the part that causes the most frustration: choosing the correct filter style for your exact brewer so the holder seats properly, seals cleanly, and sends water through the carbon media instead of around it.
Why Your Keurig Coffee Tastes Off and How to Fix It
A Keurig can make a quick cup, but it also makes water quality problems obvious fast. If your coffee suddenly tastes sharp, stale, or muddy, the brewer may be fine. Your tap water may be carrying chlorine, sediment, or mineral content that changes extraction and dulls flavor.
According to House Digest’s summary of Keurig filter guidance, Keurig water filters are designed to remove up to 97% of chlorine, and chlorine is present in over 70% of U.S. municipal water supplies. The same source notes that this matters for the more than 13 million Keurig owners in the U.S.. If your coffee tastes bitter, the issue may not be the roast at all. It may be the water going into the machine.
What bad water does to flavor
Chlorine pushes coffee in the wrong direction. It can make a good medium roast taste harsh and a dark roast taste flat. Sediment can add a dusty note, and mineral-heavy water can mute sweetness.
If your brewer has been giving you a rough cup lately, compare the taste to the common causes in this guide on why coffee tastes bitter. Water is often the first place to look because it affects every pod, every roast, and every brew size.
Practical rule: If every pod suddenly tastes worse, assume a water issue before you blame the coffee.
What bad water does to the machine
Taste is the first warning. Scale is the second problem, and it’s the more expensive one.
Hard water leaves mineral deposits inside the brewer over time. Those deposits can restrict flow, interfere with heating, and make the machine run less consistently. Even if the brewer still turns on and dispenses coffee, it may no longer be operating the way it should.
A water filter won’t solve every maintenance problem, but it does handle one of the easiest preventable causes of poor performance. For most households, that means two practical wins:
- Better taste: Filtered reservoir water reduces chlorine-related off notes.
- Less stress on the brewer: Cleaner water means less residue moving through the system.
The fix that actually works
The useful fix is simple. Install the right filter for your model, prepare it correctly, and replace it on schedule. That sounds basic, but many often misstep during these steps. They buy a cartridge that looks close enough, force the holder into place, and end up with leaks, bypass flow, or a loose fit.
The rest of the job gets much easier once compatibility is handled first.
Matching the Right Filter to Your Keurig Brewer
You open the reservoir, drop in a new filter, and it almost fits. That “almost” is where Keurig filter problems usually start.
A lot of owners buy a replacement cartridge that looks right, then assume any Keurig holder will work with any brewer. It will not. A mismatched holder can sit too high, lean in the reservoir, fail to lock into place, or leave enough play that water bypasses the filter path. In the worst cases, repeated forcing can stress the reservoir or the holder tabs.
Many guides rush straight to soaking and rinsing. The smarter first step is confirming which filter assembly your brewer uses. If you skip that check, good installation technique will not save a bad fit.
The mismatch that causes the most trouble
In day-to-day use, the common problem is not the carbon cartridge itself. It is the holder style.
Some brewers use the standard holder. Others need the tall-handle version so the assembly reaches the correct position inside a deeper reservoir. If the handle height is wrong, the filter may feel loose even when the cartridge is brand new.
Here’s the quick way to sort it out:
| Brewer detail | What to check | Why it matters |
|---|---|---|
| Older classic-style models | Reservoir shape and holder height | The wrong holder may not seat fully at the base |
| Newer tall-reservoir models | Depth and lock position | A short handle can tilt or fail to secure properly |
| Model-specific series | Serial prefix or exact model family | Some brewers only accept a specific holder version |
The model clue many owners miss
Keurig’s own guidance distinguishes between brewer families by serial prefix and filter style. If your brewer starts with 44, 45, or 48, that points you toward K-Classic filters. If it is in the 55 series, check for the Tall Handle version instead.
That detail matters because “compatible with Keurig” is too broad to trust on its own. I’ve tested holders that looked nearly identical on the counter but behaved very differently once installed. One locked cleanly. Another floated slightly upward and never sat square against the reservoir wall.
A practical compatibility check before you buy
Use the machine label, not the front branding, to confirm the exact brewer family. Then check these points:
- Exact model name: “Keurig” or “K-Supreme” alone is not specific enough for filter fit.
- Reservoir depth: Deep reservoirs often pair with tall-handle assemblies.
- Serial prefix: Brewers starting with 44, 45, 48, or 55 deserve a closer compatibility check before purchase.
- Holder behavior: The assembly should sit flush, stay upright, and lock without twisting.
If the holder needs force, stop. A correct Keurig filter assembly should press into place cleanly.
What a correct fit looks like
A proper match sits flat at the base, stays aligned when you refill the tank, and does not pop loose when you remove or replace the reservoir. The holder should feel stable, not wedged.
Poor fit creates confusing symptoms. Coffee can still brew, so owners often blame the cartridge media, the water, or the machine itself. In many cases, the actual problem is simpler. The brewer has the wrong holder style for that reservoir.
If you want a model-by-model walkthrough before installation, follow this guide to replacing the Keurig water filter by machine type. Matching the correct filter assembly first prevents the leaks, bypass flow, and loose-fit problems that generic Keurig filter instructions often miss.
Your Step-by-Step Keurig Filter Installation Guide
Once you have the right filter for your brewer, installation is straightforward. The key is to slow down for the prep. Most bad first brews happen because people rush the carbon activation step or skip the rinse.
Keurig’s official guidance says to soak the new cartridge for 5 minutes and then rinse it for 60 seconds. The same source says Keurig requires replacement every 2 months or 60 tank refills, and notes this matters in the 85% of U.S. households with hard water. Those timings aren’t filler. They activate the charcoal media and help the filter do its job from the first brew.
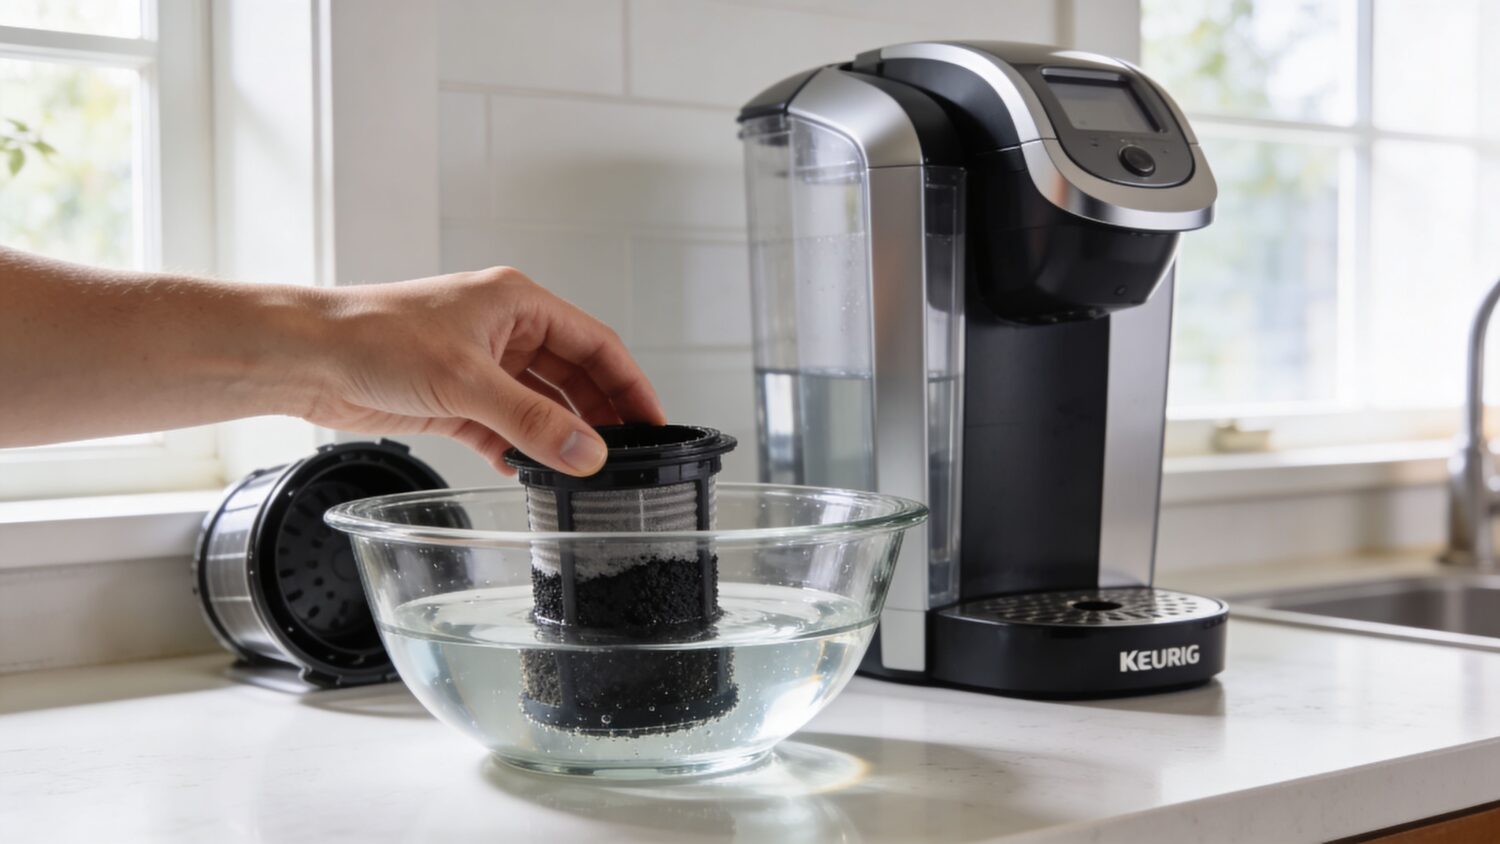
Preparing the cartridge correctly
Start by removing the new cartridge from its packaging. Place it in a bowl of fresh water and leave it there for the full 5 minutes. Don’t use hot water. Don’t shorten the soak because you’re in a hurry. Dry carbon doesn’t behave the same way as fully saturated carbon.
After the soak, rinse the cartridge under running water for the full 60 seconds. Let the water move through the filter thoroughly. If you’re using a holder with mesh in the lower section, rinse that mesh too before assembly.
A lot of users see gray water during prep and assume something is wrong. That’s usually just loose carbon dust washing away during activation.
Assembling the holder
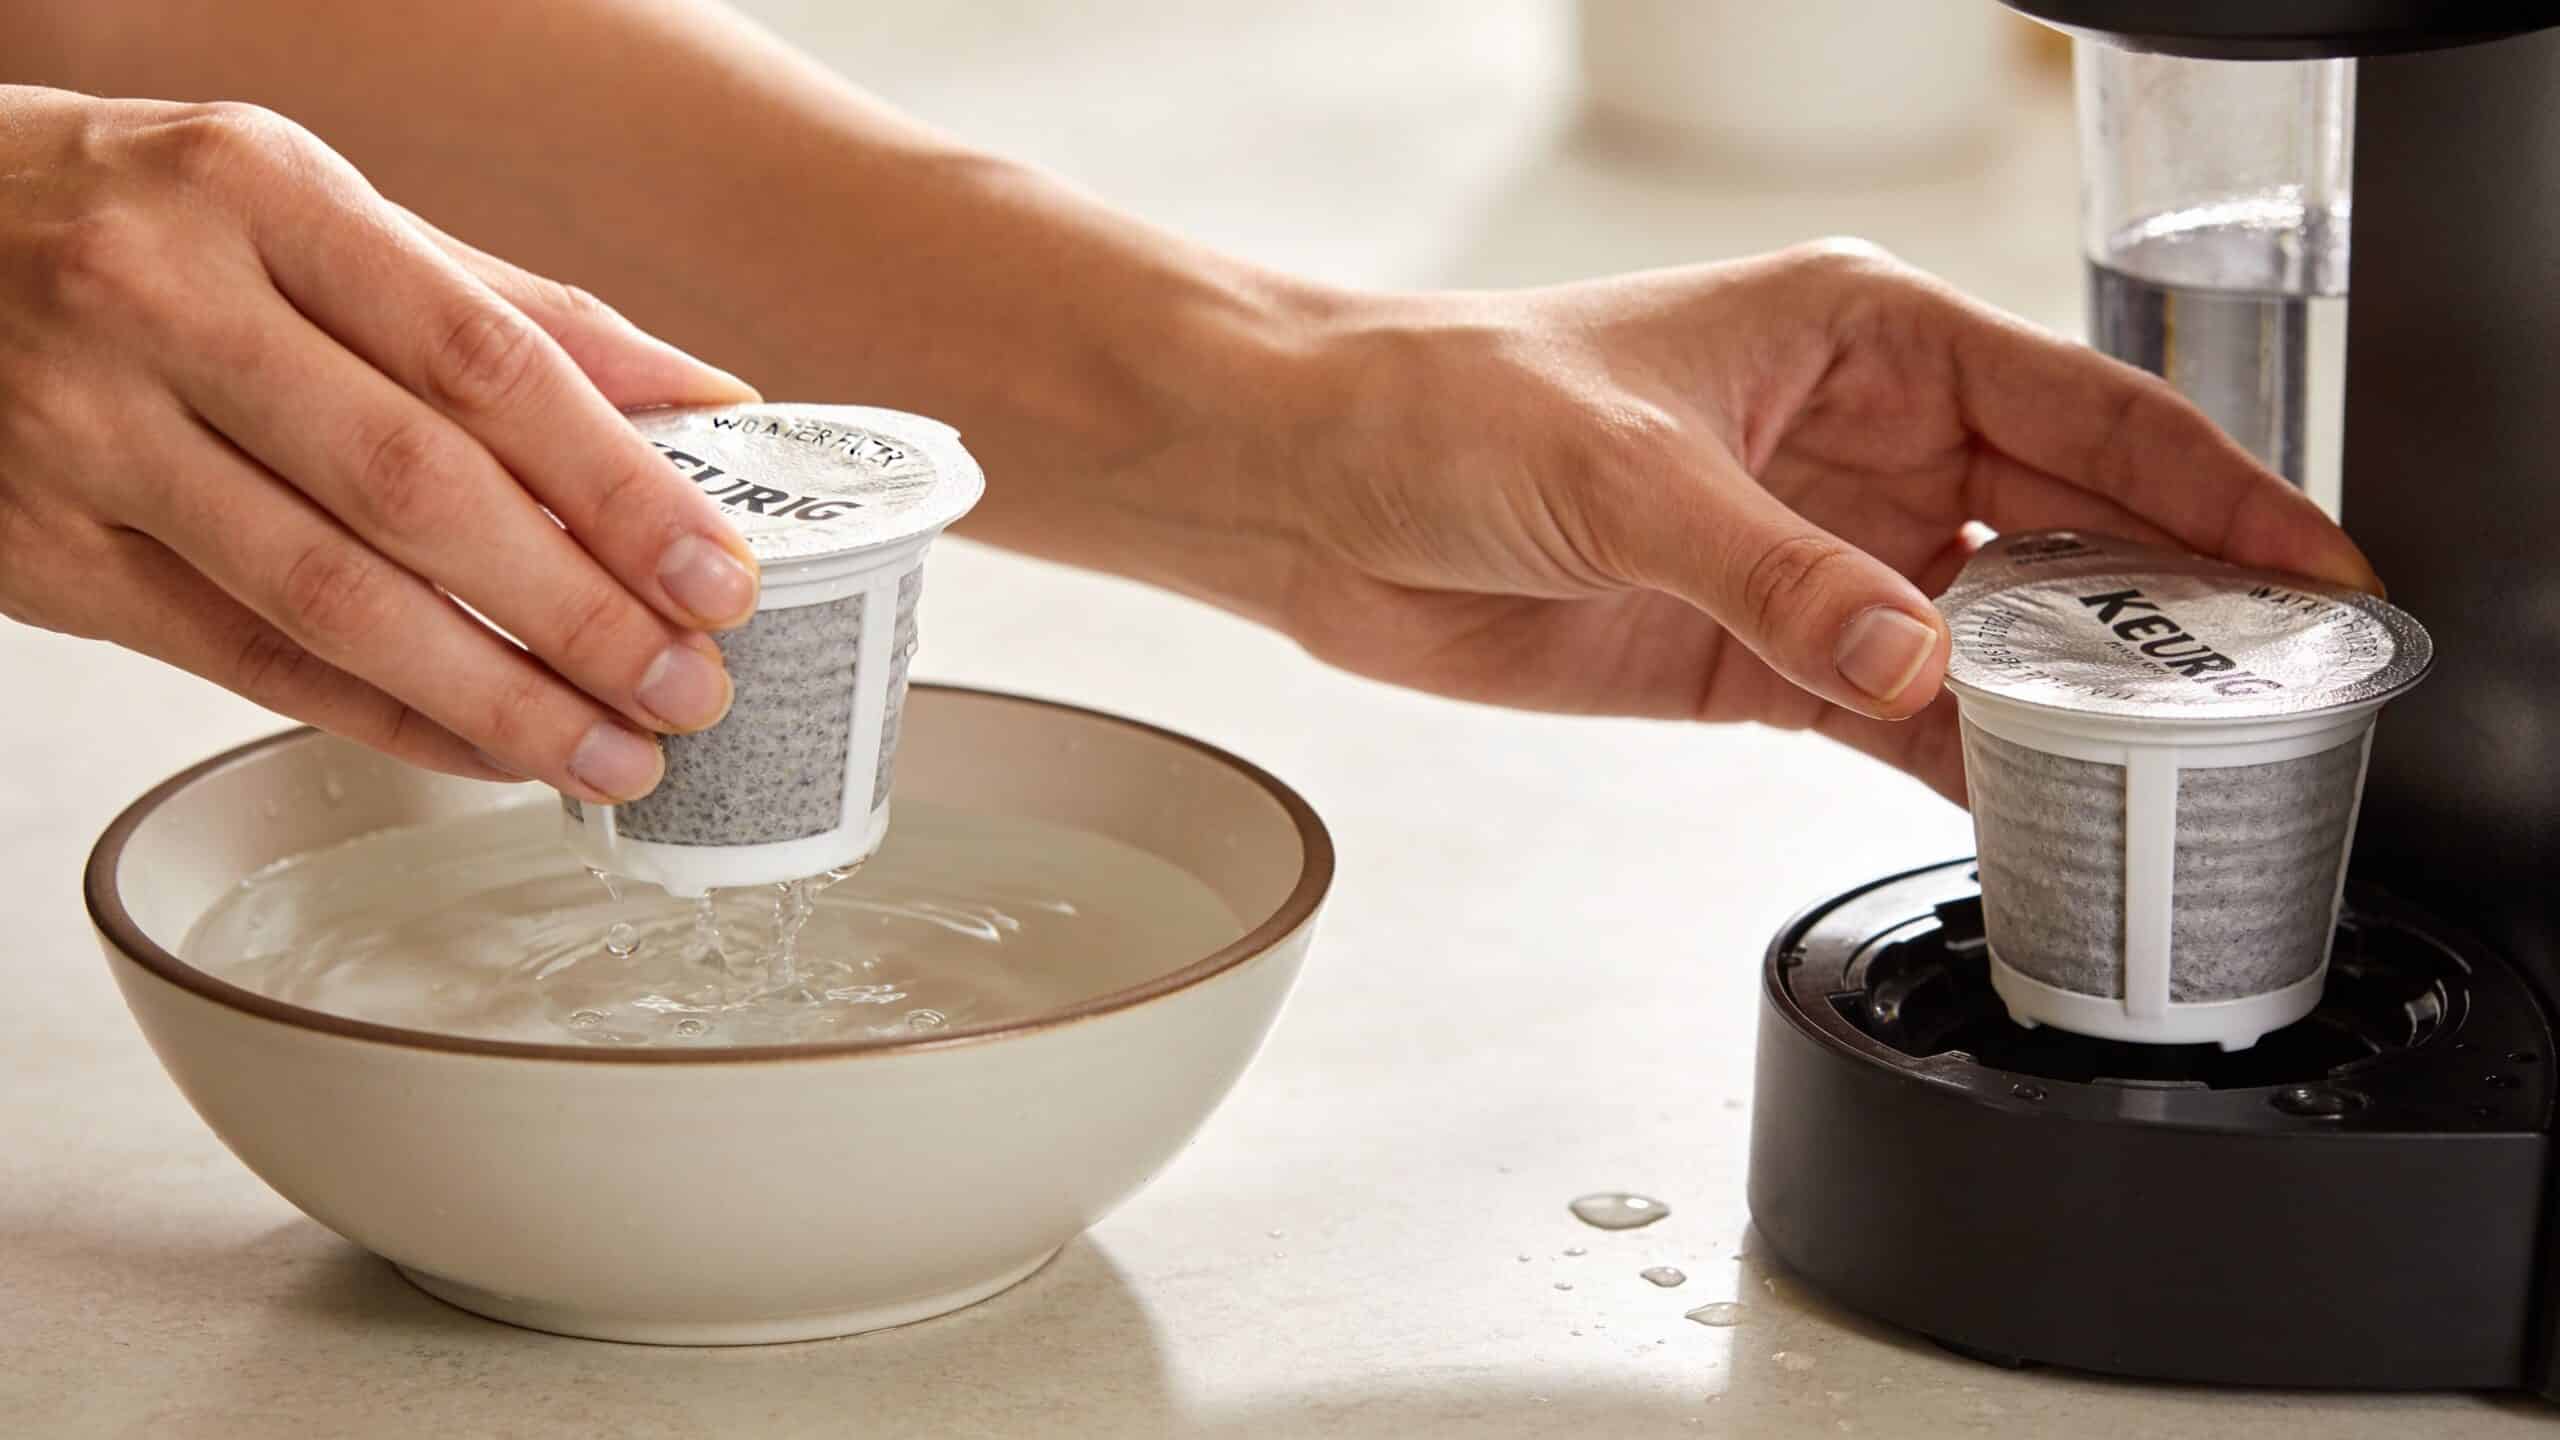
Open the filter holder and place the soaked cartridge into the lower holder section. The fit should feel deliberate, not sloppy. Once the cartridge is seated, snap the upper holder into place until it closes securely.
If your holder has a date dial, set it for the next replacement window. That gives you a simple visual reminder and keeps the filter from staying in service too long. PureHQ Inc. also provides compatible replacement filters and holder guidance for Keurig systems, including instructions for setting the replacement indicator and locking the assembly into the reservoir.
For a visual walkthrough, this official video is useful:
If you want a second written walkthrough with photos, this step-by-step guide on how to replace the Keurig water filter is a helpful reference.
Installing it in the reservoir
Remove the water reservoir from the brewer if your model allows it. Lower the assembled holder into the empty reservoir and line it up with the slot or base fitting. Press down firmly until it locks.
The holder should sit straight and stable. On compatible setups, the assembly won’t feel loose once engaged. If it rocks or resists alignment, pull it out and re-check the model match rather than forcing it.
After installation, refill the reservoir and run a water-only brew cycle. That flushes any remaining carbon dust and gives you a cleaner first cup.
Skip the first coffee brew until you’ve run plain water through the machine. It’s a small step that prevents a disappointing first cup.
PureHQ vs Standard Filters A Performance Comparison
A lot of buyers hesitate at this point for a fair reason. They worry that a non-OEM filter may not fit correctly, may leak, or may feel flimsy compared with a standard Keurig-branded replacement. That objection makes sense because with water filter holders, precision matters more than marketing language.
What matters in real use is simple. The holder has to seat correctly. The cartridge has to prep cleanly. The materials have to hold up during normal replacement cycles. If any of those fail, you notice it immediately in fit, flow, or taste.
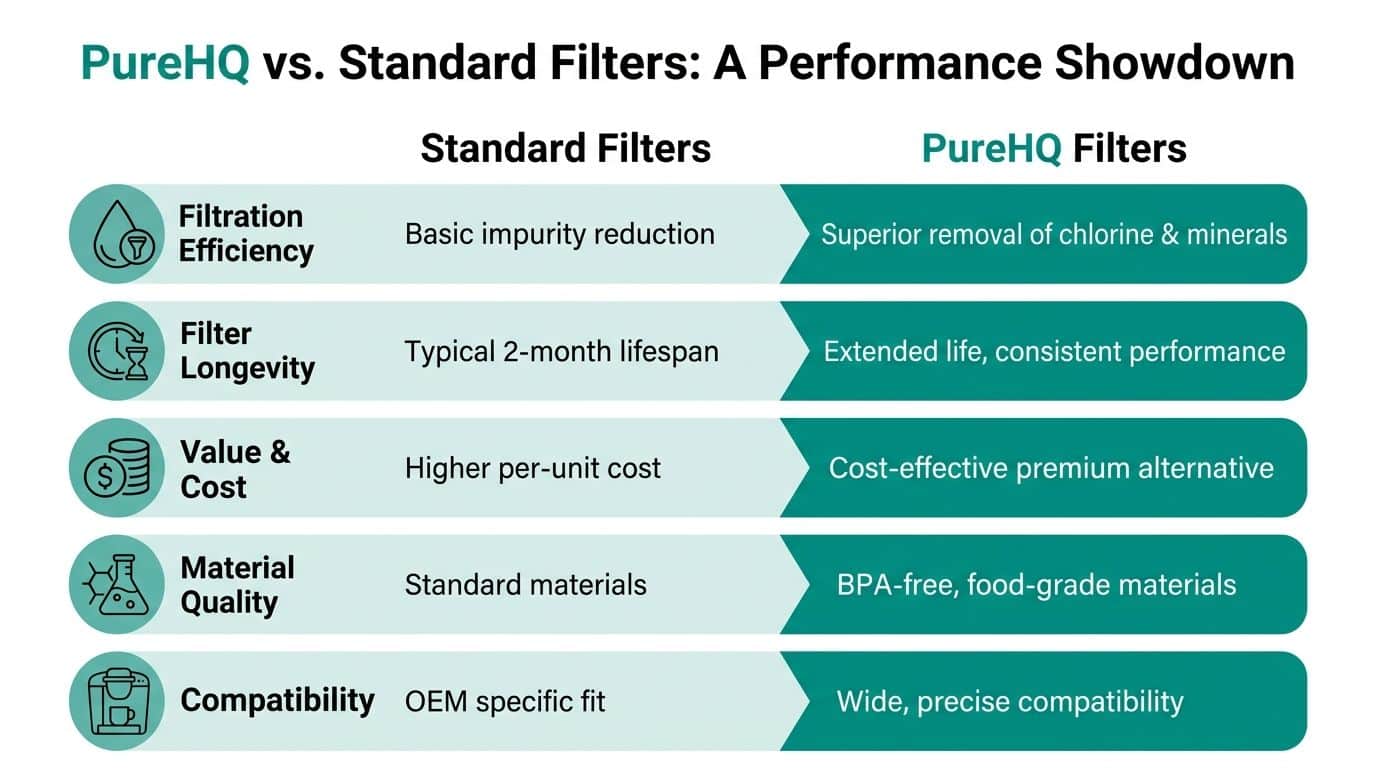
Where standard filters and premium compatibles differ
The broad trade-off is OEM certainty versus alternative flexibility. Standard Keurig filters are designed around Keurig’s own systems. Premium compatible filters aim to match that fit while giving buyers more choice on materials, bundles, and ongoing replacement cost.
Here’s the practical comparison:
| Feature | Standard Keurig Filter | PureHQ Premium Filter |
|---|---|---|
| Fit approach | Model-specific OEM fit | Compatible fit designed for supported Keurig models |
| Filtration focus | Basic chlorine and impurity reduction | Premium filtration media for chlorine and impurity reduction |
| Buying experience | Brand-native replacement path | Alternative option for compatible brewers |
| Accessory ecosystem | Keurig-centered | Can pair with compatible reusable pods and maintenance items |
| Value angle | Familiar replacement option | Premium-compatible alternative for users comparing cost and features |
What to look for if you’re worried about leaks
Leak concerns are legitimate, but they usually trace back to one of three issues:
- Wrong holder style: The filter assembly doesn’t match the brewer family.
- Poor seating: The user didn’t press the unit fully into the lock position.
- Weak molding or loose assembly: The holder closes, but the cartridge doesn’t sit securely.
That last point is where build quality matters. A good compatible filter should feel precise at the hinge, stable at the snap closure, and secure at the reservoir base. If it feels soft, warped, or inconsistent, move on.
A cheap filter usually tells on itself before you ever brew. The holder flexes, the cartridge rattles, or the assembly won’t stay aligned.
The maintenance pairing that protects the brewer
A water filter helps at the reservoir. Descaling handles mineral buildup deeper in the machine. Used together, they cover different parts of the problem.
If you keep a Keurig in regular rotation, pairing replacement filters with a descaling routine makes sense. PureHQ sells compatible filters alongside a universal descaling solution and other maintenance accessories for coffee machines, which is the practical pairing many home users want in one place.
That combination isn’t about over-accessorizing the brewer. It’s about reducing the two problems most owners run into first: off-tasting coffee and mineral buildup.
Troubleshooting Common Keurig Filter Problems
People often assume a new filter should fix every water-related issue instantly. That’s not always how it plays out. A filter can be installed correctly and still produce a strange first cup, or a brewer can keep acting up because the holder isn’t aligned the way the user thinks it is.
One of the most useful troubleshooting points comes from this Keurig filter troubleshooting video, which notes that forcing a misaligned filter holder can crack the component, while skipping the post-install water-only brew cycle can cause an off-taste in the first cup. Those are two of the most common avoidable mistakes.

If the filter won’t seat properly
Don’t push harder. Pull the holder back out and inspect three things: the cartridge orientation, the holder closure, and the model match. If the top isn’t snapped fully or the holder style is wrong for the brewer, the unit may catch on the reservoir instead of locking into it.
Look for a flush, upright position once installed. If the holder sits crooked, that’s your signal to stop.
If the first cup tastes odd
That usually points to one of two causes. The cartridge wasn’t rinsed thoroughly, or the post-install flush was skipped.
Run a water-only brew cycle before making coffee. If needed, run another. That clears residual carbon dust and gives the fresh cartridge a chance to settle in.
If you see black specks or gray water
Small carbon particles can appear after installation, especially when the cartridge is brand new. In normal cases, that’s not a sign the filter is defective. It means some loose carbon dust is still washing out.
Use these quick fixes:
- Rinse longer: If the prep was rushed, remove the cartridge and rinse it more thoroughly.
- Flush the machine: Run plain water through the brewer until the reservoir looks clean.
- Clean the holder mesh: Residual particles can collect in the lower holder area.
If the reminder doesn’t reset
Some Keurig models have reminder settings in the menu system, especially later generations. If the light or alert remains on after installation, the brewer may need a manual reset through the menu rather than recognizing the change automatically.
The exact menu path varies by model, so use the brewer’s settings and filter reminder option if available. If your machine doesn’t support reminder programming, the date dial on the holder is the simplest backup.
For a deeper list of common errors and fixes, this guide to mistakes people make with Keurig water filters is worth keeping handy.
Frequently Asked Questions About Keurig Filters
Can I use a water filter if I brew with a reusable K-Cup
Yes. That’s a sensible combination. The reusable pod affects what coffee goes into the machine. The water filter affects the water passing through it. Those are separate jobs, and they work well together.
If you use your own ground coffee, clean water becomes even more important because the flavor of the beans is less hidden than it is in some prefilled pods.
What happens if I leave the same filter in too long
The cartridge won’t keep performing the way it should forever. Over time, it loses effectiveness, and the brewer no longer gets the same help with chlorine and sediment reduction. That usually shows up first in flavor, then in general machine cleanliness and consistency.
If your coffee has drifted in taste and you can’t remember the last filter change, replacing the cartridge is a sensible first move.
Do I need to soak every new cartridge before installing it
Yes. For Keurig-style charcoal cartridges, the prep matters. A dry cartridge that gets dropped straight into the holder is more likely to release carbon dust into the reservoir and less likely to start cleanly.
The soak and rinse step is one of the few parts of filter maintenance that you really shouldn’t shortcut.
Is a loose fit ever normal
No. A proper fit can feel snug, but it shouldn’t feel improvised. The holder should lock in place and stay there. If it shifts around, rises, tilts, or needs repeated force, something is off.
In most cases, the problem is compatibility, not user strength. Recheck the brewer model and holder type before trying again.
How do I know it’s time to replace the filter if I forgot the date
Use taste, flow, and memory together. If coffee starts tasting off, if the water no longer seems as clean, or if you know the current cartridge has been in service for a while, replace it. Filter maintenance works best when it’s proactive rather than reactive.
A simple habit helps. Keep the holder dial updated, or note the replacement in your phone when you install a new cartridge.
If you want replacement filters and other Keurig maintenance accessories from a small U.S.-based brand, shop PureHQ Inc. for compatible water filters, reusable pods, and cleaning essentials that help keep daily brewing simple.
