
Coffee Machine Care
Keurig Reusable Filter Instructions: Load, Clean, Descale
Nov
You've filled your reusable filter, closed the brewer, and pressed Brew, but coffee is spilling around the holder or arriving weak and gritty. Before you add more grounds or force the handle shut, check the filter's model match and how it's loaded. Keurig reusable filter instructions aren't interchangeable across every brewer, and a filter that looks close enough isn't a reliable fit check.
The practical approach is straightforward: identify the machine, follow the correct holder configuration, respect the basket's fill limit, and separate everyday cleaning from descaling. Start with the fit, not a stronger dose of coffee.
Confirm Your Keurig Model Before Loading a Filter
Your reusable filter must match your brewer model. The Keurig K-Supreme SMART use-and-care guide states that this brewer is compatible only with the newly designed Keurig My K-Cup Universal Reusable Coffee Filter. That's a specific compatibility requirement, not a general recommendation to buy any reusable basket.
Read the model identification on your brewer and compare it with the filter's compatibility information. Don't rely on the machine's appearance, the word “universal,” or whether the filter drops into the chamber. An incorrect filter can prevent proper seating or interfere with the pod holder.
Official My K-Cup Universal Filter vs Generic Reusable Pods
The official filter is the manufacturer-supported benchmark for this comparison. That doesn't establish that every generic pod performs poorly. It means you shouldn't transfer Keurig's fit, loading, or cleaning directions to a different product without checking its own instructions.
| Factor | Official My K-Cup Universal | Generic or non-approved reusable pod |
|---|---|---|
| Compatibility with K-Supreme | Keurig specifies the newly designed version as the only compatible reusable filter | Keurig warns non-approved versions may damage the machine |
| Seating in the pod holder | Designed to seat flush and align with the exit needle | An incorrect filter can prevent proper seating |
| Fill guidance | Fill ground coffee only to MAX; close the lid until it clicks | Use that basket's own fill marking and instructions |
| Risk of brewer damage | Covered by Keurig's official use instructions | Keurig warns of possible damage from non-approved versions |
| Cleaning | Rinse the basket, lid, and body with warm water after use | Follow the product's stated washing method and dishwasher restrictions |
Check the Holder Configuration Too
Compatibility includes how the filter is installed. MultiStream preparation requires removing the red lid plug from the current official filter, while Classic Series preparation requires removing the original K-Cup Holder Assembly.
Those are different operations. Removing a plug doesn't replace removing a holder, and neither step should be applied indiscriminately to another filter design.
Use our reusable K-Cup model-fit guide to narrow the options, then compare the exact product instructions with your brewer manual.
Fit check: A handle that needs extra force is a reason to stop and inspect the installation, not permission to press harder.
Write down your brewer's model number before loading the basket. Keep it with the filter instructions so you don't have to guess when buying a replacement.
Load and Seat a Reusable Filter Correctly
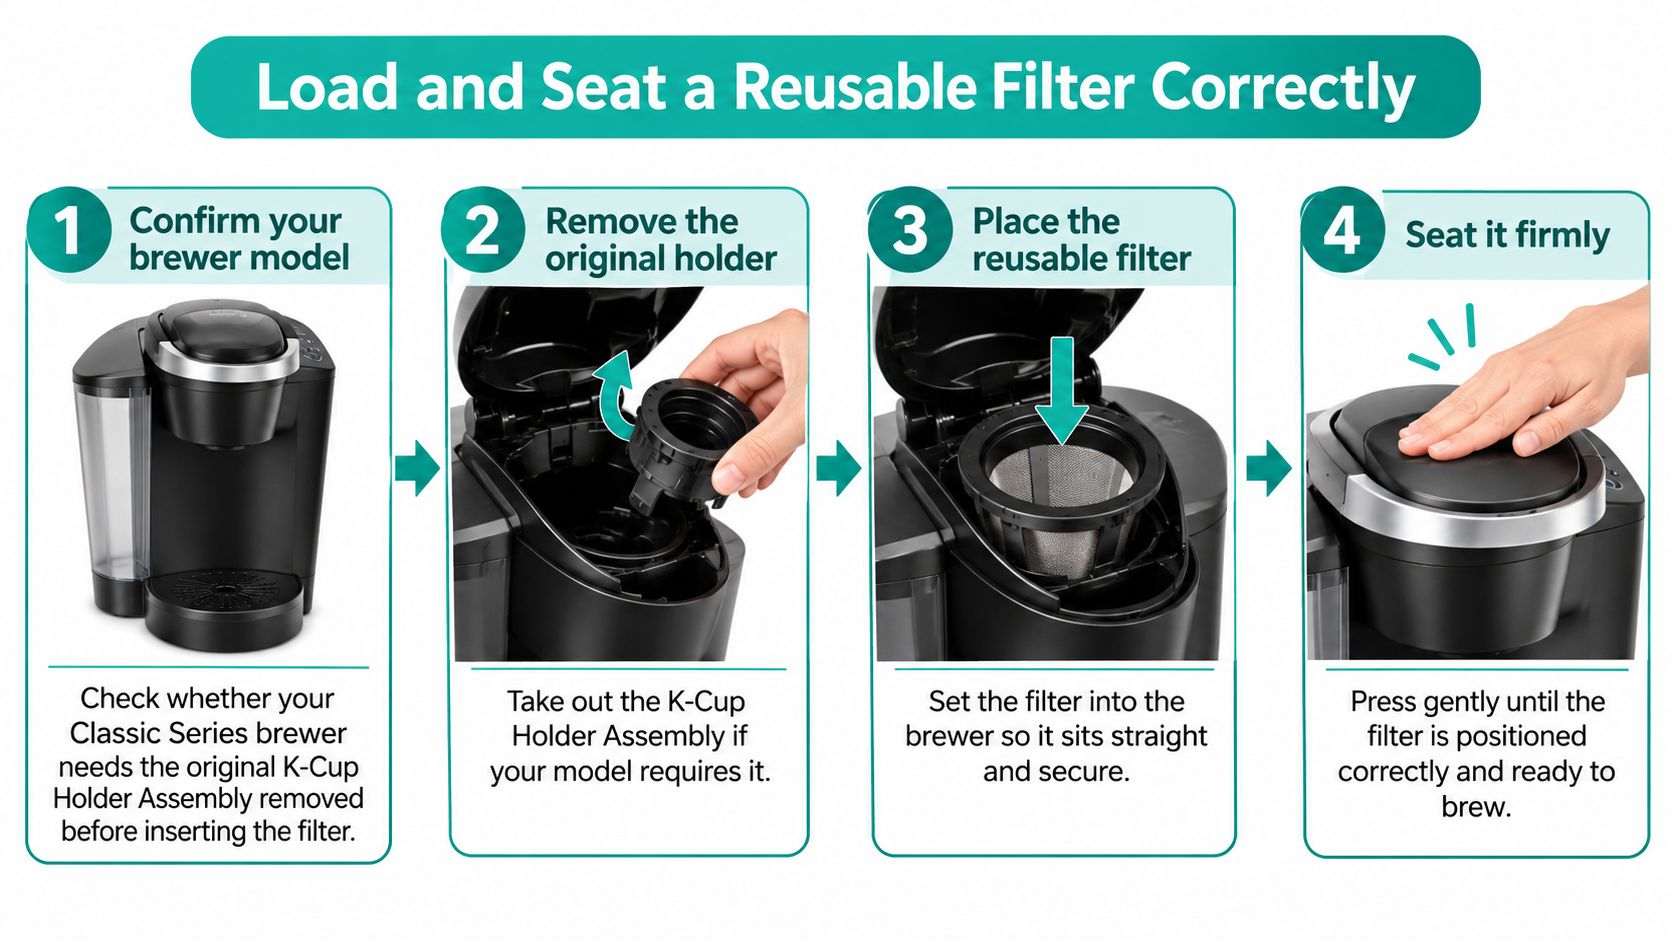
Start with an empty brewing chamber and the correct filter for your machine. On a Classic Series brewer, remove the original K-Cup Holder Assembly before inserting the official reusable filter. Don't try to solve an installation problem by squeezing the reusable assembly into the wrong configuration.
Keurig's official My K-Cup instructions establish the preparation sequence below, including the MAX fill limit, lid closure, orientation, and model-specific adjustments. These steps address overflow, poor extraction, and potential brewer damage.
Prepare, Fill, and Install
Confirm the brewer configuration. For a MultiStream brewer, open the current My K-Cup Universal filter and remove its red lid plug. For a Classic Series brewer, remove the original K-Cup Holder Assembly. Make the required adjustment before adding the filled filter.
Add ground coffee only to the MAX line. Never fill above it. Use the marked basket limit rather than an extra spoonful intended to make the coffee stronger.
Close the lid until it clicks. If it won't close normally, reopen it and inspect the fill level and closure area. Don't use the brewer handle to finish closing the filter.
Place the filter with “THIS WAY UP” visible. Orient the assembly before lowering it into position. Don't assume that any position that fits into the opening is correct.
Check alignment and seating. On Classic Series brewers, align the arrow on the filter lid with the brewer arrow. Seat the filter flush and align it with the exit needle, rather than leaving it tilted or raised.
Lower the handle and brew. If you encounter unusual resistance, stop and recheck the installation. Only begin brewing once the filter is properly positioned.
Use this installation overview as a visual reminder of the holder and seating checks.
Watch the First Brew
Stay beside the machine for the first brew after installation or a filter change. Look for steady flow, no grounds in the cup, and no coffee escaping past the drip tray. Treat those observations as a practical acceptance check, not a reason to ignore the manual if something looks wrong.
If coffee spills, don't immediately run another cycle with the same load. Let the assembly cool enough to handle safely, then inspect the fill, lid, orientation, and seating.
More grounds aren't a fix for an incorrectly installed filter. Establish a clean, properly seated brew before adjusting the coffee.
Change one thing at a time when troubleshooting. Reloading correctly gives you a useful baseline; changing the dose, filter position, and brew setting together makes it harder to identify the problem.
Clean the Filter and Brewer After Every Use
Treat rinsing as part of brewing, not a repair to attempt only after coffee starts escaping. Keurig's reusable-filter care directions call for cleaning the basket, lid, and body after each use.
Keep the removable components together while you clean and inspect them.
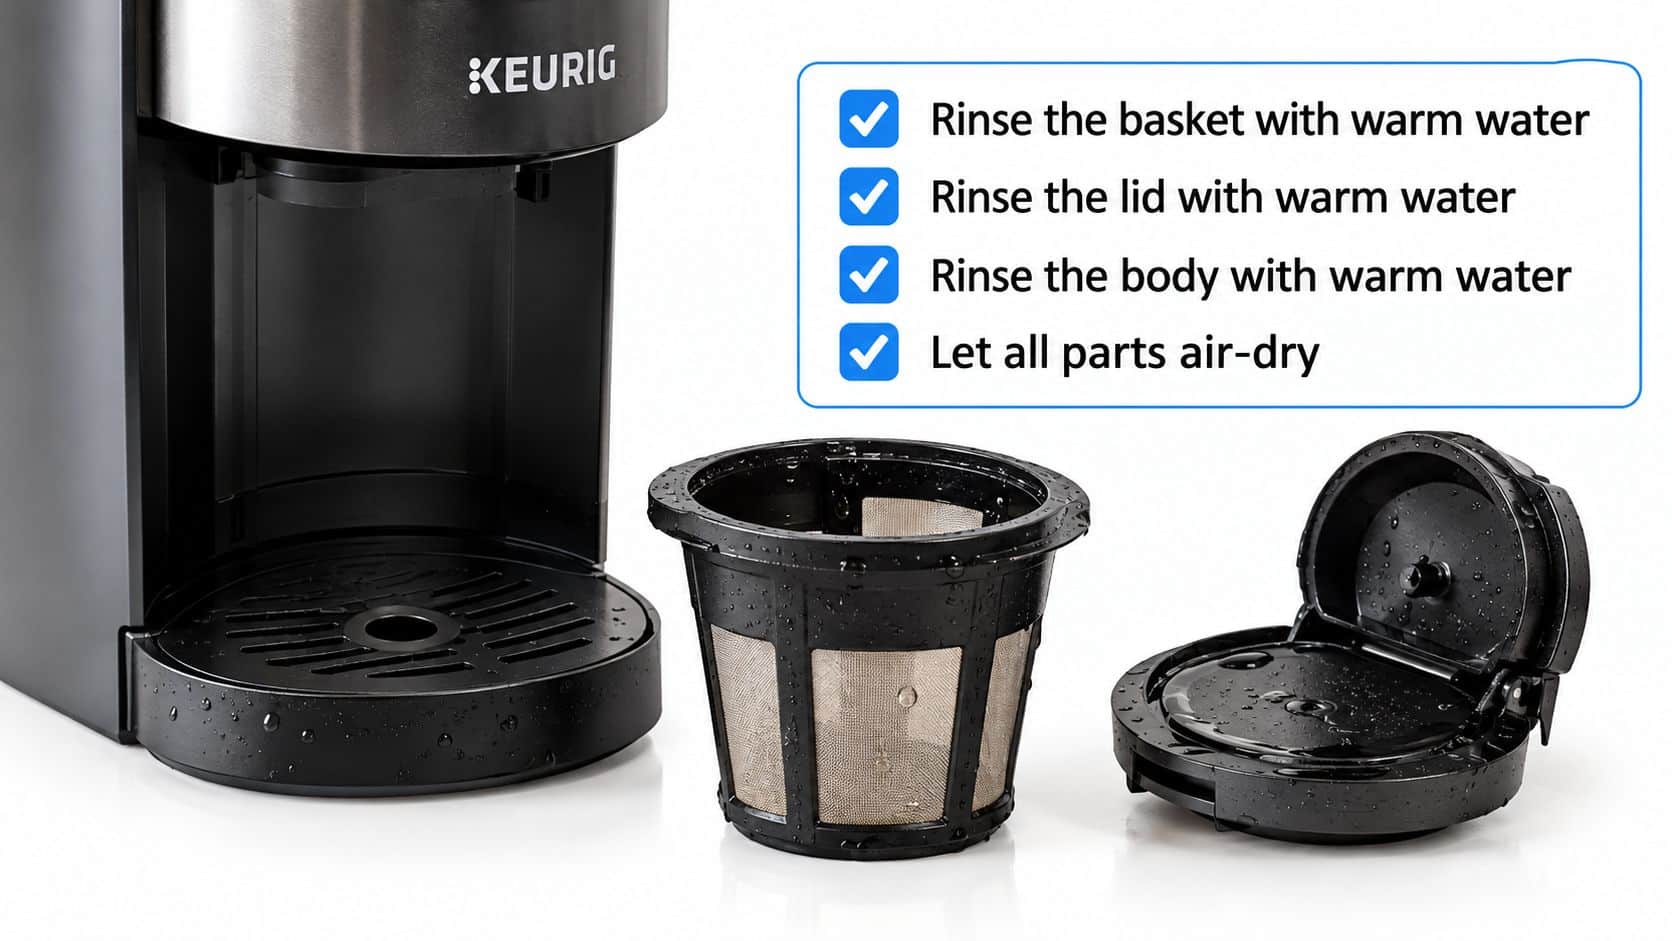
- Routine rinse: Empty the used grounds and rinse the basket, lid, and body with warm water after every use.
- Deeper cleaning: Wash the official filter's components in warm, soapy water or place them on the dishwasher's top rack. Don't assume another brand's filter has the same dishwasher allowance.
- Reservoir care: Periodically wipe the reservoir with a damp, nonabrasive, lint-free cloth, as the K-Supreme SMART guide advises.
Inspect Before Refilling
Check the filter while it's empty. Confirm that the lid still clicks shut and that the assembly still sits flush in its intended holder configuration. Cleaning shouldn't end with a forced lid or a filter left sitting at an angle.
If the lid won't close or the filter won't seat, check the model match and installation. If it still fails those checks, stop using it and contact Keurig support rather than modifying the part.
For an additional visual walkthrough, watch the cleaning demonstration.
Keep the routine simple: rinse after the last cup, inspect before the next load, and respect the basket's marked fill limit. Don't confuse a clean-looking basket with a properly maintained brewer, because the machine also needs its separate descaling routine.
Descaling and Water Filter Replacement Schedule
| Brewer or part | Interval | Notes |
|---|---|---|
| Average-use brewer | Descale every 3 months | Household schedule |
| Brewer making more than 8 pods per day | Descale every 6 to 8 weeks | High-volume schedule |
| Compatible water-filter cartridge | Replace every 3 months | Remove from reservoir before descaling |
Keurig's regular-maintenance guidance recommends descaling average-use brewers every 3 months, shortening that interval to every 6 to 8 weeks for brewers making more than 8 pods per day, and replacing compatible water-filter cartridges every 3 months. Use your specific brewer's manual if it provides a different cartridge requirement or cleaning procedure.
Choose the Schedule by Actual Use
A shared breakroom brewer shouldn't automatically follow the same maintenance calendar as a lightly used kitchen machine. Mineral scale accumulates in water-contact components, and Keurig assigns heavier-use brewers a shorter descaling interval.
Count the beverages everyone makes, not just your own morning coffee. A reusable filter doesn't remove the need to maintain the brewer's internal water path.
Keep a simple maintenance note:
- Brewer use: Record typical daily brewing activity.
- Last service: Write down when you completed descaling and cartridge replacement.
- Next action: Set reminders using the appropriate brewer guidance.
Remove the Cartridge Before Descaling
Take any installed water-filter cartridge out of the reservoir before adding descaling solution. Complete the cleaning and rinsing procedure, then reinstall or replace the cartridge so it doesn't remain immersed in the cleaning solution.
Our Keurig water-filter replacement walkthrough can help you handle the cartridge separately from the reusable coffee basket.
If you're also planning changes to your home's incoming water treatment, Erica's Plumbing, Air Conditioning & Restoration provides steps for installing whole-house filtration. Treat that as a separate household project, not a substitute for the brewer's maintenance instructions.
To choose the appropriate use category, record brewing activity across a typical week and consider the busiest routine days. Then schedule maintenance deliberately instead of waiting for the machine to slow down.
Descale Without Damaging Your Brewer
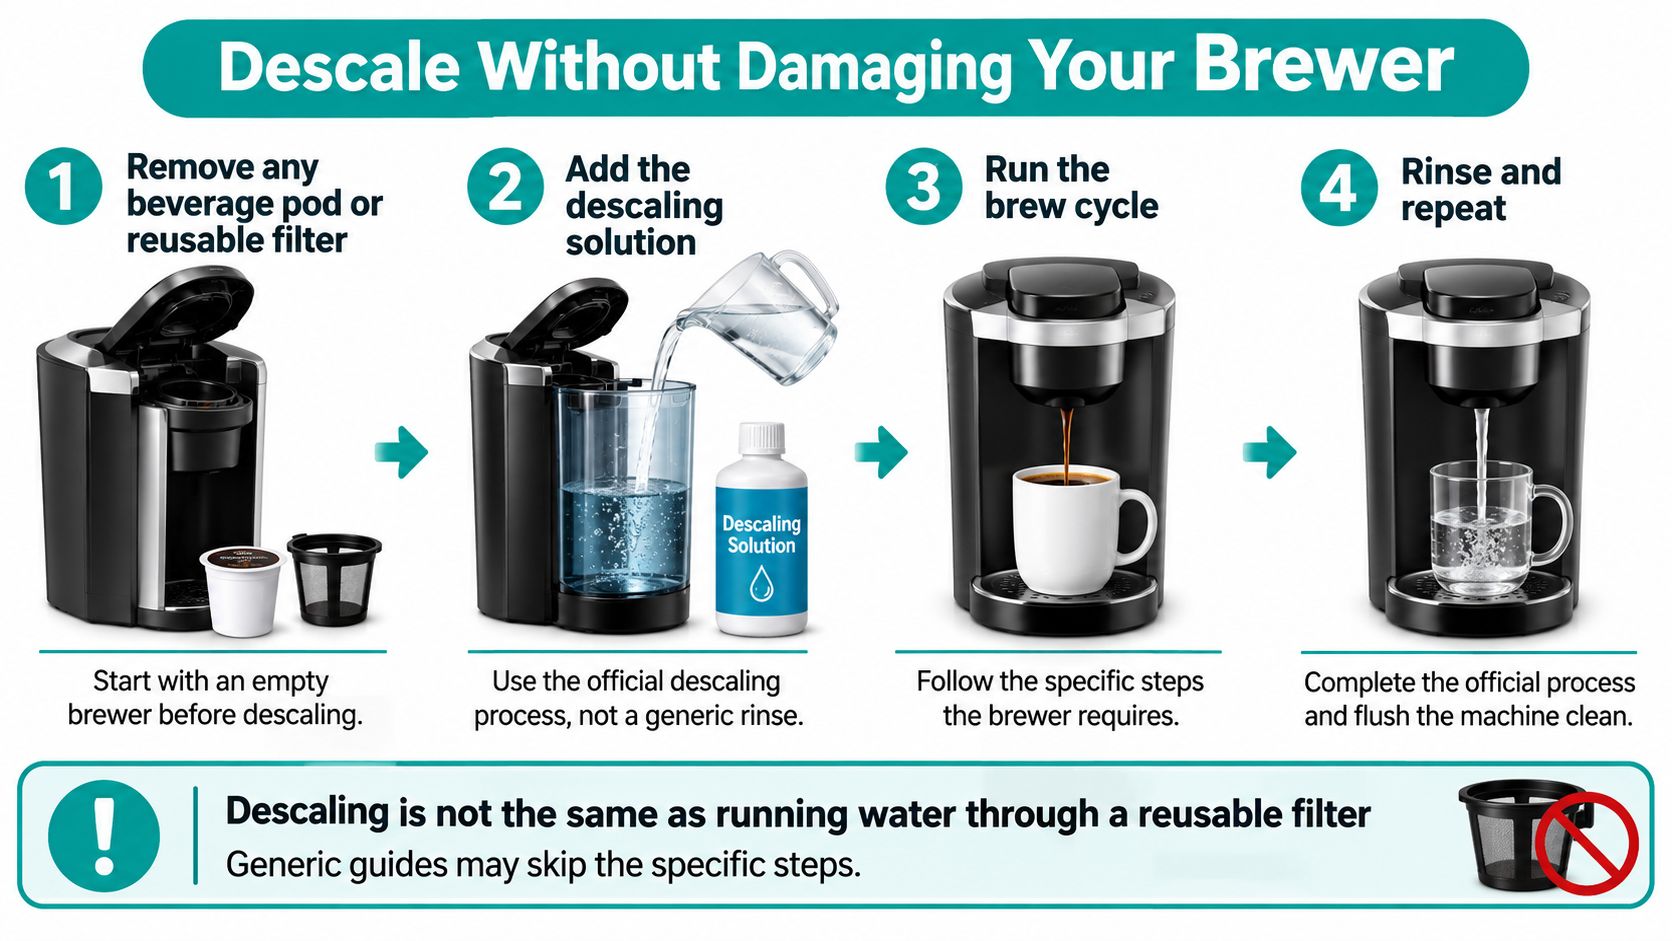
Descaling isn't the same as running water through a reusable filter. The process requires an empty pod holder, the correct solution quantity, contact time, and a complete fresh-water rinse.
The Keurig K90 use-and-care guide specifies a full-bottle solution procedure, a powered-on standing period of at least 30 minutes, and at least 12 large-size rinsing brews for that procedure. Follow this sequence only when it matches your model's instructions.
Follow the Correct Cleaning Sequence
Remove the beverage pod or reusable filter. Also remove any installed reservoir water filter. The holder must be empty, and the cartridge must stay out of the descaling solution.
Prepare the prescribed solution. For the full-bottle procedure, pour the entire bottle into the empty reservoir, fill the emptied bottle with water, and add that water. This follows the guide's specified dilution rather than an improvised mixture.
Collect and discard the hot output. Place a large mug under the spout and run the instructed cycles until the reservoir is empty. Discard each output carefully because you're handling hot cleaning liquid, not coffee.
Allow the specified standing period. Keep the brewer on during the guide's required pause. This gives the solution its prescribed contact time with mineral deposits.
Complete the fresh-water rinses. Rinse the reservoir, refill without exceeding MAX FILL, and perform the full rinse sequence required by the manual. Don't stop after the first clear-looking mug.
Reinstall or replace the water filter. Return the cartridge only after completing the fresh-water rinse process, keeping it separate from the chemical cleaning stage.
This overview highlights the difference between descaling and an ordinary water-only brew.
Don't Transfer Quantities Between Models
The Keurig K-Mini guide instead directs owners to use one-third of a bottle, 4.6 ounces, of descaling solution and add fresh water to the 10-ounce fill level. That difference is why a generic “pour in the bottle” instruction isn't safe to apply to every brewer.
Solution format matters too. Don't use a liquid-bottle measurement for cleaning tablets; match the cleaning product's directions to the brewer's approved process.
Finish the required final rinse brews and empty the reservoir before returning the machine to coffee service. A partial rinse isn't a completed descale.
Fix Overflow, Leaks and Weak Coffee
| Symptom | Likely cause | Fix |
|---|---|---|
| Coffee overflows the top | Grounds filled above the MAX line | Reload only to MAX and reseat the lid; a brief loading check |
| Grounds leak into the cup | Lid not clicked shut or filter misaligned | Close the lid fully and realign with the exit needle; a brief reloading task |
| Filter won't seat in the holder | Wrong model or non-approved filter | Confirm compatibility and use the approved My K-Cup Universal filter; don't force it |
| Weak, watery coffee | Too few grounds or filter not fully seated | Check the dose against the basket limit and reseat before brewing again |
| Hot water dribbles or flow slows | Mineral scale is a maintenance possibility | Complete a full model-specific descale and all rinse brews |
Use these causes as starting checks, not definitive diagnoses. A leaking cup doesn't prove that the machine needs descaling, and slow flow doesn't prove that the reusable filter is defective.
Separate Loading Problems From Maintenance Problems
For overflow or grounds in the cup, inspect the removable assembly first. Empty it, check closure and orientation, then reload it correctly. That's a short hands-on task, unlike a full descale with standing and rinsing stages.
For weak coffee, don't exceed the basket limit in pursuit of strength. Confirm that the filter is fully seated and that you haven't substantially underfilled it before changing other brewing variables.
Our reusable K-Cup troubleshooting tips offer additional checks for everyday loading and brewing.
Stop condition: If correct installation and a completed descale don't resolve the problem, stop brewing and contact Keurig support.
A filter that won't seat needs a compatibility decision, not more pressure. Remove it and verify the exact model designation before attempting another brew.
If a problem returns, note whether it happens with the reusable filter, during an empty-holder rinse, or both. Give support that distinction alongside your brewer model and the maintenance you've completed. Don't keep repeating leaking cycles or force the handle to test whether the part will eventually settle into place.
Shop PureHQ Reusable Filters for Your Model
Confirm the model number on your brewer before choosing a reusable filter. Match the full designation, including generation or Essentials wording where applicable, rather than buying solely by the Keurig brand name.
A useful purchase decision starts with the part you need. A reusable pod holds ground coffee for single-serve brewing, a carafe basket serves the carafe side, and a water-filter cartridge belongs to the water-filtration system. Don't treat those items as interchangeable replacements.
Match the Basket to the Brewing Job
Our Reusable Mesh Coffee Filter value pack for Keurig K-Duo Gen 2 and Essentials includes a gold-tone carafe and 2 refillable K-Cups for $18.95. For the maintenance routine, our Keurig & Breville Descaling and Cleaning Tablets come in a 24-count pack with 6 compatible water filters for $19.95; our Disposable Paper Filters for Reusable K-Cups come in a 100-pack and fit Keurig and Ninja DualBrew coffee makers.
Check each accessory against the machine and reusable basket you own. A paper liner isn't a remedy for an incorrect pod fit, and cleaning supplies don't change a brewer's compatibility requirements.
Buy for a Repeatable Routine
Before ordering, make a short checklist:
- Exact brewer: Copy the complete model identification from the machine.
- Correct component: Choose a single-serve pod, carafe basket, or water-filter replacement for the job.
- Installation method: Confirm whether the product uses the original holder or requires another configuration.
- Care requirements: Keep the product's loading and cleaning directions with your brewer manual.
For a K-Supreme SMART, respect the manufacturer's official-only reusable-filter requirement rather than assuming an aftermarket compatibility listing overrides it. For other models, compare the product's stated fit with the brewer instructions before committing.
Choose the filter you can install and maintain correctly. That's a more useful buying criterion than an unsupported promise of stronger coffee or universal fit.
PureHQ Inc. offers reusable coffee filters, water-filter replacements, and descaling supplies for model-specific brewing and maintenance. Check the model number on your brewer, then visit PureHQ Inc. to shop the reusable filter and compatible care accessories that match your machine.

