Coffee Machine Care
Your Coffee Machine Maintenance Course: A 2026 Guide
May
Your brewer probably didn't fail all at once. It started with coffee that tasted a little flat, a pod that stopped flowing cleanly, or a machine that suddenly sounded louder than usual. Most home owners treat those signs as random quirks. They aren't. They're maintenance signals.
That's why a coffee machine maintenance course makes sense for regular owners of Keurig, Ninja, and Breville machines. Not a technician manual full of wiring diagrams, and not another thin post that says "run descale mode" and calls it a day. A home-technician approach is what helps. Learn the routine, spot the symptom, and handle the care tasks that keep taste, flow, and reliability where they should be.
Module 1 Why Maintenance Matters More Than You Think
A neglected coffee machine usually tells on itself through the cup. Bitter notes show up where sweetness used to be. Brewing slows down. Water flow turns uneven. Milk residue hardens on steam parts. The machine still works, so it feels easy to postpone care for one more week. Then one more.
That habit is expensive in a very ordinary way. You get worse coffee every day, and you make the machine work harder than it should.
The coffee world takes this seriously enough that the Specialty Coffee Association Coffee Technicians Program trains professionals to install, maintain, and repair espresso machines, brewers, grinders, and water treatment systems. That matters because it confirms something home users often miss. Coffee equipment isn't just a hot-water box. It relies on interacting systems such as water quality, pressure, temperature control, and grind-related flow.
The myth that ruins home machines
"Just rinse it out" works for a mug. It doesn't work for a brewer with internal water paths, seals, needles, filters, and scale-prone heating parts.
Professional service businesses treat maintenance as structured work, not casual cleanup. If you're curious how repair operations organize recurring service, dispatch, and follow-up, it's useful to look at tools built for job management for repair shops. The point isn't that your kitchen needs shop software. It's that the industry treats upkeep as a repeatable system because repeatable systems prevent failures.
Practical rule: If your coffee tastes worse, brews slower, or the machine sounds strained, assume maintenance is overdue before you assume the machine is dying.
What home owners actually need
Most owners don't need technician certification. They need a practical routine that covers:
- Surface hygiene: remove oils, residue, and old grounds before flavor drifts
- Water care: reduce the mineral and taste problems that build up internally
- Preventive replacement: swap small consumables and worn parts before they cause messy symptoms
- Simple diagnosis: connect weak coffee, sputtering, or partial fills to the missed task behind the problem
This is the gap between basic blog advice and professional training. A home coffee machine maintenance course should teach you how to think like a technician, without turning you into one. That's what keeps a Keurig from clogging, a Ninja from brewing inconsistently, and a Breville from slowly turning into a scale-filled project.
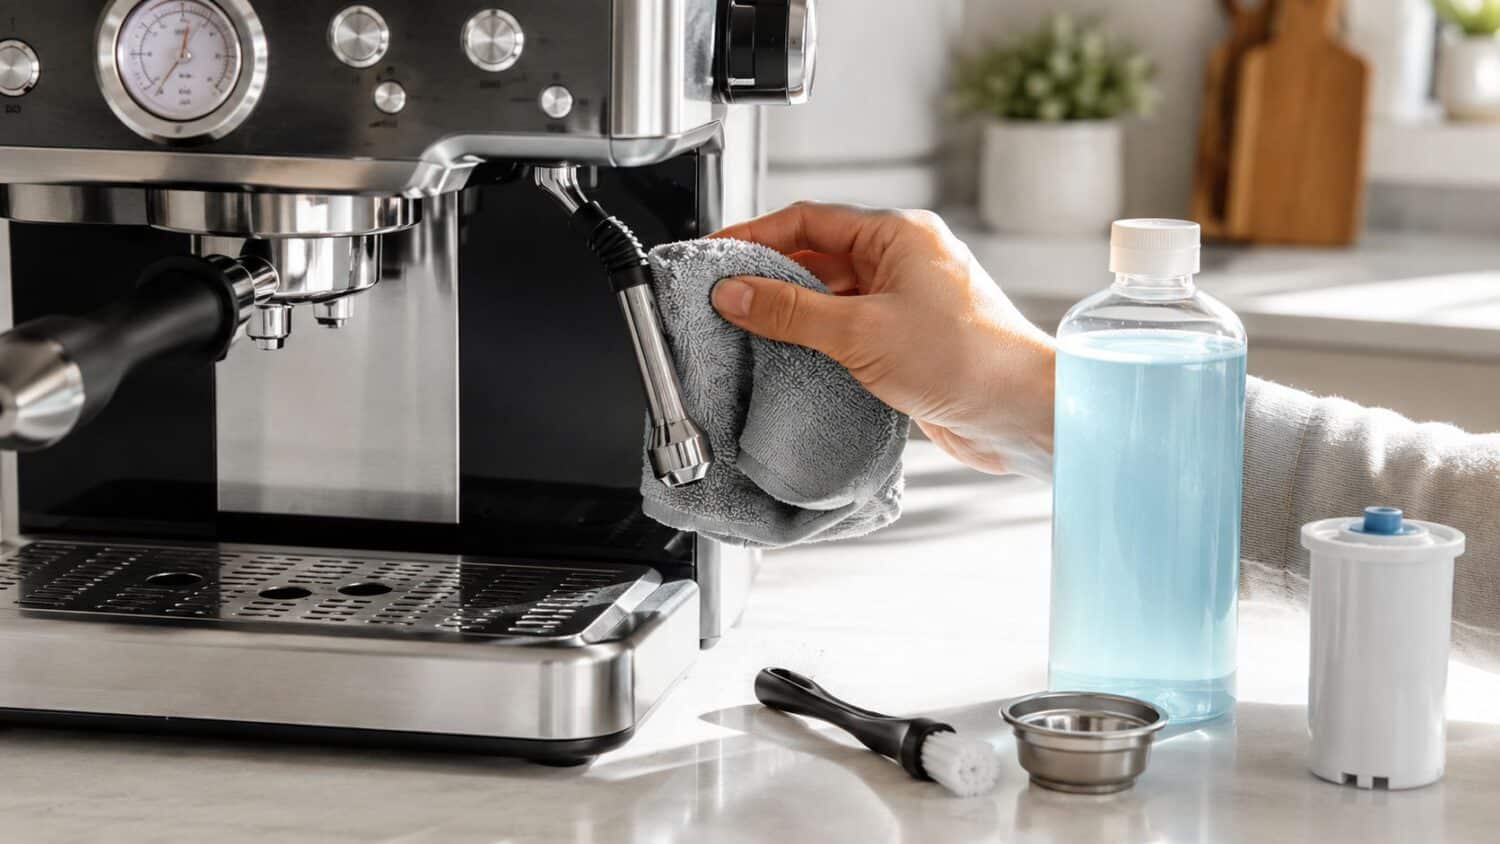
Lesson 1 The Foundation of Flavor with Daily and Weekly Cleaning
You brew a cup on Monday and it tastes fine. By Thursday, the same beans taste flat, the machine smells a little stale, and the flow looks uneven. For many Keurig, Ninja, and Breville owners, that slide starts with old residue, not bad coffee.
Coffee oils turn rancid. Wet grounds cake onto baskets and pod holders. Milk dries into a film that heat keeps baking onto steam parts. None of that looks dramatic at first, which is why daily and weekly cleaning gets skipped. Then flavor drops off and the machine starts acting older than it is.
A good home technician course starts here. Not with teardown diagrams or service menus. With the repeatable cleaning habits that keep common home machines tasting right and brewing without strain.
Your daily reset
Daily cleaning should take a few minutes, not half an hour. The goal is to remove fresh residue before it hardens.
- Rinse brew-contact parts right after use: empty and rinse the drip tray, pod holder, portafilter, or brew basket while residue is still soft.
- Wipe and purge steam parts on Breville machines: after milk drinks, wipe the wand and purge it so milk does not dry inside the tip.
- Clean reusable pod mesh gently: with refillable K-Cups and Ninja-compatible pods, tap out grounds fully and brush the mesh with a soft brush. Metal tools can damage it.
- Refresh the reservoir water: if the machine is used often, do not leave the same water sitting in the tank for long stretches.
One part causes more trouble than owners expect. The reusable pod.
When fine particles lodge in the mesh, water stops moving evenly through the coffee bed. That shows up as weak coffee, bitterness, or a cup that tastes both thin and harsh. It feels like a bean problem, but it usually traces back to flow.
The weekly clean that restores flavor
Weekly cleaning handles what a quick rinse cannot. During this, oils, film, and hidden grime get removed before they start affecting taste.
For a Keurig, wash the pod holder and removable funnel parts. For a Ninja, scrub the brew basket, clean reusable filter parts, and wipe the reservoir surfaces. For a Breville espresso machine, clean the baskets, wipe the shower area, and run a detergent backflush if the model supports it.
That routine sounds basic. It is also where a lot of flavor problems get fixed.
If you want the habit to stick, download a cleaning schedule template and mark tasks by machine type. Keurig owners usually forget the pod area. Ninja owners miss filter and basket buildup. Breville owners tend to stay on top of the portafilter but ignore the group head until shots start tasting dirty.
Clean parts while residue is fresh. Five minutes now saves scrubbing later and keeps old oils out of tomorrow's cup.
Machine-specific habits that work
A useful owner course has to match the machine on the counter. Popular home brewers fail in different ways, and the cleaning routine should reflect that.
Keurig
Check the pod holder, exit needle area, drip tray, and reusable pod mesh. If cups start brewing unevenly, look for trapped grounds and sticky residue before assuming a larger failure.
Ninja
Watch the brew basket, shower area, and reusable filter parts. Ninja machines often show neglect as uneven extraction, stale flavors, or coffee that tastes weaker than the dose should allow.
Breville
Heat, pressure, and milk create faster buildup. Wipe, purge, rinse, and keep baskets free of old oils. A Breville can still look clean from the outside while the parts that touch coffee are overdue for attention.
If you want an owner-friendly reference to compare against your routine, this guide on how to clean a coffee maker is a useful companion.
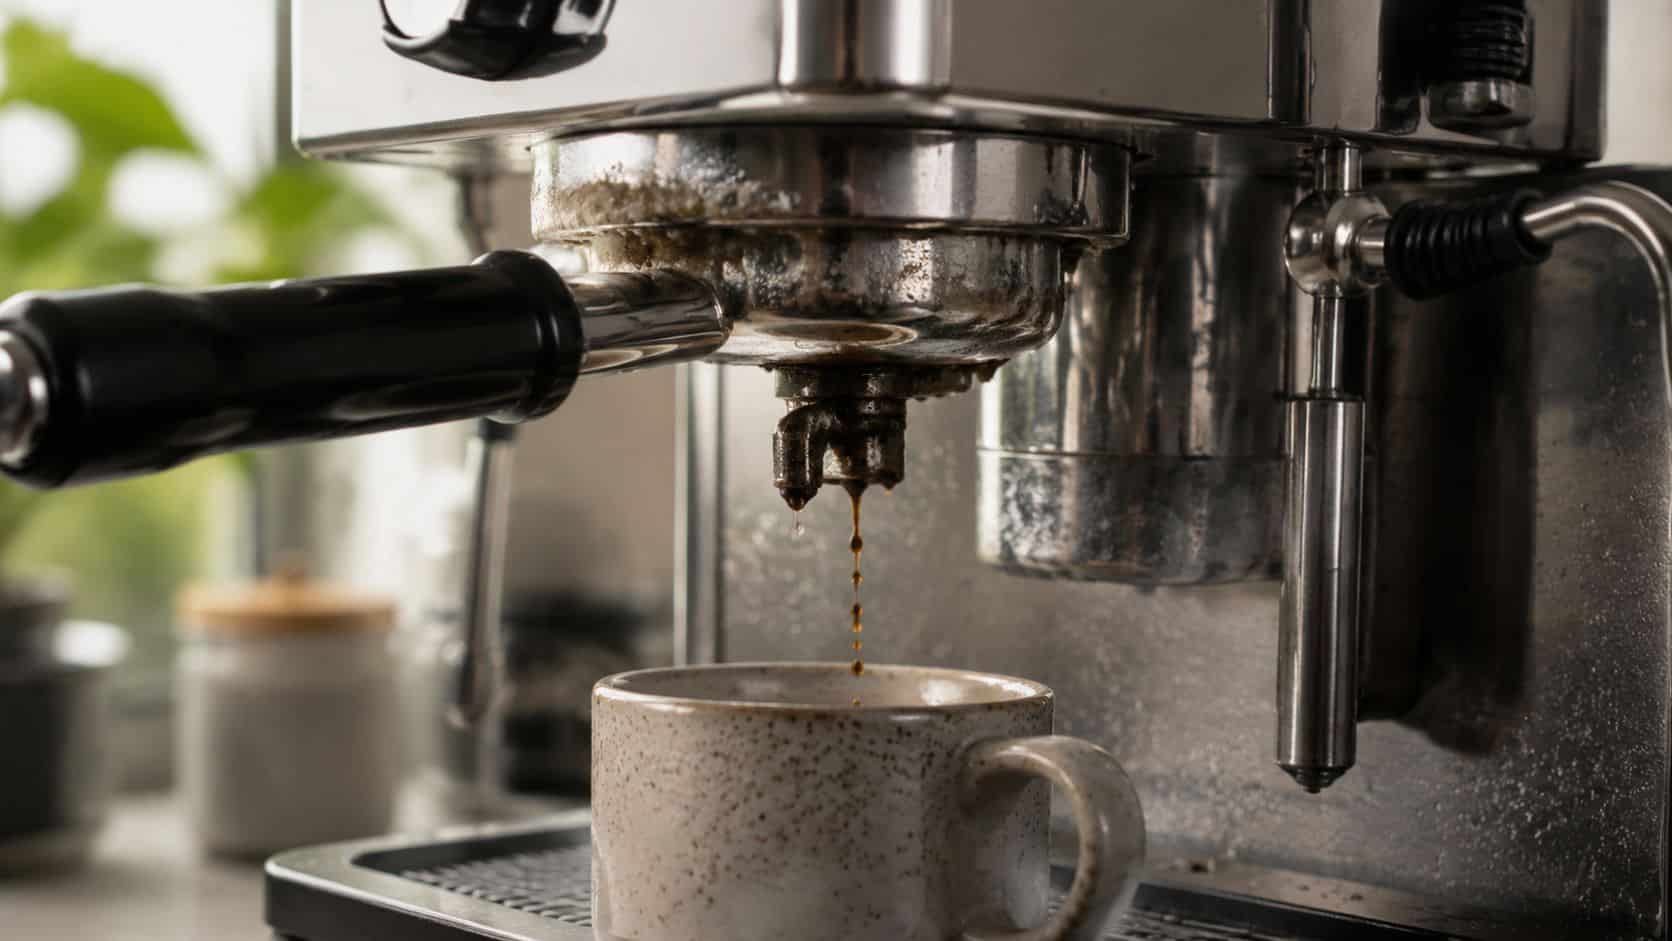
Lesson 2 Defeating Mineral Buildup by Descaling Your Machine
Cleaning removes visible residue. Descaling removes the hidden buildup that slowly chokes a machine from the inside.
The reason this matters is simple. The U.S. Geological Survey explains that approximately 85% of homes in the United States have hard water. Hard water carries the minerals that build up inside coffee makers. If your Keurig starts brewing short cups, your Ninja takes longer than normal, or your Breville sounds strained, scale is one of the first things to suspect.
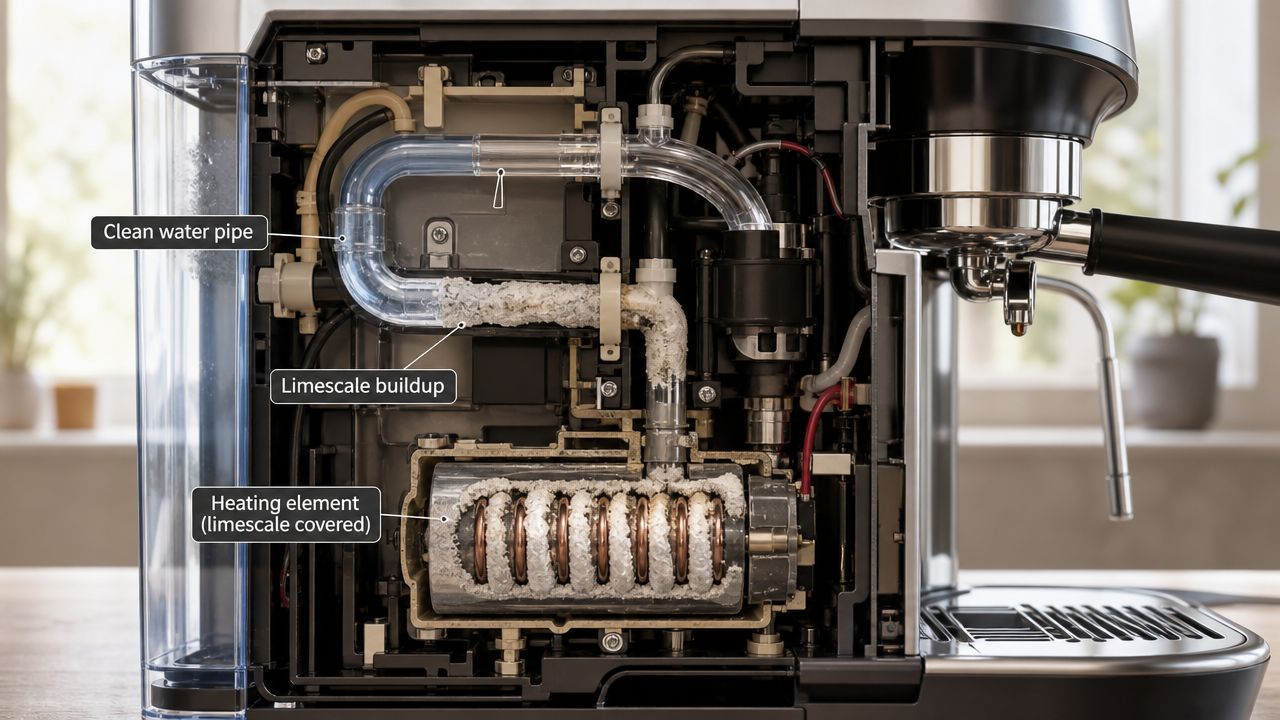
What scale actually does
Mineral buildup narrows water paths, interferes with heating efficiency, and changes how water moves through the machine. You taste that as dull, sour, or underpowered coffee. You hear it as sputtering, extra noise, or strained pumping.
Scale also fools owners because the machine often still "works." It just works worse.
Signs your machine needs descaling
Look for patterns, not just one symptom:
- Shorter pours: the machine stops before it should or doesn't brew a full cup
- Longer brew times: water is moving through restricted pathways
- Strange noises: internal components are pushing against buildup
- Taste drift: coffee starts tasting weak, sharp, or oddly flat even after normal cleaning
For a deeper owner-focused explanation of product options and process, this guide to the best descaler for a coffee machine is worth reading before you run a cycle.
A practical descaling approach for home users
For Keurig and Ninja machines, start by emptying the reservoir and removing any water filter if your machine uses one. Fill with the descaling solution according to the product instructions, run the recommended brew or clean cycle, then flush thoroughly with fresh water until the machine runs clean and odor-free.
Breville owners need to be more careful because espresso machines have more internal complexity. Follow the machine's descale procedure exactly, especially if your model prompts you through the cycle.
One product mention is enough here. A universal descaling solution, such as one sold by PureHQ Inc., is designed for this kind of owner-level maintenance across multiple machine brands.
Before you start, a visual walkthrough helps. This video shows the kind of process and pacing that makes descaling less intimidating:
Vinegar is popular because it's in the pantry. That doesn't make it the right default for every machine. Follow the machine guidance and the descaler instructions, not kitchen folklore.
Lesson 3 Mastering Water Quality with Proper Filtration
Descaling fixes yesterday's buildup. Filtration reduces tomorrow's.
A lot of owners treat water as neutral because it looks clean coming out of the tap. In practice, water changes both flavor and maintenance load. Chlorine odors, off tastes, and mineral-heavy water all work against the cup and the machine.
Why filtration belongs in a home technician routine
The Specialty Coffee Association's technician training explicitly includes water treatment systems in the professional maintenance skill set, which is one reason a home coffee machine maintenance course shouldn't stop at wiping parts and running cleaner. Good water habits reduce taste problems and lower the stress on internal components over time.
For owners using Keurig, Ninja, or Breville machines with filter systems, the basic job of a charcoal-style filter is straightforward. It helps reduce taste and odor issues so the brewed coffee starts from cleaner input. It also gives you a preventive habit instead of waiting for scaling and flavor drift to announce themselves later.
If you want a broader owner guide to the topic, this article on how to improve water quality for coffee gives a solid overview.
PureHQ Water Filters vs. Generic Alternatives
One common objection comes up fast: do third-party filters fit and filter properly? That's a fair concern. A cheap filter that fits loosely can create bypass problems, where water slips around the filter instead of through it.
| Feature | PureHQ Premium Filters | Standard Generic Filters |
|---|---|---|
| Fit focus | Designed around compatibility for specific home coffee machine formats | Fit can vary, which raises the risk of loose seating |
| Material transparency | Marketed with clear compatibility and material details such as BPA-free positioning where applicable | Product details are often sparse or inconsistent |
| Flavor management | Intended to reduce chlorine and odor issues in routine home use | Performance can be inconsistent from batch to batch |
| Owner confidence | Easier to reorder when the machine model is clearly listed | Shoppers often have to guess from broad compatibility claims |
| Support | Usually paired with FAQs and brand guidance | Often limited to marketplace listing text |
This isn't about saying every generic filter fails. Plenty work acceptably. The trade-off is predictability. If you've ever installed a cheap filter that felt loose, jammed awkwardly, or made you wonder whether water was passing through it correctly, you already know the issue.
What to check before you buy
- Machine compatibility: Keurig, Ninja, and Breville use different filter formats
- Replacement rhythm: replace filters on a consistent schedule so they don't become forgotten hardware
- Fit after installation: the filter should seat cleanly without forcing or wobbling
- Taste result: if chlorine smell or odd flavor remains unchanged, recheck fit and model match
A filter only helps if water actually goes through it. Good fit isn't a minor detail. It's the whole job.
Lesson 4 Building Your Preventive Maintenance Schedule
A coffee machine rarely fails all at once. It starts with a slower pour on Monday, a strange sputter on Thursday, then a cup that tastes flat even though you used the same beans. Owners of Keurig, Ninja, and Breville machines run into this all the time because home machines hide wear until several small maintenance misses pile up.
A good schedule fixes that. It gives home users a technician's habit without turning the kitchen into a repair bench.
A Home Schedule That Sticks
The best schedule is the one you will follow when life gets busy. Skip the long printable checklist with twenty boxes. Keep a short routine where you store filters, cleaner, or pods so the reminder shows up at the moment you need it.

For home owners, the trade-off is simple. A detailed schedule catches more problems, but a complicated one gets ignored. A lighter schedule misses some early warning signs, but it gets done. Aim for the middle. Enough structure to spot trouble early, not so much paperwork that you stop using it after a week.
A workable routine for Keurig, Ninja, and Breville
Daily
Rinse anything that touched coffee or milk. Empty the drip tray before stale water sits there all day. If you use reusable pods or baskets, check for wet grounds stuck in corners because that residue hardens fast.
Weekly
Clean the brew path parts you can remove without tools. On a Keurig, that may mean the pod holder and exit area. On a Ninja, it often includes the brew basket and shower area. On a Breville espresso machine, this is the time to clean baskets, steam parts, and any screen that collects oils.
Monthly
Check the machine like a home technician, not just a user. Is the brew louder than usual? Has the flow slowed down? Does the lid, tank, or filter housing feel loose? Replace the water filter if your model uses one and your usage pattern supports monthly changes.
Quarterly
Run a full descale if your water and machine history call for it. Inspect seals, gaskets, baskets, and removable valves or screens you can access safely. Breville owners should pay close attention here because pressure, heat, and milk use expose small wear problems sooner.
Why this schedule works
Each layer covers a different failure point. Daily care protects taste and keeps old residue from baking onto parts. Weekly cleaning reaches the spots that affect flow. Monthly checks catch changes in sound, speed, and fit before they become breakdowns. Quarterly work deals with buildup and wear that no quick rinse will solve.
That pattern shows up in other household equipment too. This article on homeowner boiler service advice makes the same point from a different angle. Machines last longer when the check happens before the problem is obvious.
A few adjustments make the schedule easier to live with:
- For busy households: assign one fixed cleanup day and treat it like taking out the trash
- For shared kitchens or breakrooms: give one person ownership of the weekly check so the machine does not become everyone's job and no one's job
- For espresso setups: keep basic wear items on hand so a cheap gasket or basket problem does not sideline the machine for two weeks
The goal is not perfection. The goal is catching problems while they are still small, cheap, and easy to fix.
Final Exam Troubleshooting Common Coffee Machine Issues
When a coffee machine acts up, the symptom usually points back to one missed maintenance habit. You don't need a lab coat to diagnose most home problems. You need a calm checklist.
Weak or watery coffee
Start with the brew path. Reusable pods and baskets often hold residue in fine mesh or corners that look clean at a glance. If those parts are dirty, water won't flow through the coffee properly.
Also check whether scale is restricting the machine internally. If cleaning doesn't restore normal strength, descale next.
Grounds in the cup
This usually points to a pod or basket problem, not the machine itself. Inspect reusable pods for damaged mesh, trapped grounds around the rim, or overfilling that prevents proper closure.
If the pod is old, warped, or difficult to clean thoroughly, replacement is often the smarter move than constant troubleshooting.
Machine won't brew a full cup
Partial fills often trace back to mineral buildup or clogged exit points. Run through the deep-cleaning steps first, then descale if the issue remains. Keurig owners see this one often because short pours can look like a software quirk when the actual cause is restricted flow.
Strange noises, sputtering, or groaning
Listen for pattern changes. A machine that's louder than normal often has trouble moving water. That can come from scale, blocked pathways, or a reservoir part not seated correctly after cleaning.
If a machine suddenly sounds strained, stop running cycle after cycle and check the maintenance basics first. Repetition rarely fixes blockage.
Quick diagnostic checklist
- Taste is off: clean the coffee-contact parts first
- Flow is slow: inspect for clogs, then descale
- Cup volume changed: suspect internal restriction
- Steam performance dropped: clean milk-contact parts and inspect for residue
- Problem keeps returning: review your schedule, not just the one-time fix
If you've worked through the cleaning, descaling, and filtration basics and the machine still leaks, flickers, or shows electrical issues, that's the point to stop DIY troubleshooting and get qualified service. Home maintenance should make ownership easier, not push you into repairs that aren't safe.
Pure coffee starts with clean water paths, clean brew parts, and a routine you can keep. If you need filters, reusable pods, descalers, or maintenance accessories built for Keurig, Ninja, Breville, and similar home brewers, shop PureHQ Inc..
