Coffee Machine Care
Keurig Water Filter Replacement Instructions: Easy Guide
May
You fill the reservoir, brew your usual pod, take a sip, and something’s off. The coffee tastes flat, stale, or oddly harsh. Often, blame falls on the pod, the roast, or the machine itself. In a lot of kitchens, however, the underlying issue is simpler. The water filter is overdue, installed wrong, or never activated properly in the first place.
That’s where people get stuck. Keurig owners and compatible Ninja users can find plenty of quick videos and half-complete tips online, but the advice often conflicts. A filter swap should be easy. Instead, it turns into cloudy water, a cartridge that won’t seat correctly, or coffee that still tastes wrong after the replacement.
Why Your Morning Coffee Suddenly Tastes Off
A bad cup first thing in the morning is irritating because it feels like it came out of nowhere. Yesterday the brewer was fine. Today the same machine gives you coffee that tastes dull or dirty, even when you haven’t changed pods or beans.
In most cases, the water side gets ignored until the taste changes enough to force attention. That’s a mistake I see constantly. People clean the exterior, wipe the drip tray, and descale once in a while, but the small charcoal cartridge in the reservoir gets treated like an afterthought.

Why so many people get this wrong
The internet has made a simple maintenance job harder than it should be. Instructional videos and guides often give inconsistent advice on filter preparation, and users frequently report cloudy first cups, which points to a basic problem. Many people still don’t know that the cartridge needs proper soaking and rinsing before it goes into the machine.
Cloudy first brews usually aren’t a machine failure. They’re a preparation failure.
If your tap water already has a noticeable taste, the problem gets even more obvious. In homes with tougher water conditions, broader filtration at the plumbing level can help too. If you’re looking beyond the coffee maker itself, this overview of reliable Halo water systems in Atlanta gives useful context on whole-home filtration and why incoming water quality matters before it ever reaches your brewer.
One clear path beats five conflicting tutorials
Most users don’t need more tips. They need one set of keurig water filter replacement instructions that lines up with how these brewers work. That means preparing the cartridge correctly, fitting it into the holder without forcing it, and reinstalling it in the reservoir based on the machine family you own.
If you also want a broader primer on the overall process, this guide to coffee maker water filter replacement is a helpful companion. The rest of this article narrows the focus to Keurig machines and compatible Ninja models, with the mistakes and trade-offs spelled out plainly.
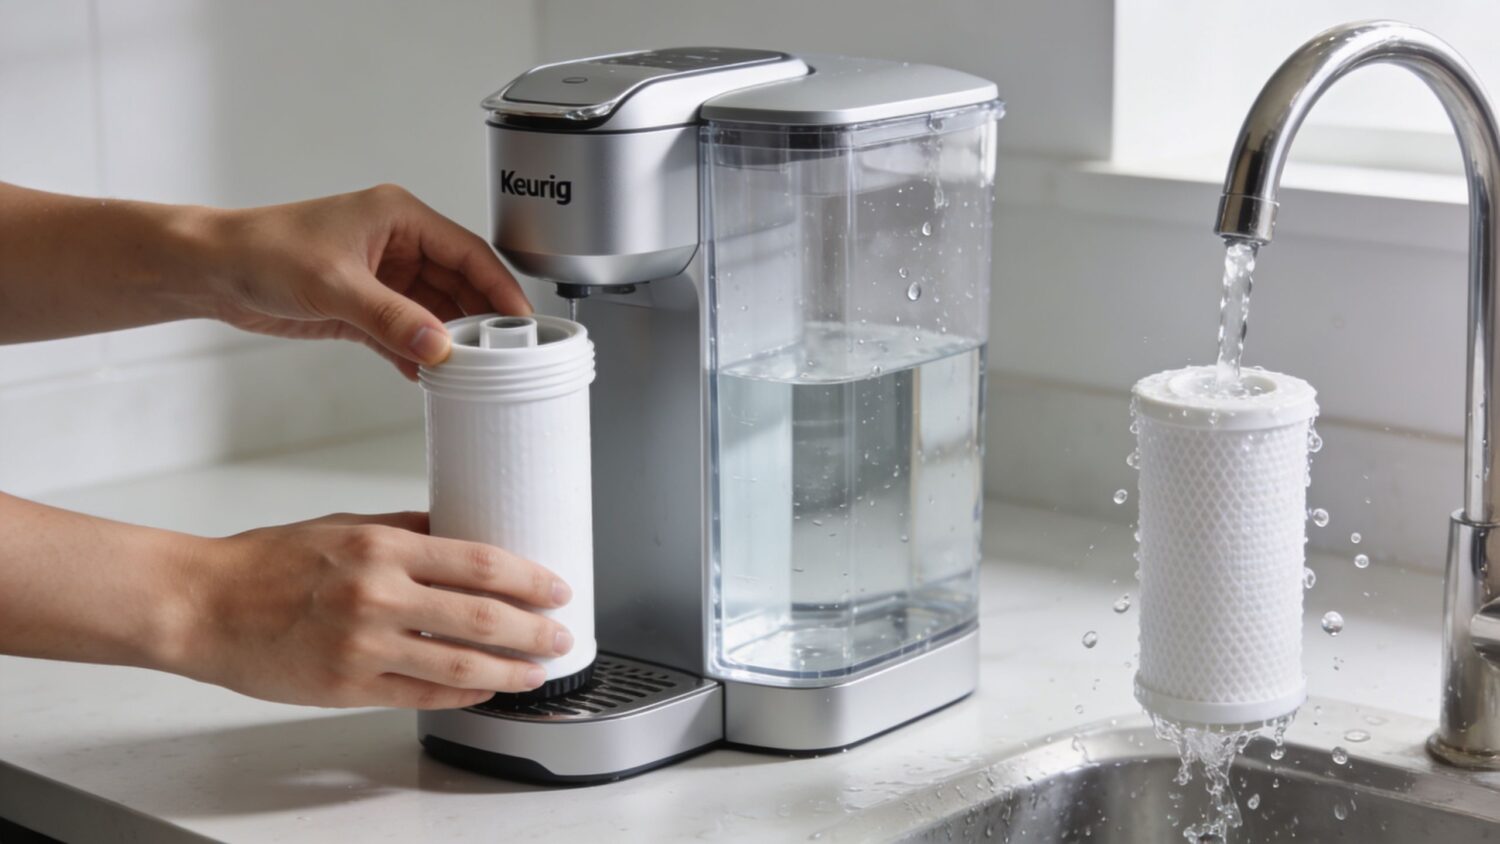
Prepare Your New Water Filter Cartridge The Right Way
Most filter problems start before the cartridge ever reaches the reservoir. The fix is simple, but you can’t rush it.
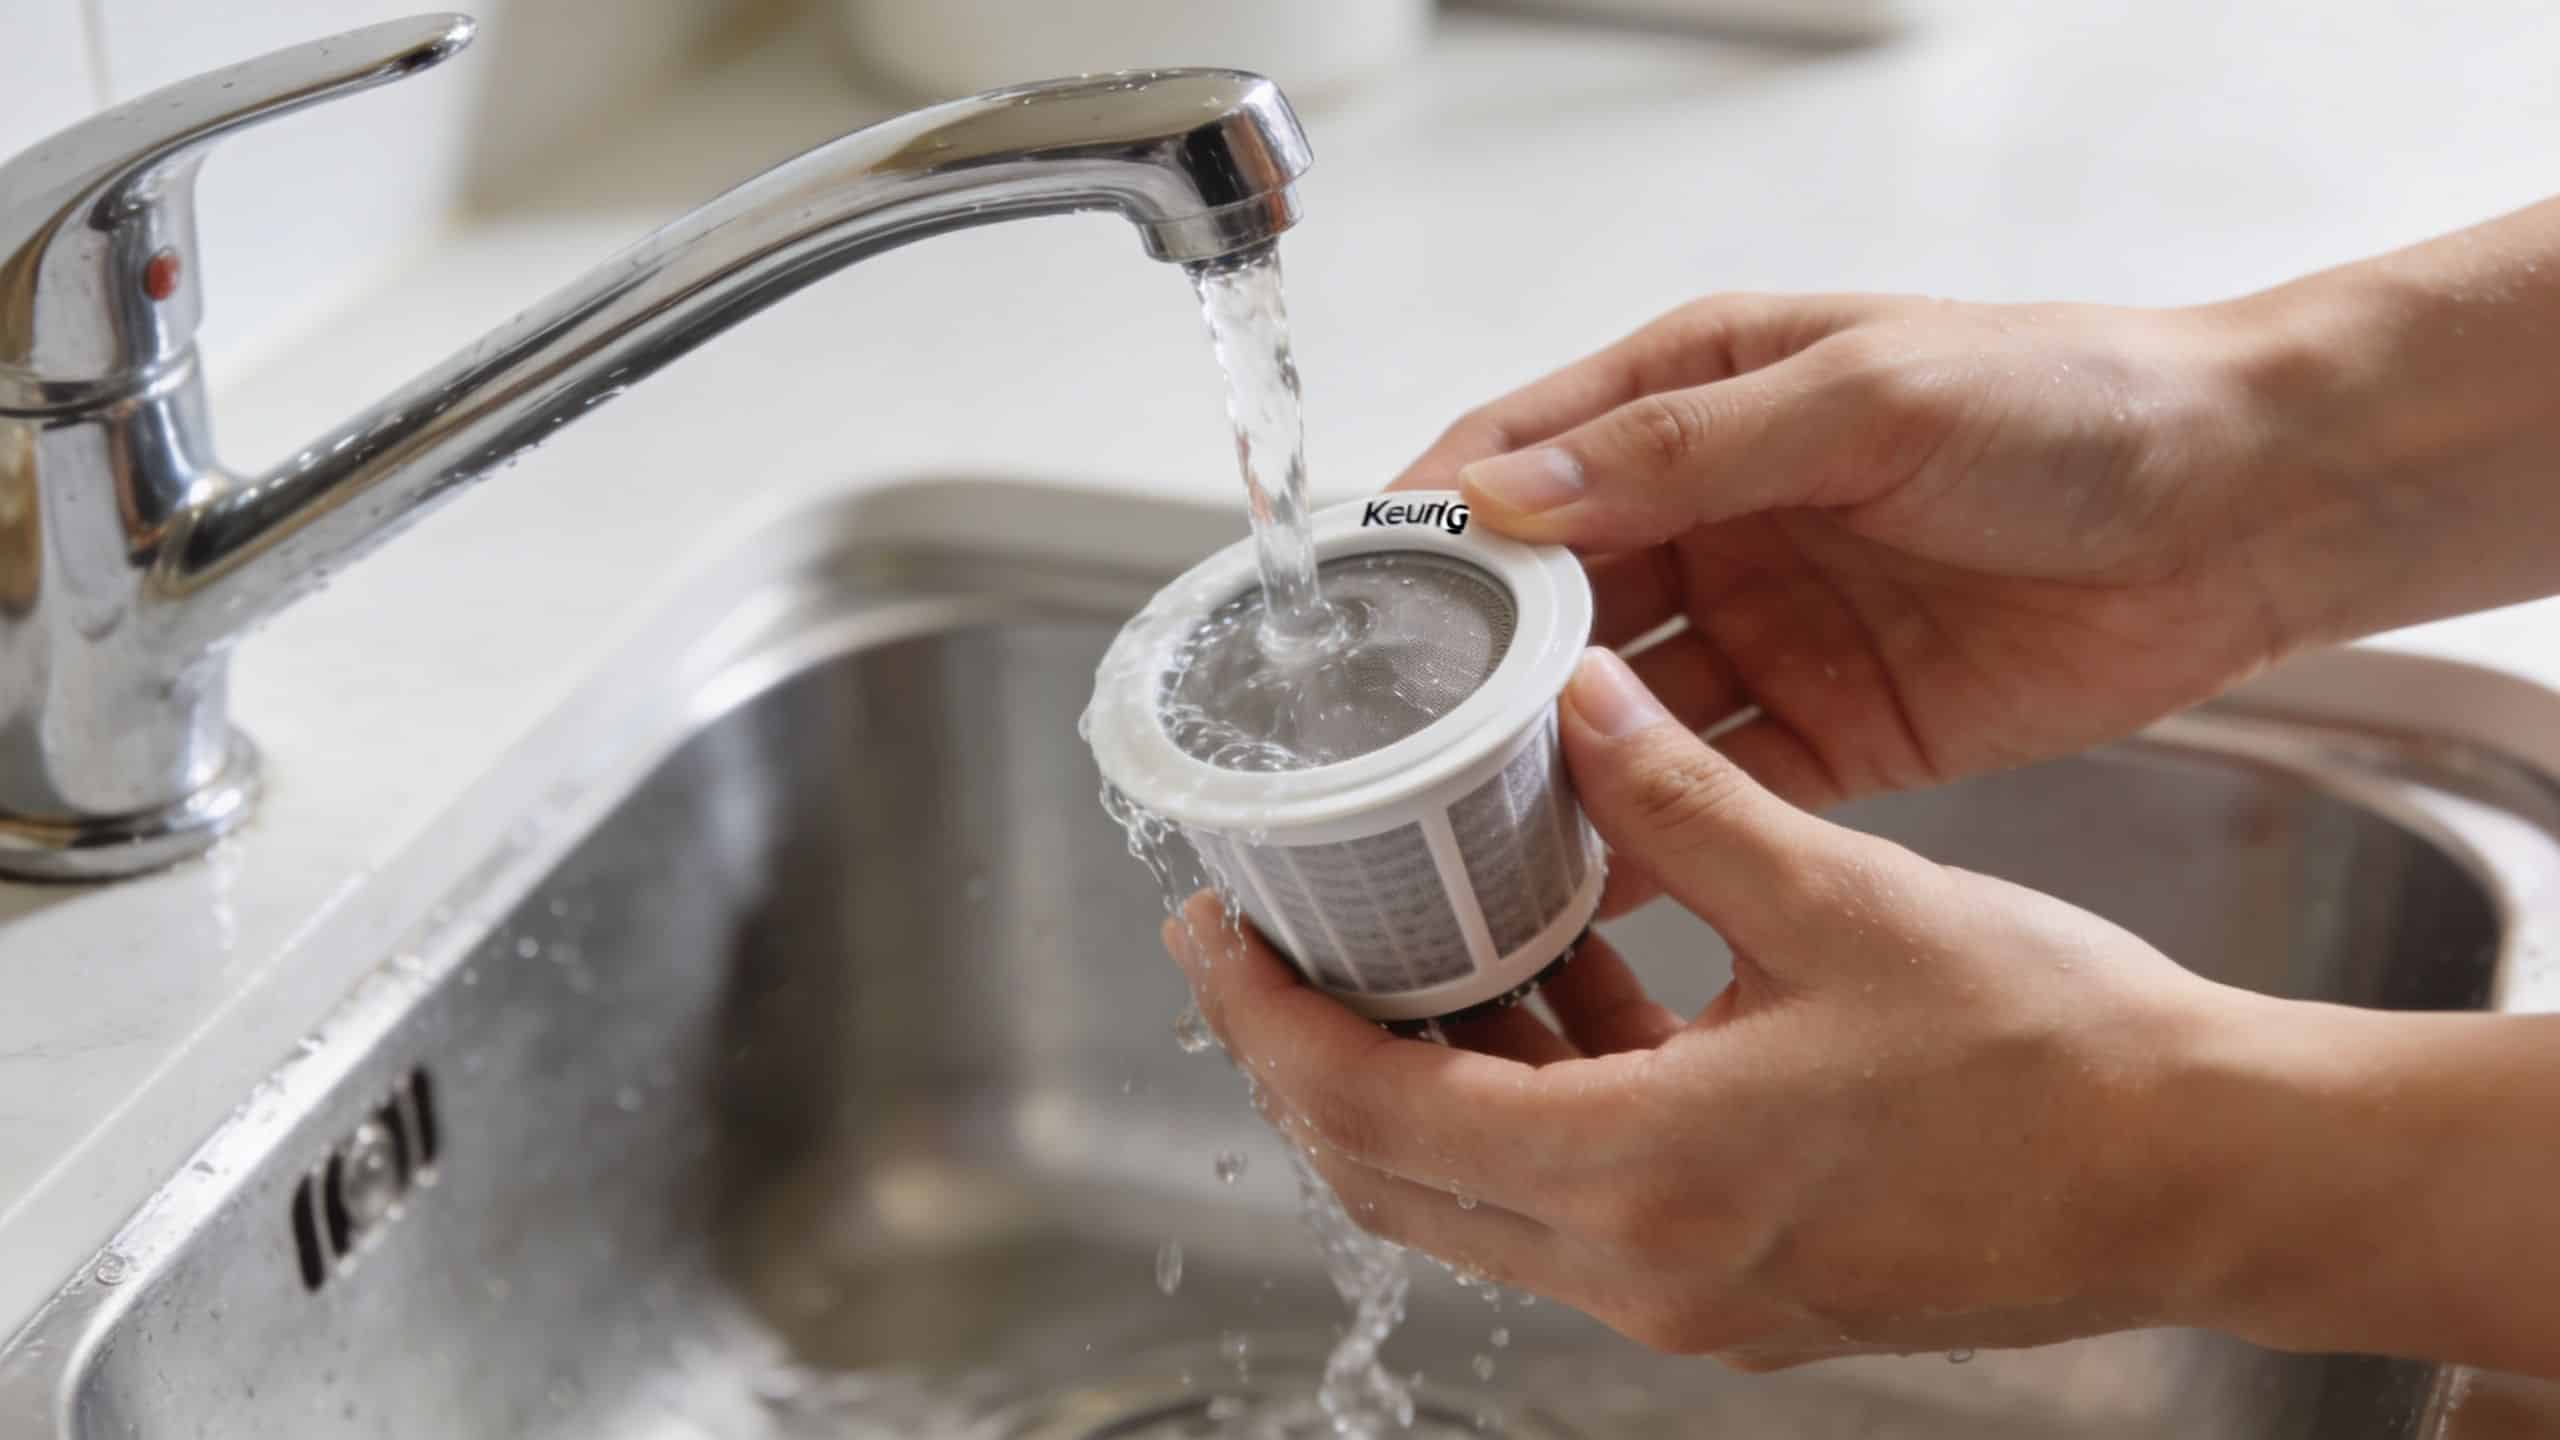
Official Keurig-style preparation guidance says a new cartridge must be soaked in fresh water for exactly 5 minutes, then rinsed under running water for 60 seconds. That isn’t busywork. Dry carbon media doesn’t filter as effectively, so skipping that prep can hurt performance from the first brew.
The only prep routine that consistently works
Use this sequence:
- Fill a cup or bowl with fresh water. Use cool or room-temperature water, not hot water.
- Submerge the new cartridge fully for 5 minutes. Don’t shortcut this.
- Rinse the cartridge for 60 seconds under running water. Let the water run across the whole surface.
- If your holder has mesh in the lower section, rinse that too.
- Insert the cartridge into the lower holder. It should sit firmly, not wobble.
- Snap the upper holder in place.
- Set the date dial if your holder includes one.
That whole prep and assembly routine usually takes less than 10 minutes, and that’s time well spent if you want the first cup to taste clean instead of chalky or off.
What works and what does not
Some users try to save time by giving the filter a quick splash and calling it done. That’s where the trouble starts. A fast rinse doesn’t fully prepare the carbon, and a loose install creates another failure point.
What works:
- Full soak time: Carbon needs time in water before use.
- Complete rinse: Running water clears the cartridge before brewing starts.
- Firm fit: The holder should close securely without sloppiness.
What doesn’t:
- Hot-water soaking: It’s not recommended for prep.
- Dry installation: The filter may still fit, but it won’t behave the same.
- Forcing the holder closed: If it feels wrong, reopen it and reseat the cartridge.
A quick visual can help if you want to see the sequence before you do it:
Practical rule: If the new cartridge wasn’t soaked and rinsed exactly as directed, don’t troubleshoot the brewer yet. Redo the filter prep first.
Replacing the Filter in Your Specific Keurig or Ninja Model
The cartridge prep is universal. The holder location and reservoir layout are not. That’s where people get tripped up, especially if they’ve moved from an older K-Classic to a slimmer Keurig, or from Keurig to a compatible Ninja machine.
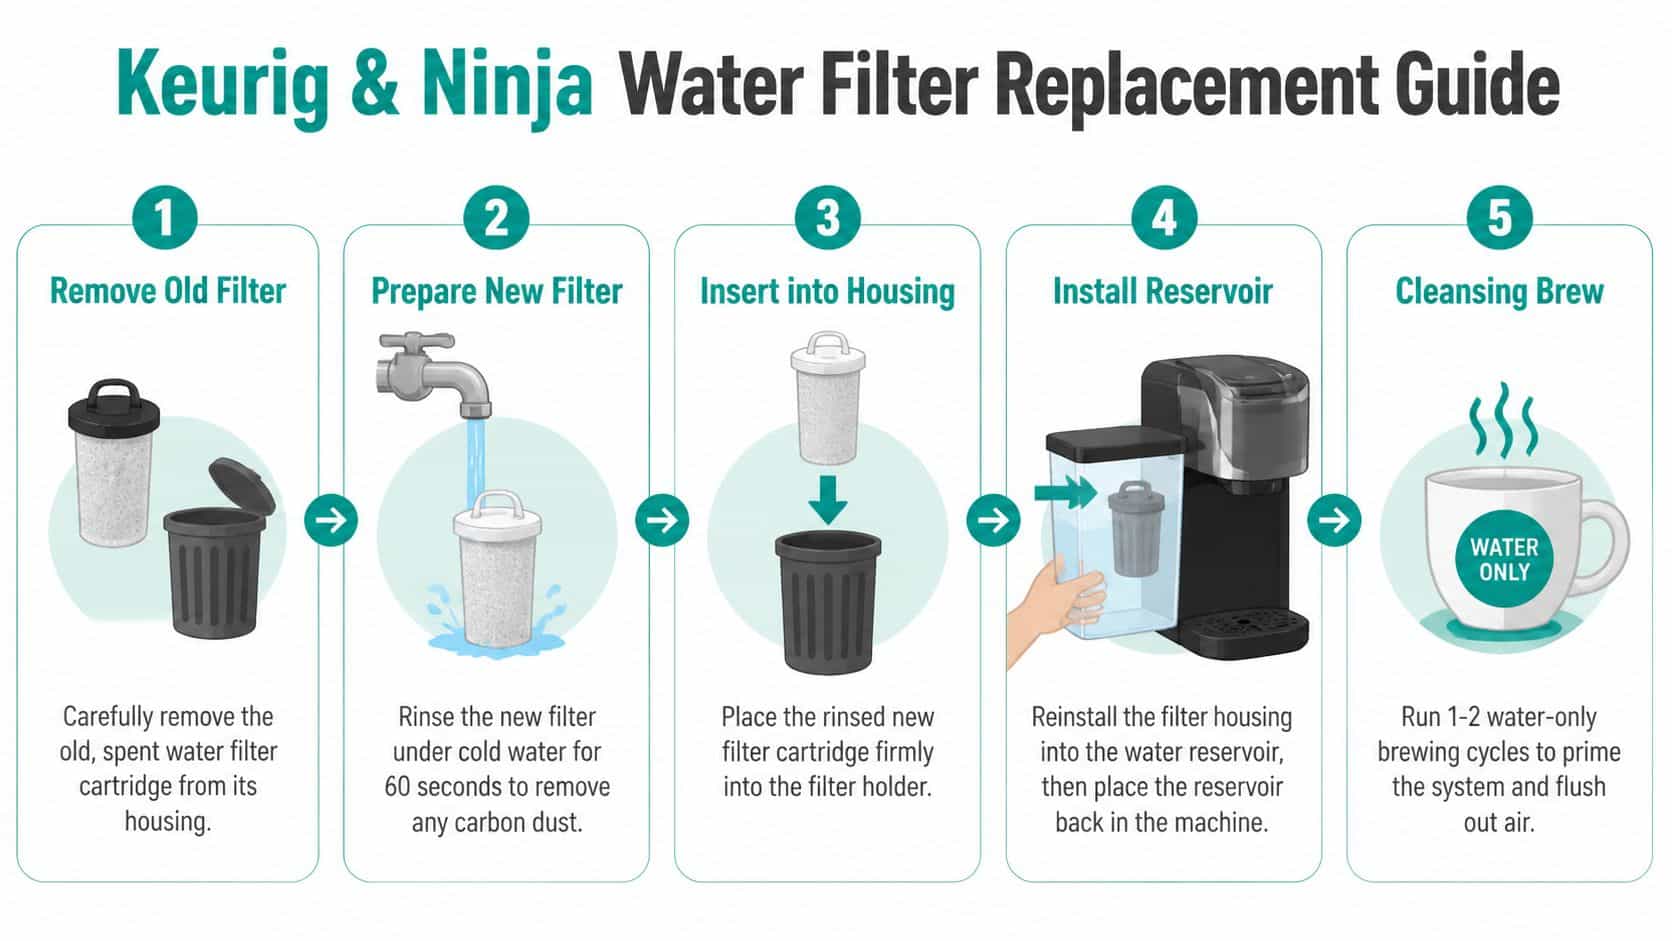
K-Classic and older reservoir-style Keurig models
On older Keurig brewers, the filter assembly usually sits inside the removable water reservoir. Once you remove the tank, the holder is easy to spot near the base.
Use this approach:
- Remove the reservoir: Lift it straight out and set it on a stable surface.
- Pull out the filter holder: It normally lifts or slides out without much resistance.
- Open the holder and discard the old cartridge: If the old filter sticks, don’t twist aggressively. Open the holder first.
- Install the prepared new cartridge: Seat it in the lower section and snap the top shut.
- Return the holder to the reservoir: Make sure it sits fully in its slot before reinstalling the tank.
These models are usually the easiest to service. The common mistake isn’t access. It’s forgetting that a cartridge can look installed even when it isn’t seated all the way.
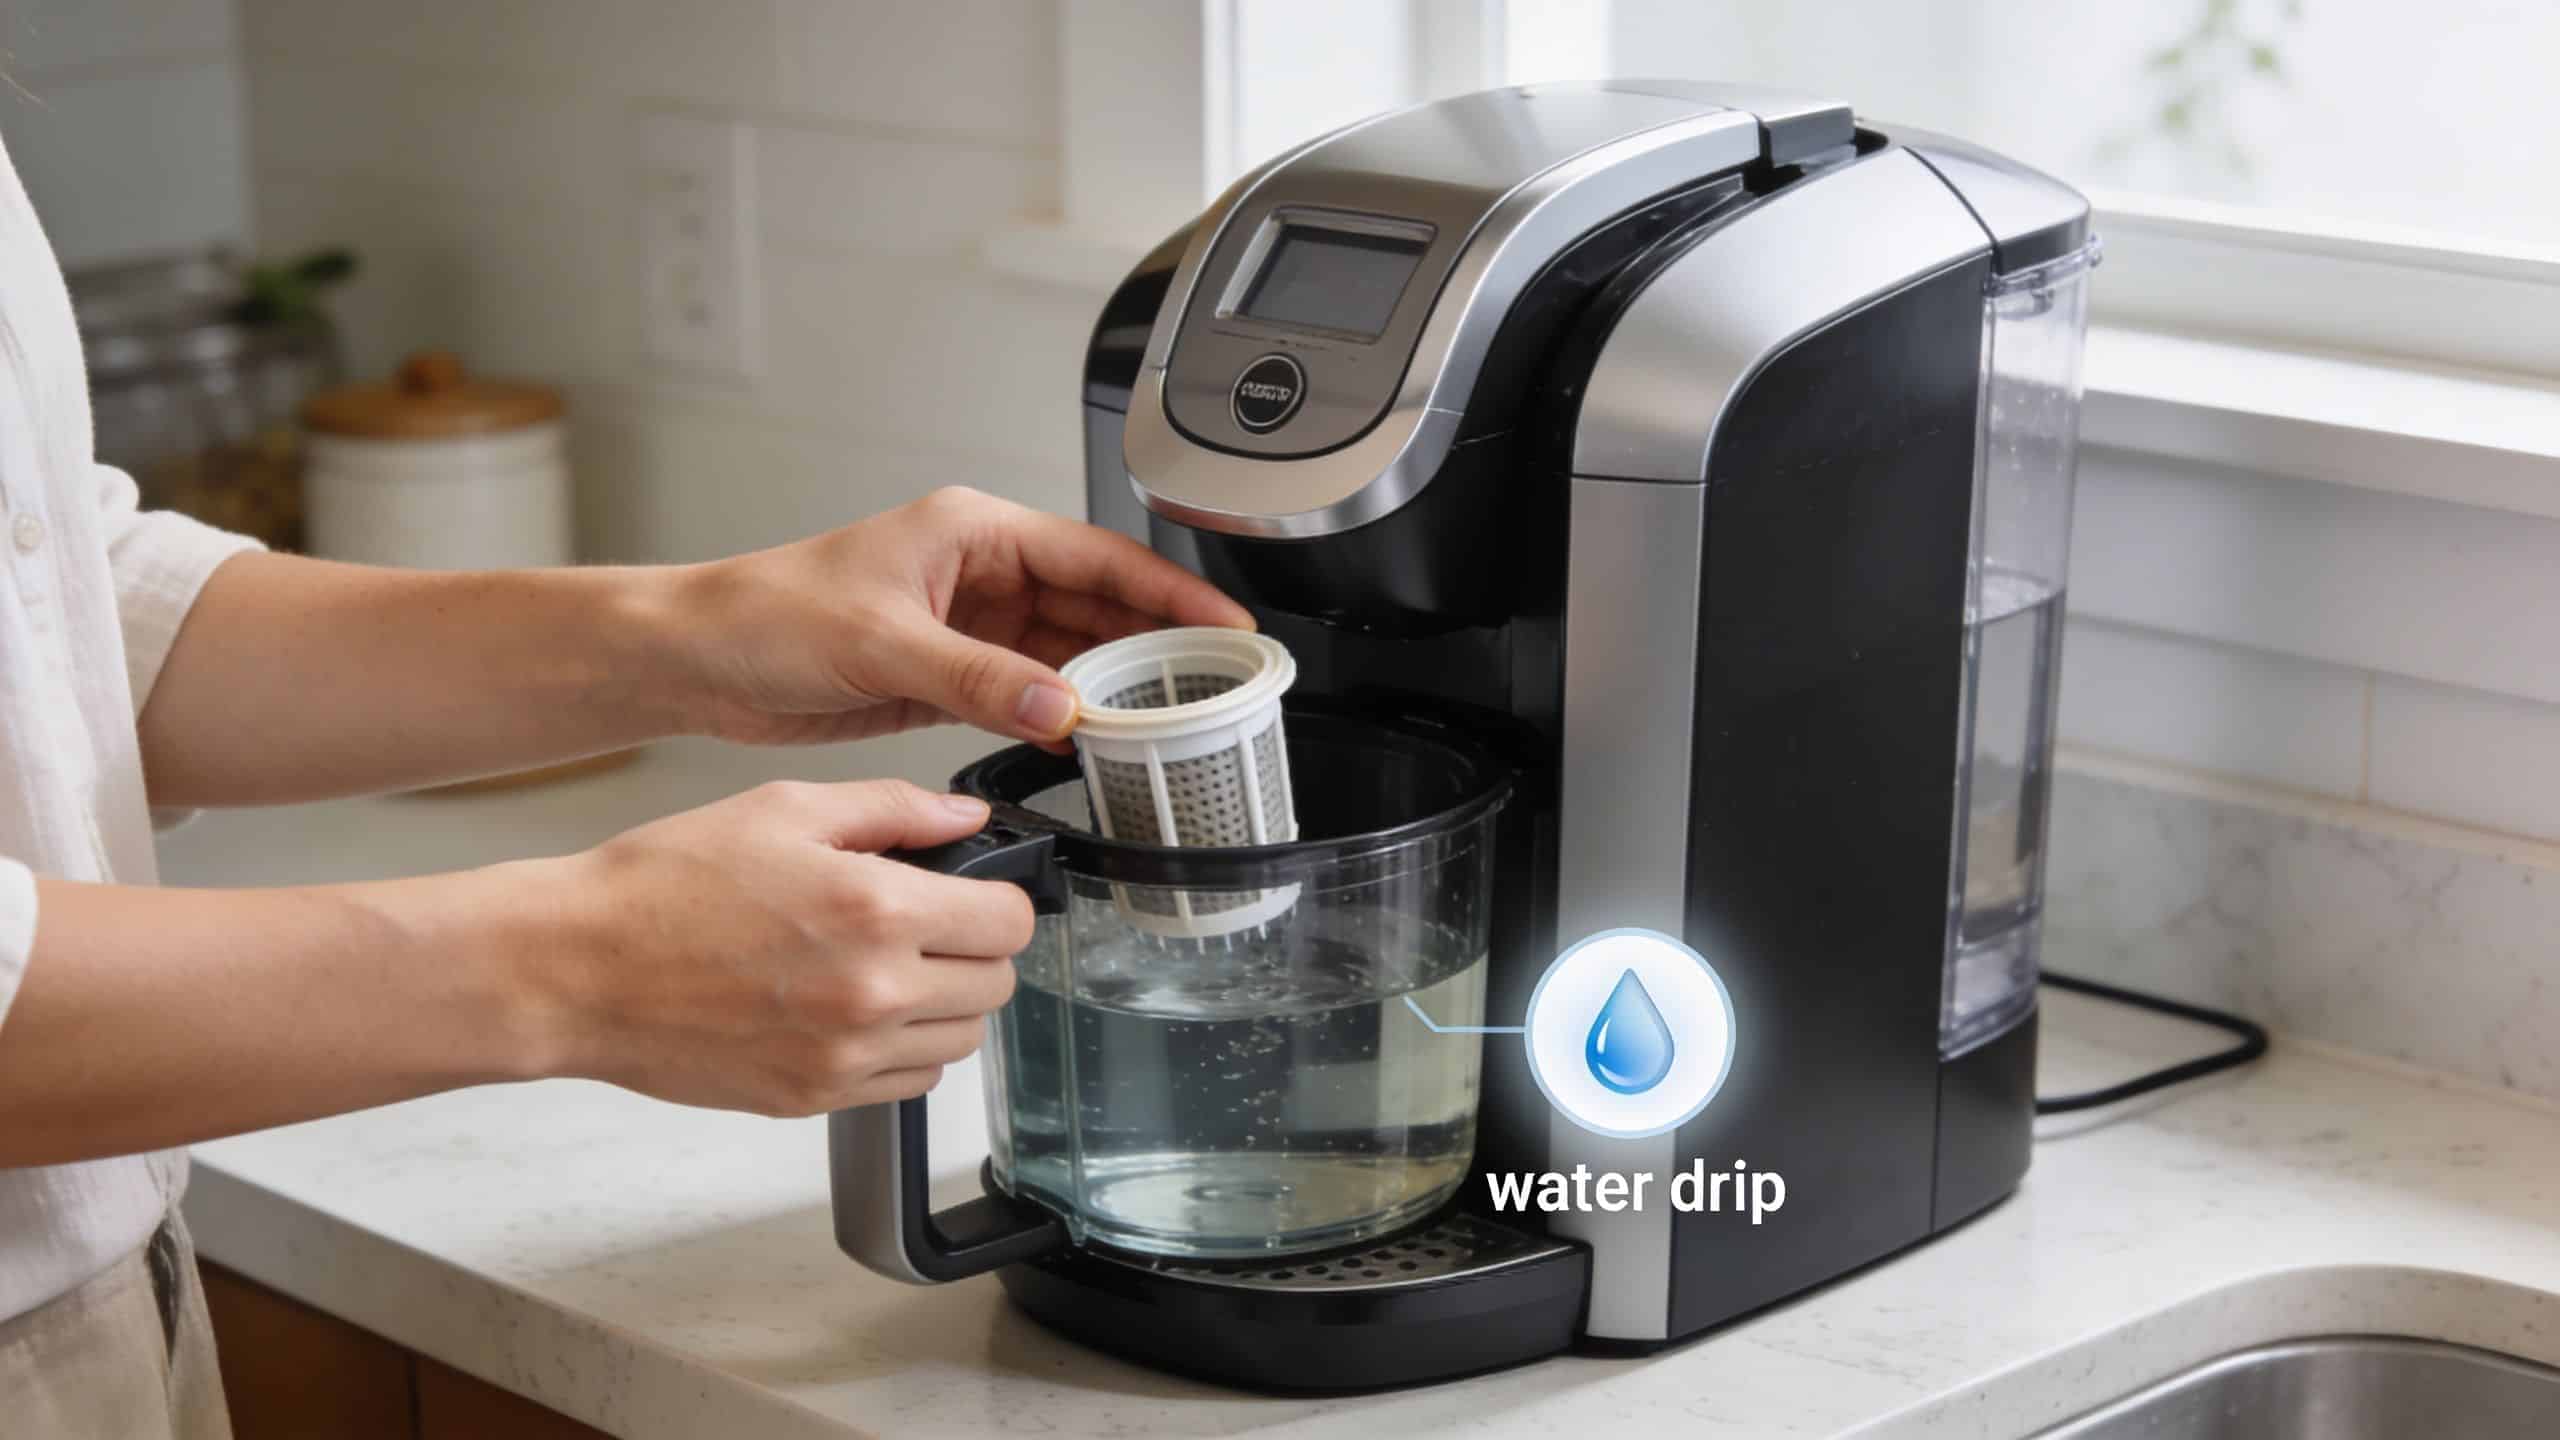
Keurig 2.0 and K-Supreme family models
These machines often have a slightly different holder design and a reservoir shape that makes access feel tighter. The process is still straightforward, but alignment matters more.
A good working routine is:
- Remove the water reservoir.
- Locate the vertical or base-mounted holder inside the tank.
- Release the holder carefully instead of yanking it sideways.
- Swap in the freshly prepared cartridge.
- Reinstall the holder so it locks into place cleanly.
- Refill the reservoir and set it back onto the brewer.
If the holder rocks after installation, take it back out. A filter that sits crooked can let water bypass the cartridge path.
K-Slim and K-Duo models
Slimmer machines give you less room for your hands. That makes users think the filter is incompatible, but the problem is the angle.
A few things help here:
- Work on a counter with good light. These reservoirs are less forgiving.
- Keep the holder upright during insertion. Tilting it can catch the housing edge.
- Press deliberately, not hard. You want a snug fit, not a forced one.
K-Duo owners should also check that they’re working with the correct reservoir section and not crowding the assembly around other removable parts. When fit is tight, patience beats pressure every time.
Compatible Ninja models
Compatible Ninja systems can vary in how the water tank opens and where the filter housing sits. The broad routine stays the same: remove the tank, remove the old cartridge from its housing, install the prepared replacement, and return the assembly to the reservoir.
The practical difference is tolerance. Some compatible holders slide in with a more direct path, while others need a precise orientation before they seat correctly. If you feel resistance, stop and compare the holder position to the grooves or guides inside the tank.
Finish with a cleansing brew
After the new cartridge is installed, fill the reservoir and run water-only brew cycles before making coffee. That primes the system, clears trapped air, and gives you a cleaner first real cup.
A short checklist helps:
| Step | What to confirm |
|---|---|
| Holder assembly | Cartridge is fully seated and holder is snapped shut |
| Reservoir install | Tank sits flat and locks into place correctly |
| Water-only cycle | Brewer runs cleanly without odd taste or visible residue |
PureHQ Premium Filters vs Generic Alternatives
A replacement filter only helps if it fits the holder correctly and behaves consistently in use. That’s the point where many generic options fall short. They may look similar in the box, but poor fit can let water move around the cartridge instead of through it.
That bypass issue matters. If water isn’t taking the intended path, the filter does less work and the brewer may still produce disappointing flavor. A loose cartridge can also make the holder feel cheap or unstable, even when the machine itself is fine.
PureHQ vs Generic Water Filter Comparison
| Feature | PureHQ Premium Filter | Standard Generic Filter |
|---|---|---|
| Fit in compatible holder | Designed for a firm, deliberate fit in compatible Keurig systems | Fit can vary, which may lead to wobble or harder closure |
| Preparation guidance | Product ecosystem includes clear holder and replacement guidance | Guidance often depends on third-party listings or brief packaging text |
| Material consistency | Marketed around coffee machine accessory use and compatibility | Consistency may vary across sellers and batches |
| Risk of water bypass | Lower when the cartridge seats properly in the holder | Higher if the cartridge is undersized or sits crooked |
| User confidence during install | Easier to judge whether the holder closed correctly | More trial and error if dimensions are inconsistent |
A common objection is simple: “If the generic filter fits, isn’t that good enough?” Sometimes yes. Sometimes no. In real use, “close enough” is exactly what causes leaks around the holder, difficult closure, or water bypass that defeats the point of filtering.
For users who want a cartridge made for this category, PureHQ’s compatible Keurig water filters are one option to compare against standard generics. If you’re doing a full maintenance cycle, it also makes sense to pair fresh filters with a descaler so the machine’s internal water path and the reservoir system get attention at the same time.
Troubleshooting Common Filter Replacement Problems
Most post-install problems fall into three buckets. The coffee looks cloudy, the cartridge doesn’t seem to fit right, or the machine keeps showing a reminder after you already changed the filter.
Cloudy water or weird-tasting coffee
This is the most common complaint right after installation. The likely cause is rushed prep.
Filter specialists note that soaking and rinsing serve two jobs at once. The steps remove loose charcoal particles from manufacturing and activate the charcoal’s porous structure. If you skip or rush that prep, residual charcoal dust can wash into the first few brews.
Fix it this way:
- Remove the new cartridge
- Prepare a fresh one correctly if needed
- Run water-only brew cycles before making coffee again
If the taste is still off after that, clean the reservoir itself. Old residue in the tank can mimic a bad filter.
The filter won’t fit or the holder won’t close
This usually comes down to one of three issues:
- Wrong cartridge shape: Similar-looking filters are not always interchangeable.
- Crooked seating: The cartridge is resting on an edge instead of the lower holder base.
- Overtight handling: Forcing the top section can jam the housing.
Open the holder, reseat the cartridge, and try again with steady pressure. If you keep seeing the same issue, compare the replacement to the old cartridge instead of forcing a mismatch. For more examples of fit and prep errors, this breakdown of common Keurig water filter mistakes and fixes is worth a look.
Don’t fight the plastic. When a filter is right, the holder closes with intent, not brute force.
The reminder light is still on
This confuses people because the filter replacement may be successful even when the reminder remains active. On many brewers, the reminder is a separate tracking function. Reset it through the machine menu or by using the model’s filter reminder controls after the physical replacement is complete.
If your holder has a date dial, use that too. It’s a simple backup when digital reminders get ignored or reset by mistake.
When to Replace Your Filter and Quick Maintenance Tips
A lot of owners wait until the coffee tastes bad. That’s too late. The better habit is replacing the filter on a routine schedule and keeping the reservoir clean enough that a new cartridge isn’t fighting old buildup.
The holder’s date dial helps more than people think. Set it as soon as you install the cartridge, then give the reservoir a quick rinse during normal cleaning. That prevents slime, mineral film, and old water odors from undermining the fresh filter.
A few habits keep things simple:
- Use the date dial: It’s an easy visual reminder.
- Rinse the tank regularly: A clean reservoir protects flavor.
- Run water-only brews after replacement: This helps settle the system before coffee touches it.
- Bundle maintenance tasks: If scale buildup is starting, add cleaning tablets or a descaling product to the same service session.
Fresh filters improve one part of the water path. They don’t replace full machine care.
If you want replacement parts and maintenance supplies built for daily coffee use, shop PureHQ Inc. for compatible water filters, descalers, reusable pods, and other brewer accessories that help keep Keurig and compatible Ninja machines running clean.
