Coffee Machine Care
Keurig Maintenance Kit: The Ultimate Guide to a Clean Brew
Apr
Bad coffee from a Keurig usually isn’t a coffee problem. It’s a maintenance problem. When mineral scale tightens up the water path and old coffee oils cling to the brew chamber, the machine starts sending clear signals: slower pours, weaker extraction, odd bitterness, lukewarm cups, and leaks that seem to come out of nowhere.
A good keurig maintenance kit fixes more than surface mess. It restores flow, helps the heater work properly, and keeps you from replacing a machine that probably isn’t dead at all. If you care about total cost of ownership, that matters. Spending a little time on upkeep is usually far cheaper than living with bad brews or buying another brewer early.
Why Your Keurig Is Secretly Crying for Help
A lot of Keurig owners assume the machine is worn out when coffee starts tasting flat or the brew gets painfully slow. In many cases, the internals are overdue for cleaning. Consumer reports aggregated in forums like iFixit show that 30 to 40% of Keurig machines fail prematurely within two years when owners skip proper maintenance, often because mineral buildup keeps choking the system, as summarized in this Keurig maintenance discussion.
That number gets my attention because the failure signs often start small. The coffee comes out a little cooler. The stream looks weaker. You hear the pump working harder than it used to. Then one day the machine throws an error, leaks, or stalls mid-brew.
What’s happening inside the machine
Keurigs live with two kinds of buildup:
- Mineral scale from water, which settles on heating elements and in narrow internal passages
- Coffee oils and fine grounds from pods, which collect around the brew chamber and needles
Those two problems create most of the complaints I hear from owners. Scale restricts flow and interferes with heat transfer. Oils turn rancid, affect flavor, and trap debris where pods puncture.
Practical rule: If your Keurig suddenly tastes bitter, brews slowly, or sounds strained, assume buildup first. Don’t assume the brewer is finished.
Why neglect costs more than a kit
The expensive part of poor maintenance isn’t only the cleaner you forgot to buy. It’s the chain reaction after that. A machine that struggles to heat and pump properly wastes your coffee, wastes your time, and pushes you toward replacement faster than necessary.
That’s why I treat maintenance as protection, not as an optional extra. The goal isn’t just a clean reservoir or a prettier machine on the counter. The goal is to keep water moving freely, keep heat where it belongs, and get back to coffee that tastes like coffee instead of stale residue.
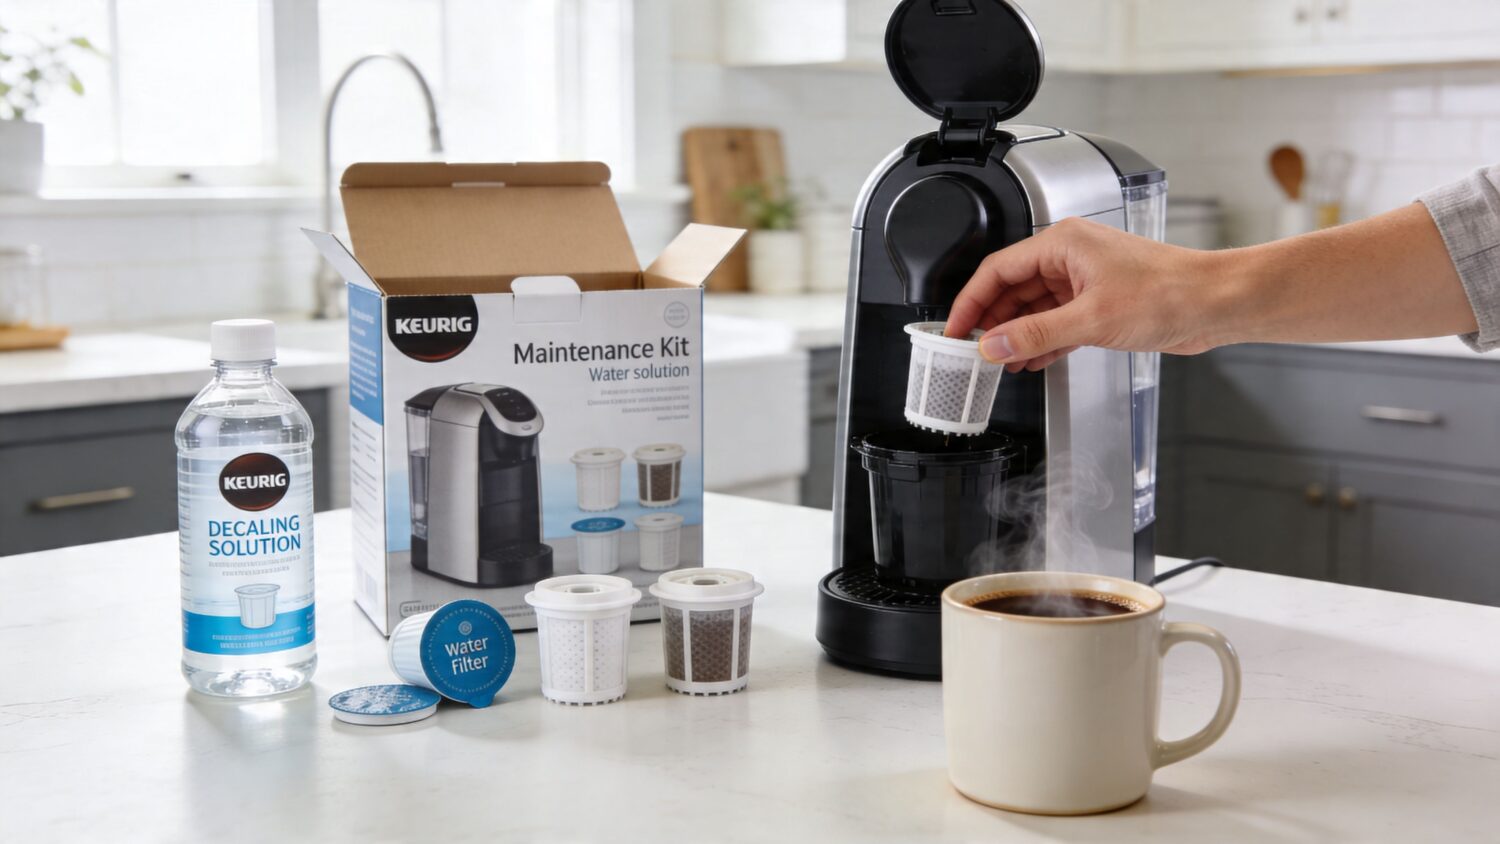
What’s Inside the Box and Why Each Part Matters
A standard brewer care kit isn’t complicated, but every piece has a job. A typical kit includes descaling solution, rinse pods, and water filter cartridges, and the rinse pods are designed to clear coffee oils from the brew chamber and needle, which can prevent up to 70% of bitterness complaints in daily use, according to this guide to using a Keurig cleaning kit.

The descaling solution
This is the part that deals with the hidden problem. Descaler moves through the internal tubing, heater area, and water path where you can’t scrub by hand. If your machine is brewing slowly or running cooler than normal, this is the item doing the heavy lifting.
Think of it as internal maintenance, not surface cleaning. Wiping the outside won’t remove limescale packed inside the system.
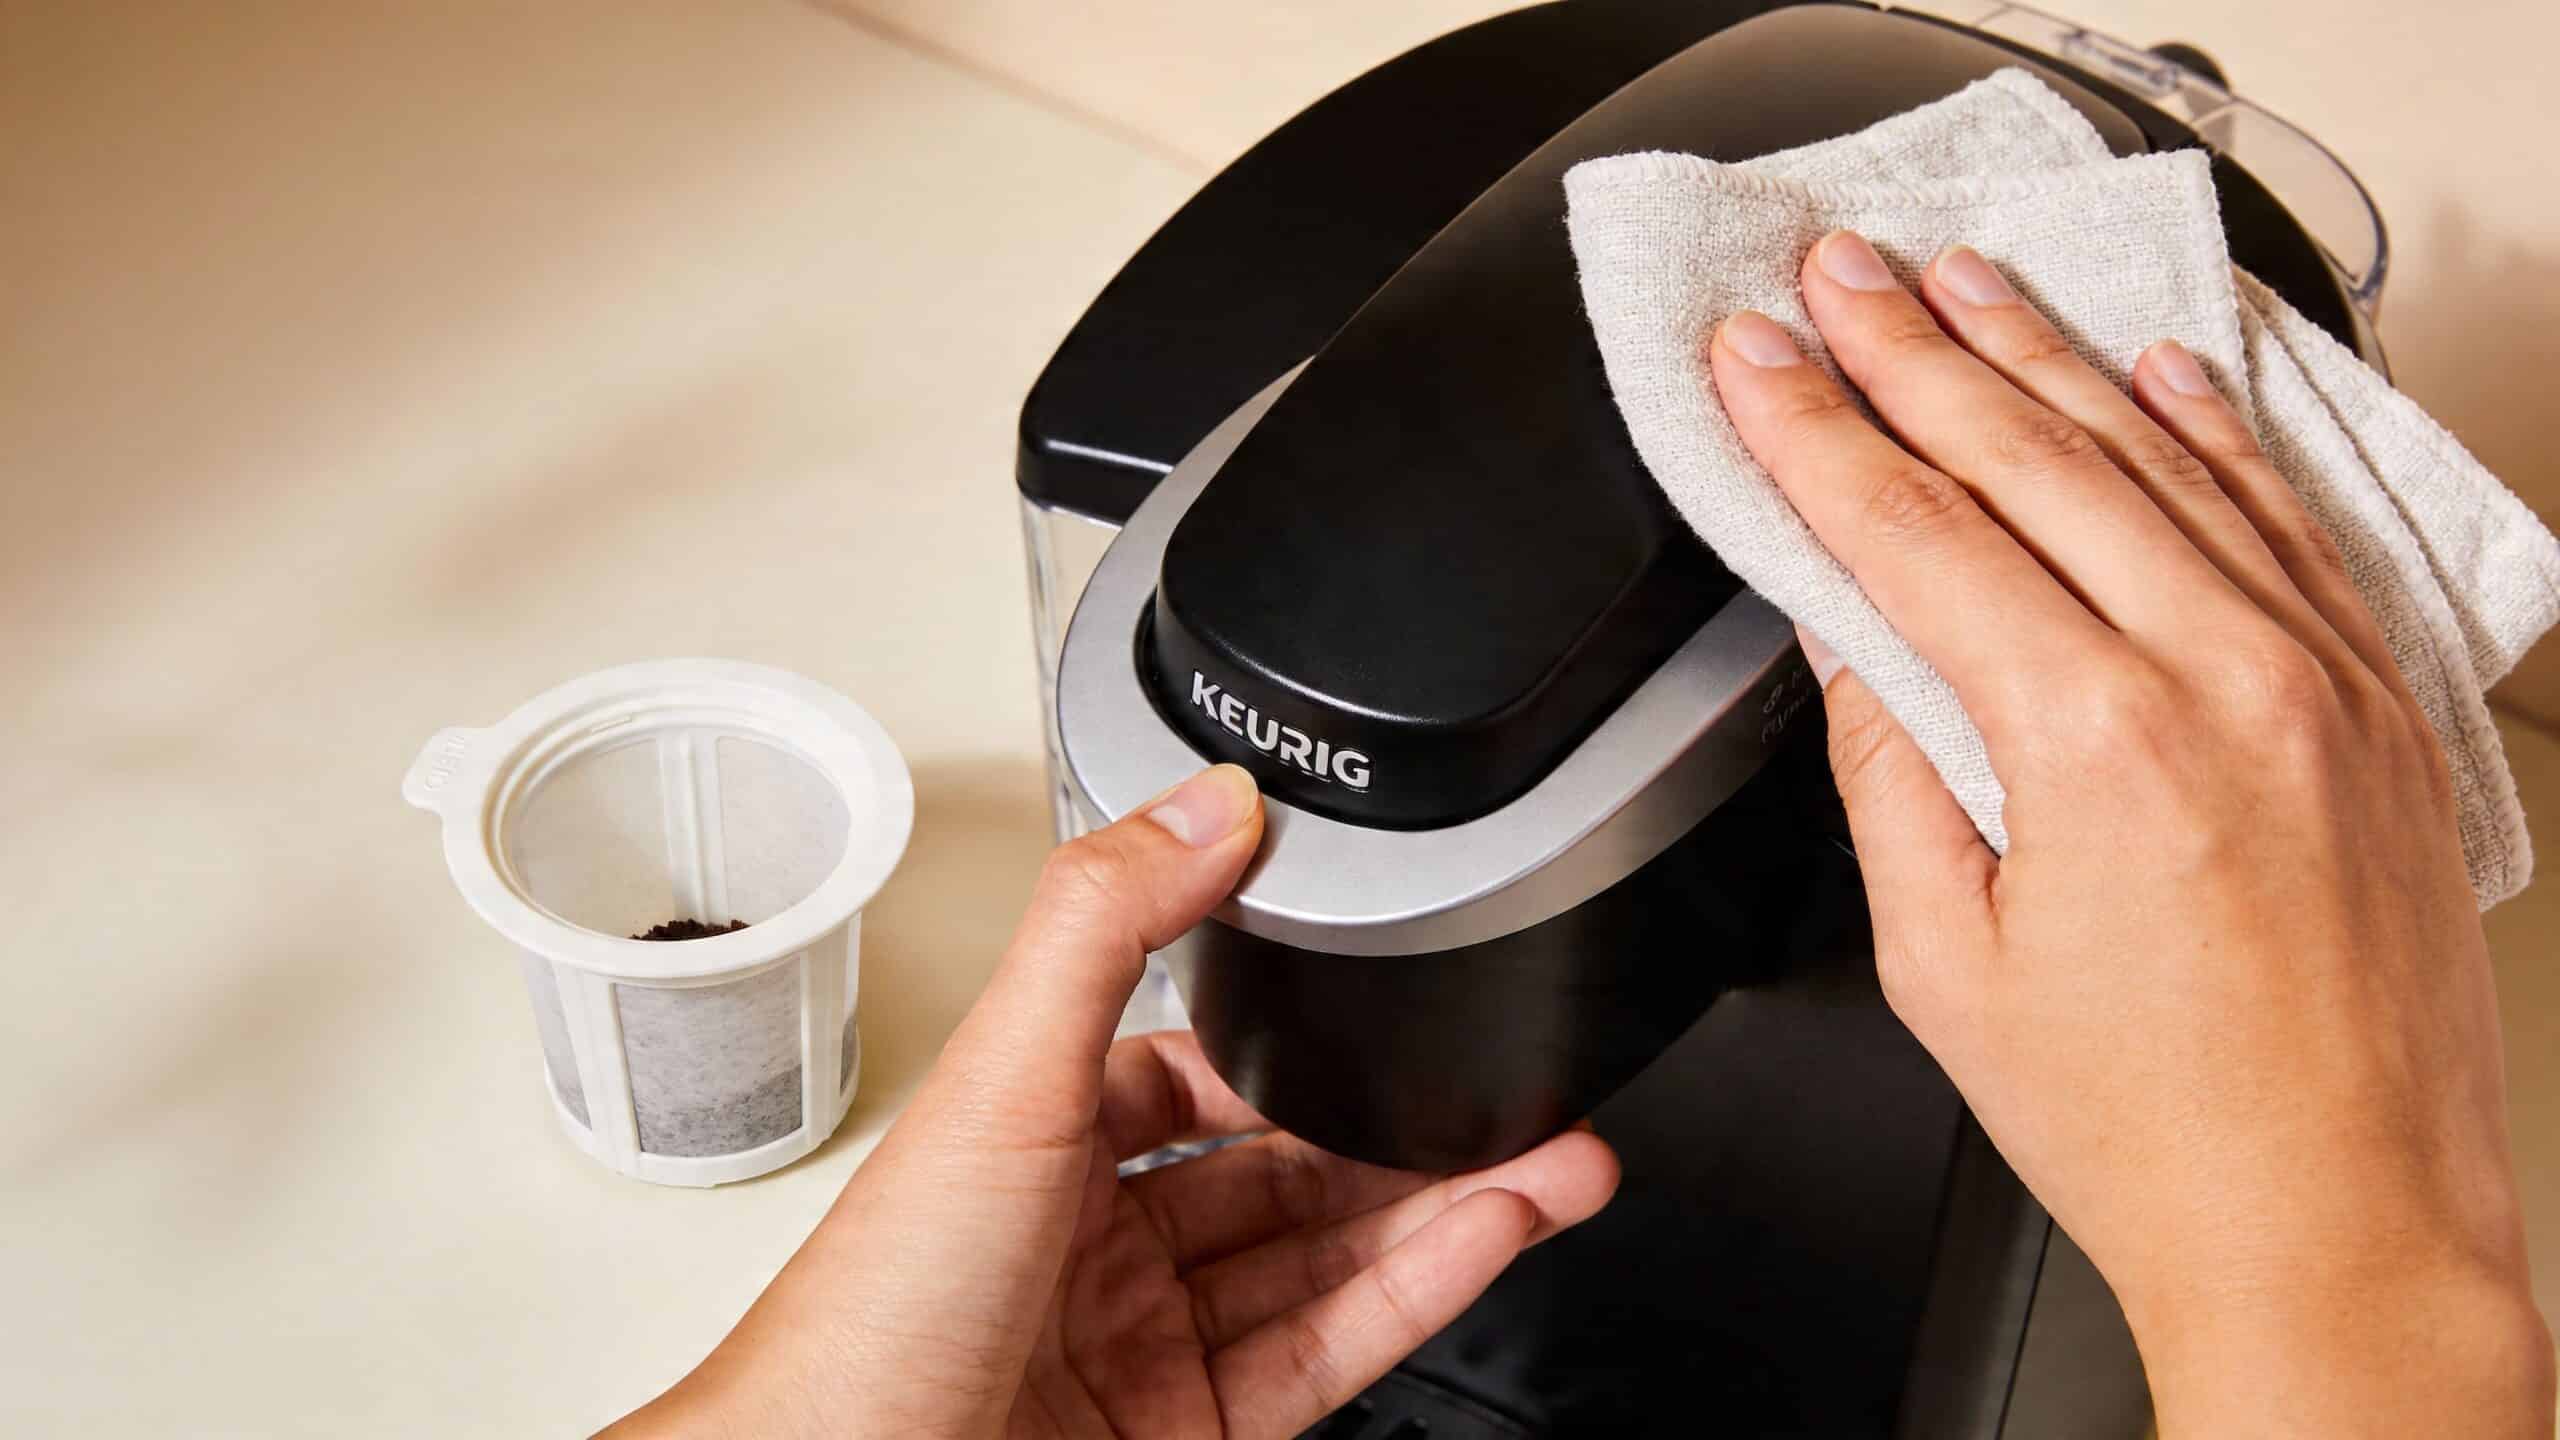
The rinse pods
Rinse pods target coffee residue in the brew chamber and around the needles. This matters more than many owners realize. Coffee oils build up quickly, and once they do, they change flavor before they create a full blockage.
I like rinse pods because they’re easy for people to use consistently. If a task is simple, people consistently perform it.
The water filter cartridges
These work upstream. They don’t descale an already dirty machine, but they help reduce what reaches the reservoir and internal path over time. In practical terms, they support the machine between deep cleanings and help keep scale pressure from rebuilding as fast.
A filter is preventive care. Descaler is corrective care. You want both.
Why complete kits work better than single items
A lot of owners buy only descaler and ignore the rest. That’s better than doing nothing, but it leaves flavor problems and needle residue in place.
A complete keurig maintenance kit covers three separate jobs:
- Break down scale inside the water system
- Flush out coffee oils where pods brew
- Reduce new buildup before it starts
A machine can brew after a partial cleaning. It won’t brew at its best until you deal with both minerals and oils.
Your Step-by-Step Guide to a Perfect Descale
The biggest mistake I see is rushing the process. People run one cycle, empty the tank, and expect the machine to come back to life. Descaling works when the solution has enough contact time to loosen and dissolve what’s stuck inside.
Start with a cool machine and an empty reservoir. Remove any pod, empty the drip tray, and take out the water filter if your model uses one. Keep a large mug handy because you’ll be discarding every cleaning brew.

Run the cleaning solution the right way
The standard process is straightforward. Pour the full descaling solution into the reservoir, then fill the empty bottle with water and add that too. Brew the largest cup size repeatedly until the reservoir is empty, discarding each output. Then let the machine sit powered on for a 30-minute soak, a step described in this Keurig descaling walkthrough.
That soak matters. The same source explains that the dwell time can increase descaling effectiveness by 40 to 50% compared with no-soak methods. When scale has hardened onto internal surfaces, contact time does the work that quick flushing can’t.
If you want a simple explainer on why acids are useful for this kind of mineral removal, this overview of citric acid for cleaning gives helpful background without turning the process into chemistry homework.
Finish the descale instead of stopping halfway
After the soak, resume brewing until the reservoir is empty again. Then rinse the reservoir thoroughly, fill it with fresh water, and run 12 water-only rinse brews. That same descaling guide notes that this rinse stage reduces post-cleaning taste carryover by over 90% when done properly.
Most “my coffee tastes like cleaner” complaints trace back to an incomplete rinse, not a bad product.
Here’s the sequence I recommend people follow:
Empty and prep the brewer
Remove pods and the water filter. Start with a clear machine so nothing interrupts the cycle.Add descaler and matching water
Use the full bottle, then add water using the empty bottle as your measure.Run repeated large brews
Keep going until the reservoir is drained.Wait through the soak
Leave the machine on for the full 30 minutes.Complete the rinse phase
Refill with fresh water and do all rinse brews before making coffee again.
A visual walkthrough helps if you’d rather see the process before doing it yourself.
Mistakes that cause repeat problems
Skipping steps is what usually leads to “I descaled it and nothing changed.”
- Skipping the soak: The same Keurig cleaning reference says skipped soak time is tied to 45% of failures in service logs because deposits remain in place.
- Under-rinsing the machine: Inadequate rinsing can leave a metallic aftertaste, with the guide noting 25% aftertaste incidence when users don’t flush enough fresh water.
- Treating a clog like a scale issue only: If the needles are dirty, descaler alone won’t solve the entire problem.
Don’t judge the result after the first cleaning brew. Judge it after the full descale, full rinse, and your first fresh cup.
Mastering Routine Care for Long-Term Performance
Quarterly descaling is the rescue job. Routine care is what keeps you from needing rescue all the time. If you want a Keurig to stay consistent, the best habit is a short maintenance rhythm you can stick to.
A simple schedule that works
I tell owners to think in layers, not in big occasional cleanups. This coffee maker cleaning frequency guide is useful because it frames maintenance as a repeatable routine rather than a panic fix.
Daily habit
Empty spent pods, rinse the drip tray if needed, and wipe splashes before they bake on.Weekly habit
Use a rinse pod to clear coffee oils from the brew path. If your machine has started sputtering or dripping around the pod area, inspect the needle area too.Every filter cycle
Replace the water filter cartridge on schedule. In brewer care guidance, filter swaps are tied to regular refill intervals and help reduce scale pressure before it starts building up again.
One task most kits don’t solve
Needle clogs cause a lot of false alarms. If water sprays unevenly, pods overflow, or you notice drips after brewing, check the exit needle and upper puncture point for packed grounds. A careful cleaning with a simple paperclip often clears compacted debris that rinse products loosen but don’t fully remove.
That’s one reason I don’t treat the box as the whole answer. Kits help, but hands-on inspection still matters.
A clean reservoir won’t fix a blocked needle. When flow is erratic, inspect the puncture points before blaming the pump.
Water choice matters more than people think
If your local water is hard, scale returns faster. Many owners get better long-term results by pairing filter changes with cleaner source water. If you’re comparing options, this explainer on distilled water is a useful primer on what distilled water is and when people choose it for appliance care.
I wouldn’t build your whole maintenance plan around one trick. Instead, combine sensible water habits, regular filter changes, weekly oil cleanup, and occasional manual needle cleaning. That mix does more for long-term machine health than blindly following the box once every few months.
Official Kits vs Third-Party Solutions A Cost Comparison
A lot of buyers hesitate when they see a non-OEM cleaning product. The concern is reasonable. They want to know if the fit is right, whether the formula is safe, and whether they’re trading reliability for savings.
The short answer is that third-party maintenance products aren’t new or unproven. The Caffenu Complete Maintenance Kit debuted around 2014 as the first complete third-party solution for Keurig K-Cup brewers, including 2.0 models, and it addressed maintenance issues associated with up to 25% brew temperature drops, according to Caffenu’s history of the first complete maintenance kit for Keurig K-Cup brewers.
What the real trade-off looks like
Official kits give you model-specific familiarity. The packaging is clear, and many owners like staying inside the brand’s ecosystem. The downside is recurring repurchase. If you maintain one machine at home, that may feel manageable. If you maintain several brewers in a household or small office, recurring OEM-only buying gets old fast.
Third-party kits widen your options. Some are built for multiple brands, some let you buy descaler tablets separately from filters, and some make more sense if you also maintain a Ninja or Breville. A practical overview of what goes into a Keurig brewer care kit helps clarify where branded kits and compatible kits overlap.
Keurig official kit vs PureHQ universal kit
| Feature | Keurig 3-Month Brewer Care Kit | PureHQ Universal Coffee Care Kit |
|---|---|---|
| Primary use | Keurig-focused routine maintenance | Multi-brand maintenance for compatible brewers |
| Typical contents | Descaler, rinse pods, water filters | Commonly sold with descaling and compatible maintenance accessories |
| Compatibility | Geared to Keurig systems | Useful if you maintain Keurig and other coffee machines |
| Buying style | Fixed branded bundle | More flexible if you prefer separate refills or broader compatibility |
| Best fit | Owners who want the official routine | Owners focused on total cost of ownership and broader use |
Addressing the biggest objection
The most common objection is compatibility. People worry a third-party solution will leak, fit poorly, or leave residue. That concern is valid with bargain-bin accessories. It’s less valid when you choose products built specifically for coffee machine maintenance and follow the full cleaning sequence.
Another practical difference is flexibility. PureHQ Inc., for example, sells compatible descaler tablets and water filter cartridges for Keurig systems and other brewers, which is useful if you want one maintenance shelf instead of brand-specific clutter. That kind of setup also pairs naturally with reusable pods or replacement filters if you’re trying to cut waste and simplify ongoing care.
For many homes, the smarter buy isn’t “official versus generic.” It’s “single-brand bundle versus a compatible system that matches how many machines you maintain.”
What to Do When Your Keurig Still Won't Cooperate
Sometimes the machine still acts up after a proper cleaning. That doesn’t always mean the descale failed. It usually means one part of the problem remains: trapped debris, an incomplete rinse, or a model-specific reset issue.
One reason multi-brand products have become more common is that owners are tired of buying separate solutions for every machine. Recent data cited by Salt & Umber notes a 40% year-over-year increase in sales of universal descaling tablets at major retailers like Home Depot, pointing to stronger demand for flexible maintenance products across Keurig, Ninja, and Breville users in this roundup of Keurig cleaner options.
If the descale light stays on
Run the full rinse phase without long pauses between brews. Some machines won’t clear the maintenance flag if the sequence is interrupted. If you already did that, unplug the brewer briefly, refill with fresh water, and repeat consecutive large water-only brews.
If coffee still tastes off
That’s usually leftover residue from an incomplete flush. Rinse the reservoir again and run more water-only cycles until the smell and taste disappear. Also check whether an old filter or dirty brew head is reintroducing stale flavor.
If brewing is still slow
Look beyond scale. Inspect the needle area for packed grounds and wipe the pod chamber thoroughly. Slow brewing after descaling often points to debris that the solution loosened but didn’t fully clear.
If the machine leaks
Leaks around the pod area usually suggest a clog or damaged seal. Make sure the pod is seated correctly, inspect the puncture area, and clean away any grounds. If the leak starts from the reservoir connection or body seam, that’s more likely a part issue than a cleaning issue.
If performance improves only a little after descaling, don’t repeat the same step blindly. Check flow points, rinse quality, and the needle area before deciding the brewer is finished.
Brew Better Coffee and Protect Your Investment
A Keurig doesn’t need much to stay reliable. It needs regular descaling, cleaner water management, and a little attention to the places coffee oils and grounds like to hide. Ignore those basics and the machine starts acting old before its time. Keep up with them and you usually get better flavor, steadier brewing, and fewer frustrating surprises.
That’s the true value of a keurig maintenance kit. It isn’t just about cleaning day. It’s about lowering the total cost of ownership over the life of the machine. Good maintenance keeps you from replacing a brewer early, wasting coffee on bad cups, or chasing the same preventable issues every month.
If your Keurig has gone slow, bitter, noisy, or unreliable, don’t wait for it to quit. Clean it properly, keep a simple routine, and use accessories that match how you brew.
If you’re ready to get your brewer back into shape, shop maintenance supplies and compatible coffee accessories from PureHQ Inc. and build a routine that protects your machine, improves flavor, and keeps everyday brewing simple.

Pingback: Keurig Duo Reusable K Cup: How to Brew the Perfect Cup (and Carafe!) - PureHQ