
Coffee Machine Care
Reusable Coffee Pods for Keurig 2.0 Compared
Nov
Stop shopping for a pod that says universal on the box. That word is the most popular advice for reusable coffee pods for Keurig 2.0, and it's also the weakest test you can use. A pod can look right, drop into the holder, and still fail because the brewer doesn't recognize it, the lid sits too high, or the needle layout is wrong. I would check the exact model first, then choose a material, then learn how to fill it. Anything else puts the cart in front of the cup.
The Pod Your Keurig 2.0 Will Not Brew
A reusable pod can fit the holder and still leave your Keurig 2.0 idle. You fill the same cup you used on an older machine, lower the handle, and see an error instead of a brew-size choice. Reseating it changes nothing. The problem is the brewer's recognition system, not necessarily the way you filled the pod.
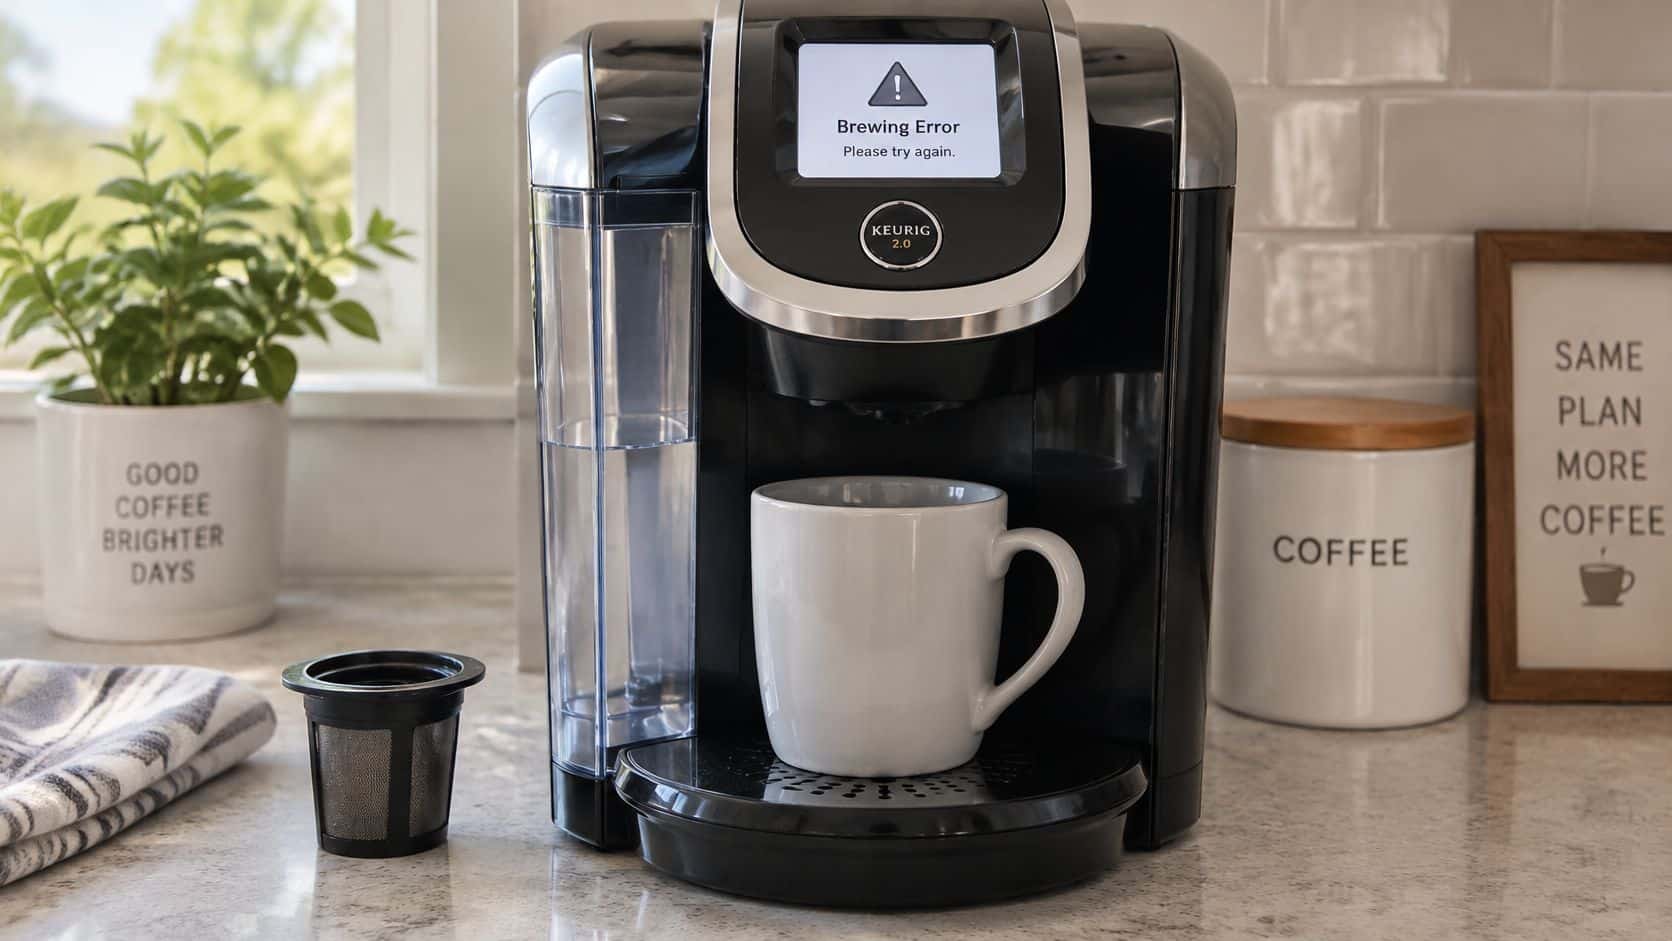
The error screen below is where many owners learn that shape alone does not prove compatibility.
Why the Brewer Says No
Keurig 2.0 was a major redesign. The history of the Keurig platform says the system arrived in fall 2014 with an infrared scanner that read an invisible marker printed on a pod's foil lid. Without a recognized marker, the brewer showed an error and would not start. That could affect compatible pods and older K-Cups, not only counterfeit ones.
The original My K-Cup refillable accessory did not work with 2.0. It had let owners fill a reusable filter with their choice of ground coffee, but the older basket could not be moved to the new brewer. Keurig later said it would offer a version of My K-Cup compatible with 2.0. The gap between those accessories made one point clear: a pod can look right and still fail the machine's checks.
Compatibility is not pod shape. Recognition, the holder, and the accessory design each matter. Any one can prevent a brew.
That remains a useful buying rule. Listings may group several Keurig generations under one compatibility claim, which says little about whether a pod suits your exact brewer. A pod that sits too high can be forced down, stressing the holder or keeping the rim from sealing. Water may then escape around the pod instead of flowing through the grounds.
What to Do Instead of Guessing
Check compatibility before comparing materials or prices. Start with the exact brewer model and needle style, then confirm that the pod's holder and lid clear the machine without force. A label saying “universal” or “Keurig 2.0 compatible” is not enough on its own. Recognition, needle layout, holder fit, and lid clearance are separate failure points.
Then choose between stainless steel, plastic, or mesh with the cup you want in mind. The pod's fit gets it brewing; the dose, grind, and how tightly you fill it determine whether the coffee tastes weak or water struggles to pass through. Paper and regular descaling can also matter to the finished cup, but they cannot correct a compatibility mismatch.
Check first, brew second. A cheaper pod is the wrong savings if it will not seat or seal properly, or if it leaves you with a drawer full of unused filters.
Match the Pod to Your Exact Brewer
Start with the rule that ends most arguments. Keurig's 2.0 Quick Start Guide states that Keurig 2.0 brewers are not compatible with the original My K-Cup reusable filter accessory. That's a brewer-level rule, not a marketing preference, and it means a similar-looking older basket can fail even when it seems to sit fine in the holder.
So read the model off your machine before you trust any listing. You'll find it on the base, the back, or near the water tank. Then find your row below and shop only inside it.
| Brewer family | Needle style | Original My K-Cup | Buy this class | Check before brewing |
|---|---|---|---|---|
| K200 series 2.0 | Single needle | Not compatible | 2.0 single-needle refillable pod | Error after the lid closes |
| K400 and K450 | Single needle | Not compatible | 2.0 single-needle refillable pod | Lid clearance without force |
| K500 and K550 | Single needle | Not compatible | 2.0 single-needle refillable pod | Pod holder seated correctly |
| K-Elite | Single needle | Not the 2005 version | Single-needle pod named for K-Elite or 2.0 | Lid closes flat |
| K-Duo on the single-serve side | Single needle on the pod side | Not the 2005 version | Single-needle pod; carafe basket stays out of the pod holder | Correct side of the machine |
| K-Supreme, K-Slim, K-Crema | MultiStream | Not a substitute for the new universal filter | MultiStream refillable pod, not a 2.0 single-needle pod | Do not force a single-needle cup |
How to Read Your Row
The 2.0 families at the top share one thing that matters. They use a single needle, so they need a refillable pod built for that single puncture point and labeled for 2.0. The original My K-Cup from the earlier generation is the wrong accessory on every one of those rows, whatever its shape suggests.
The K-Duo row trips people up for a dumber reason. The machine brews two ways, and the reusable pod belongs on the single-serve side only. The carafe basket is a separate part for a separate job, and mixing the two setups guarantees a failed brew.
The last row is a different machine wearing a familiar brand. K-Supreme, K-Slim, and K-Crema use MultiStream, where water enters through multiple ports instead of one needle. A single-needle 2.0 pod can't distribute that water correctly, so don't let a shared brand name talk you into it. If you want the longer model-by-model walk-through, our guide to choosing the right reusable K-Cup for different Keurig models lays out each family in detail.
The Four Checks Before You Brew
- Confirm the model number: Read it off the brewer itself, not the box you threw away.
- Note the needle style: Open the handle and look. One needle means single-needle, multiple ports means MultiStream.
- Seat the pod as designed: Don't remove safety parts, cut anything, or leave an internal adapter in place that the pod wasn't built around.
- Stop if the lid needs force: A thick lid that won't close flat is a wrong pod, not a tight fit.
Owners report the same three failures even on pods advertised as compatible, which tells you the label isn't doing the checking for you. One is a "not designed for this brewer" style error after the lid closes. Another is a holder or adapter left in the chamber that changes how the pod seats. The third is simple geometry, a lid too thick to close without leaning on the handle.
Each failure is independent, so passing one check doesn't clear the others. And no material upgrade rescues you here. A premium steel pod in the wrong shape is just an expensive pod that doesn't brew.
Stainless Steel Against Plastic and Generic Mesh
Once your model row is settled, material is the key decision. The four cards below are the four options you'll see in a listing, laid out side by side.
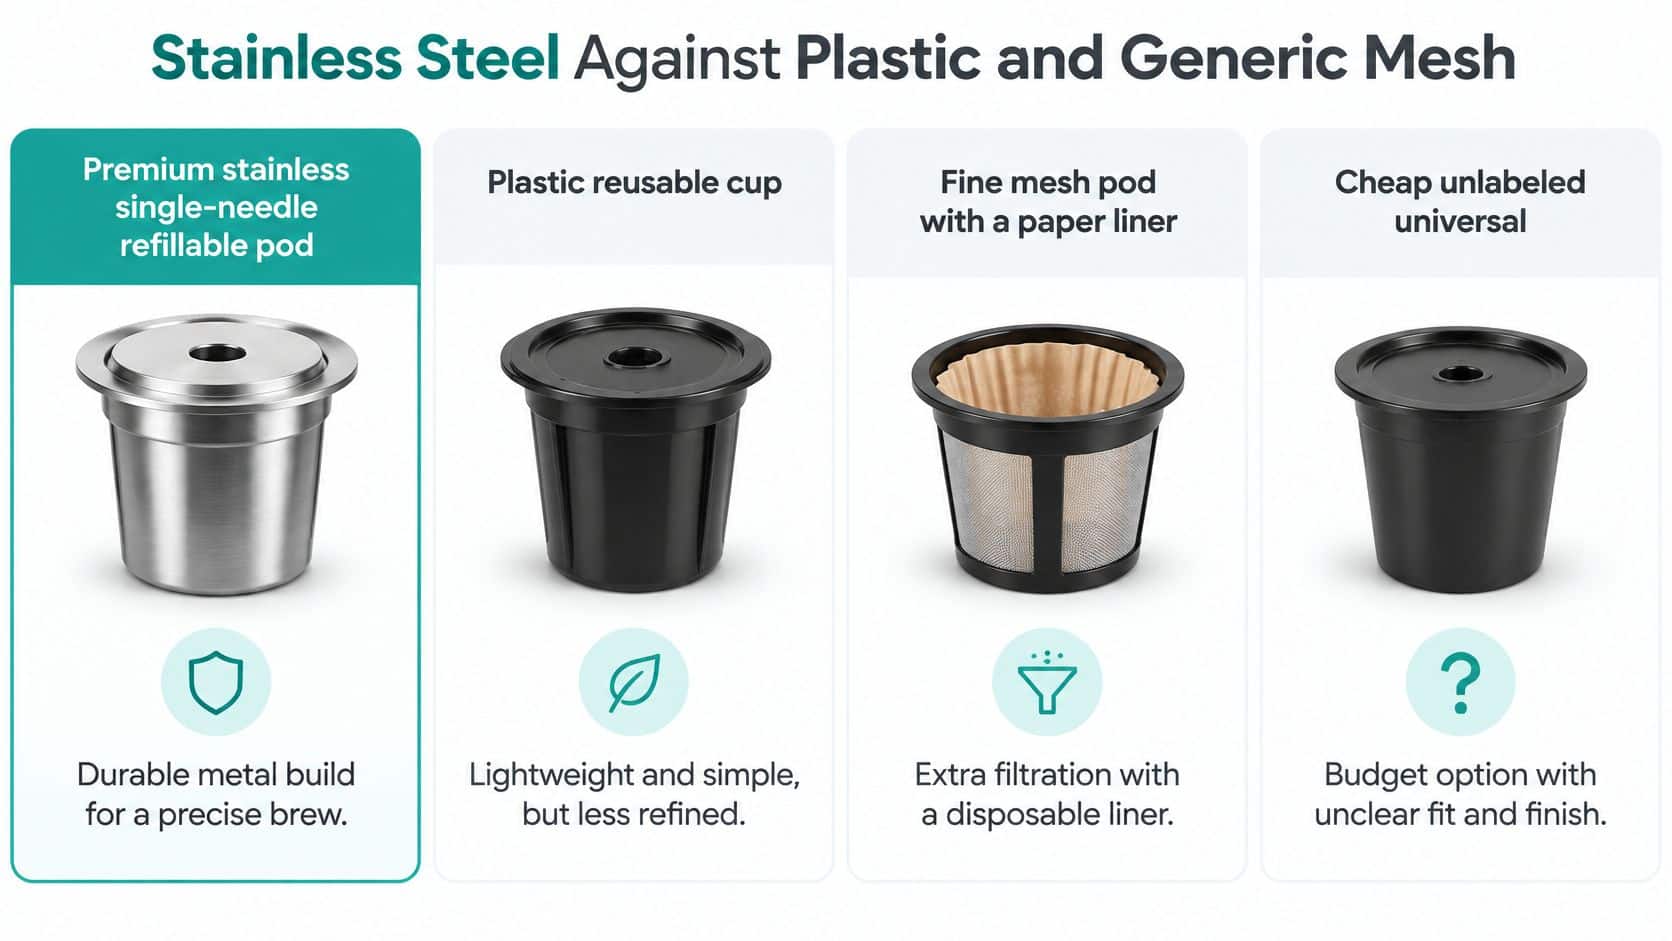
Near-boiling water passes through whatever holds your grounds, so the brew path is the honest way to compare them. A plastic basket puts that hot water in contact with a material that can stain, warp, or crack over months of heat cycles. Stainless steel keeps the brew path metal, which is why I'd steer anyone worried about heating plastic, including the common BPA concern, toward steel rather than toward a cheaper cup.
| Pod type | What hot water touches | Usual first failure | Sediment in the cup | Choose it when |
|---|---|---|---|---|
| Premium stainless single-needle | Steel mesh and steel body | Dented rim or lost lid gasket | Low to moderate; finer with a paper liner | Daily 2.0 brewing and a model match |
| Plastic reusable | Plastic basket and lid | Warp, crack, or stained lid | Moderate | A short trial only |
| Mesh plus paper liner | Mesh plus a paper wall | Liner forgotten or overloaded | Lowest of the four | Grounds in the cup are the main complaint |
| Generic unlabeled universal | Unlisted plastic or mesh | Lid will not close or brew will not start | Often high | The listing names your exact model; otherwise skip it |
What Each Material Really Buys You
Stainless costs more upfront, and I won't pretend otherwise. What you get for it is a body that doesn't warp, doesn't hold old coffee smells the way scratched plastic does, and survives being knocked against a sink every morning. It's not magic, though. Steel still sheds fine particles into the cup if the mesh is coarse or you pack the dose down hard.
Plastic has exactly one honest use. It's a cheap way to find out whether you'll tolerate rinsing a pod at all before you spend real money. Treat it as a trial, because heat and dishwasher cycles will eventually warp the lid or crack the basket.
A paper liner inside a steel or mesh pod is the sediment fix that works. The paper wall catches fines the mesh lets through, so the cup comes out cleaner. The trade is plain. You add one small disposable to every brew, which partly undercuts the waste argument for going reusable.
The generic unlabeled universal is where cheap turns expensive. If the listing won't name your model, you're paying to test someone else's geometry on your machine. That's the wrong savings, because a pod that never brews saves you nothing.
If the handle needs force, the pod is wrong. No material, at any price, corrects a bad fit.
The Universal Warning Worth Reading
I keep pushing model names over the word universal. The K-Supreme SMART Use & Care Guide says that brewer is compatible only with the newly designed Keurig My K-Cup Universal Reusable Coffee Filter and warns users not to use other reusable filters or previous versions because they may damage the brewer. That rule is written for the K-Supreme SMART, not for your 2.0, but it proves the principle. Keurig defines reusable compatibility by generation and internal design, so a pod has to name your model.
Now the objection I hear most. People blame stainless steel for leaks, and the material is almost never the cause. Leaks come from an overfilled basket, a misaligned silicone lid, or a pod too tall for the 2.0 holder. The full leak diagnosis lives in the maintenance discussion further down, because the fix depends on which of those three you've got.
If you'd rather watch the differences than read about them, this short walkthrough shows how the pod types handle in practice.
Homes and Offices That Actually Save Money
The pod fits and the brewer runs. Now you hit the argument that decides whether reusable coffee pods for Keurig 2.0 stay in your kitchen. The coffee's thin, there's silt at the bottom of the mug, and somebody has to rinse the basket. In owner discussions about using their own beans in a reusable pod, users repeatedly describe weak coffee, sediment, grounds in the cup, and substantial cleanup effort even after changing grind size or switching pod designs. So the question isn't whether it works. It's under which conditions it stays worth it.
The One-Person Kitchen
A home user who already buys a bag of ground coffee is the person this product is built for. The same pod runs most weekdays, the cup is fine at a smaller brew size, and rinsing takes a minute at the sink while the mug cools. One of our customers put it plainly. Suzie C said she likes using her own coffee and that our reusable pods are perfect for that.
In that setting the trade-offs cooperate. Dose, grind, and paper filtration are set once by one person who drinks the result, so the cup stays consistent. Nobody's compensating for a weak brew by heaping in extra coffee, which keeps the per-cup cost where you planned it.
The Shared Breakroom
A small office flips every one of those conditions. Several people share one brewer, nobody owns the cleanup, and the basket sits dirty between brews until someone wants coffee badly enough to deal with it. Grounds reach the cup, extraction wanders, and people dose heavier to fix a weak mug. Labor and inconsistency can erase the pod-price savings entirely, because you're paying in time and in coffee instead of in disposables.
| Brew size | Fill approach | Expected strength |
|---|---|---|
| 6 oz | Fill nearer the safe line | Strongest of the four sizes |
| 8 oz | Fill nearer the safe line | Balanced strength |
| 10 oz | Accept a milder cup or brew a smaller size twice | Weaker unless dose or grind changes |
| 12 oz | Accept a milder cup or brew a smaller size twice | Weakest because water dilutes the same dose |
The table is just arithmetic. Every larger button pushes more water through the same small dose, so strength falls unless you change the grind, the dose, or the paper setup. That's why the 6- and 8-ounce settings satisfy people and the 10- and 12-ounce settings generate complaints. A weak cup and a gritty cup are also different problems. Underfilling makes coffee pale, while coarse mesh with no paper liner lets fines through even at a correct dose.
My verdicts are simple. Buy stainless if one household uses the same brewer daily and will rinse it. Add paper liners if sediment is the complaint that would send you back to disposables. Skip reusable pods if your breakroom won't clean the basket the same day, because a pod nobody washes brews worse coffee every round. For the cost side worked out in full, our breakdown of how to save money with reusable K-Cups runs the numbers.
Fill Grind and Brew for a Stronger Cup
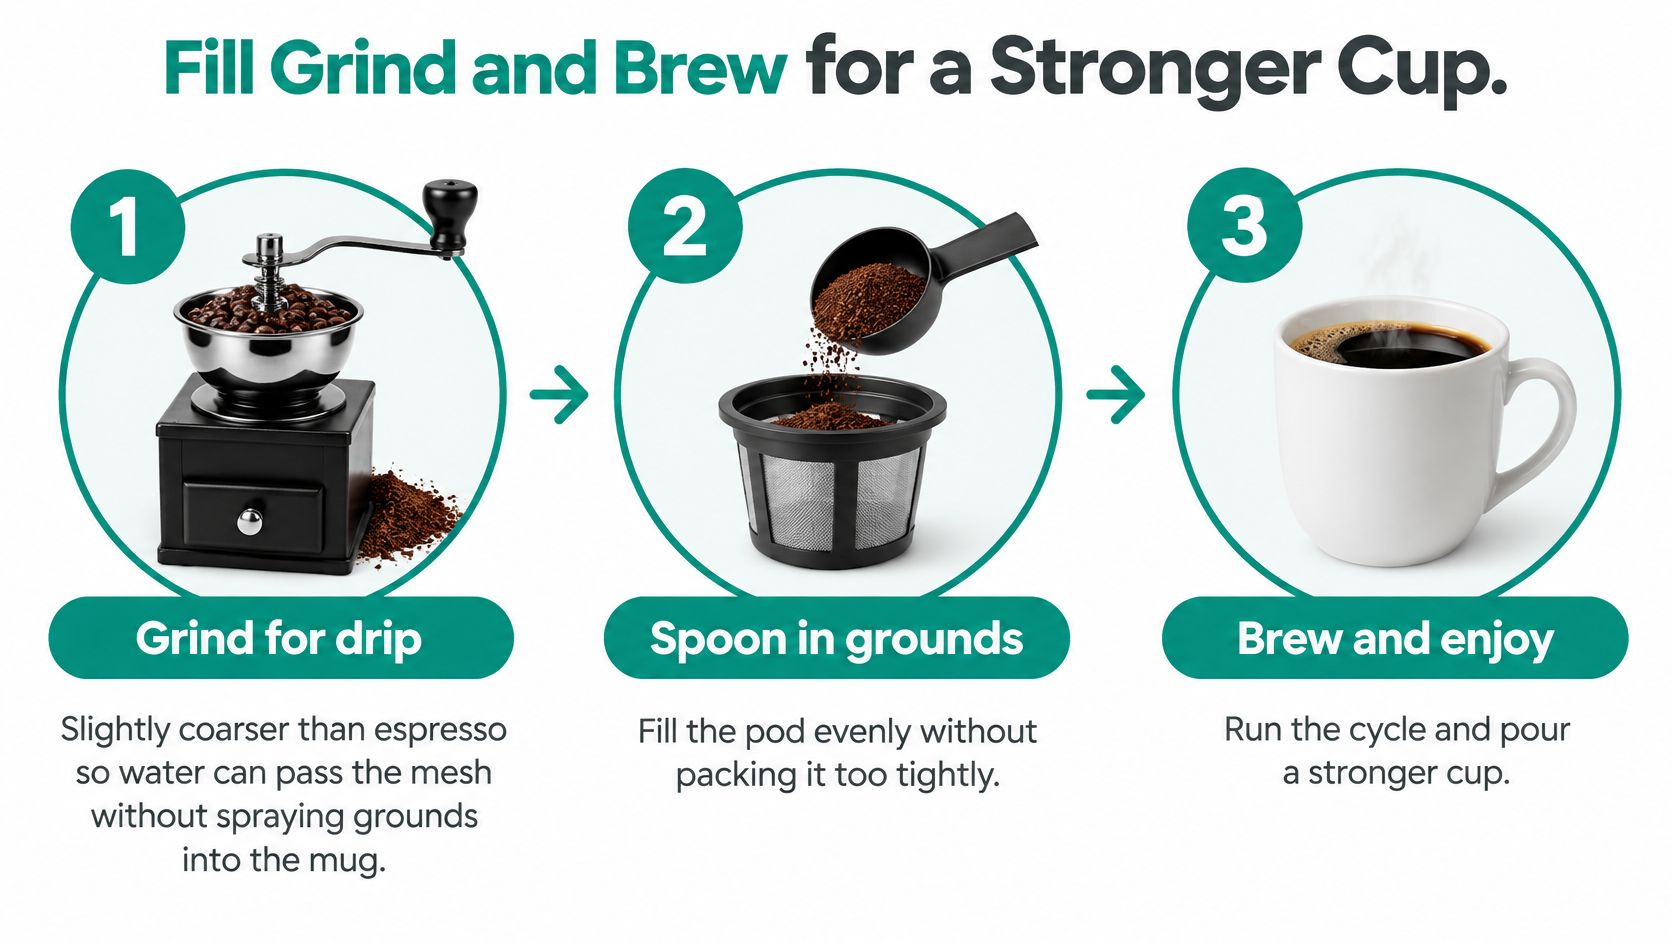
This routine assumes your pod already matches your brewer. Six steps, done the same way every morning, will get you a stronger and cleaner cup than any amount of improvising. The three-part graphic below compresses the same sequence into grind, fill, and brew.
The Six-Step Load
- Grind for drip, slightly coarser than espresso. Water has to pass through the mesh at brewer pressure, and an espresso-fine grind chokes that flow so the machine pushes grounds and water where they shouldn't go. Too coarse does the opposite, letting water race through without extracting much.
- Spoon the grounds in loosely and stop below the rim. The lid needs room to seal against the basket. Don't tamp. Packing the dose down slows the flow and forces water out around the gasket, which is where most rim drips start.
- Match the fill to the button you're pressing. For a 6- or 8-ounce cup, fill closer to the safe line so the smaller water volume still meets enough coffee. For 10 or 12 ounces, accept a milder cup or brew a smaller size twice. Overfilling one basket to chase strength just breaks the seal from step two.
- Add a paper liner when the last cup had silt. Drop the liner in first, then add the same loose dose inside it. The paper catches the fines that an open mesh passes, so this is a filtration choice, not a strength trick.
- Seat the pod and close the handle with normal pressure. Normal is the key word. If you're leaning on it, something in the earlier steps is wrong, usually a heaped fill.
- Knock out the puck and rinse the mesh right away. Coffee oils dry into a film that's much harder to remove later, and that film narrows the mesh openings brew by brew. A ten-second rinse now beats a scrub on Saturday.
The Two Misses That Ruin the Cup
Underfilling is the first miss, and it results in a pale, watery mug no grind adjustment can fix. There is not enough coffee in the basket for the water passing through it. Fill nearer the safe line before you adjust anything else.
The second miss is subtler. A coarse open mesh without paper lets fine particles straight through even when your dose is exactly right, so the cup tastes fine but finishes gritty. That's a filtration problem wearing a dose problem's clothes, and the liner in step four is the fix.
Two accessories sit naturally next to this routine. Paper liners made for reusable K-Cups belong beside the pod if sediment, not caffeine, is your complaint. A water filter in the reservoir does a completely different job from the pod, since it treats water entering the machine while the pod only holds grounds at the brew chamber. If you want more ways to work with loose grounds in these machines, our guide to using coffee grounds in a Keurig covers the variations.
A good load shows itself immediately. The stream runs even, nothing drips at the lid, and the cup tastes like coffee without a second brew to rescue it.
Fix Leaks Sediment and Scale
The complaint goes like this. The reusable pod leaks, the coffee tastes flat or faintly metallic, and the machine seems dirtier than it was with disposables. Those are three separate problems, and lumping them together is why people give up on pods that were working fine.
Separate the Gasket From the Grind
A drip at the rim is a sealing problem. The usual causes are a twisted gasket, a basket heaped above its rim, or a pod that's the wrong height for that holder. Reseat the gasket flat, level the fill, and if the drip survives both, the pod geometry is wrong for your machine.
Silt after a correct fill is a different diagnosis. It points at mesh alone doing a job it can't fully do, which is a paper liner decision, not a pod defect. If you skipped the liner, that's your answer. And a bitter or flat taste that creeps in over weeks usually isn't the pod at all. Keeping up with basic machine care is how you protect your morning coffee routine from slow flavor drift.
Scale Is the Problem Rinsing Cannot Touch
Loose grounds and daily rinsing don't remove mineral scale from the water path or heating system. Keurig's descaling guide for 2.0 brewers instructs users to run a cleansing brew using 6 ounces of hot water without a K-Cup, allow the brewer to stand for at least 30 minutes, and then repeat the fresh-water brewing process until at least 12 rinsing brews have been completed. The guide also specifies removing any water filter before descaling and refilling only to the reservoir's maximum line.
Those counts are the point. A quick rinse isn't descaling, and skipping the soak or the repeated rinses can leave descaling solution or loosened deposits inside the machine. A refillable pod cuts disposable packs. It does not replace any of this.
If you brew daily, keep a universal descaling solution and a replacement reservoir filter alongside your pod, because mineral buildup changes taste and flow even when the basket is spotless. One handles the water path, the other handles the water itself.
Stop rule: If the handle won't close or the brewer still rejects the pod, don't cut parts and don't bypass the holder. A modified machine is a broken warranty and a safety problem, not a workaround.
Buy the Pod That Names Your Brewer
The decision splits into two branches, and your base plate picks the branch for you. If your machine is a single-needle 2.0, Classic, K-Elite, or K-Mini, our match is the 2-Pack of Reusable K Cups, stainless steel refillable pods for Keurig single-needle brewers including Classic, 2.0, K-Elite and K-Mini series, sold as a 2-pack for $19.95. Shop that 2-pack when you want your own ground coffee in a metal pod instead of another foil cup.
If your machine is a K-Supreme, K-Slim, or K-Crema, don't use the single-needle 2.0 pod at all. Our Reusable Stainless Steel K-Cups for Keurig MultiStream coffee makers come in a 2-pack for $19.95 and fit K-Supreme, K-Slim and K-Crema. MultiStream owners, especially anyone with a K-Supreme SMART, should follow their brewer guide and never force another reusable filter into the chamber.
Paper liners and a descaler sit alongside either pod, since sediment control and water-path care don't change with needle style. And if dialing in a reusable pod makes you curious about other ways to brew the same beans, it's worth taking time to find your ideal brewing technique beyond the Keurig entirely.
Here's your one action. Open our reusable K-Cup page, match the product name to the model printed on your brewer, and order the 2-pack that lists that model before you retire the old My K-Cup for good.
PureHQ Inc. makes stainless steel reusable K-Cups, paper liners, water filters, and descaling solutions built for specific Keurig models rather than vague universal claims, so you can brew your own ground coffee without fighting error screens or forced lids. Match your brewer model to the right pod and keep it brewing clean with the accessories that support it. Visit PureHQ Inc. to shop the exact fit for your machine today.

