
Coffee Machine Care
Using Reusable K Cup in Keurig 2.0: Step-by-Step Guide
Nov
You load fresh grounds, close the lid, press brew, and your Keurig 2.0 refuses, leaks, or pours a weak cup. That's usually not your coffee. It's a compatibility or menu-setting failure. Using a Reusable K Cup in Keurig 2.0 works when the filter matches your exact series, seats flush, and you run the brewer's reusable-filter setting. Get those three basics right first, then judge taste.
Why Reusable Pods Are Worth Switching To on Keurig 2.0
A Stanford report stated that approximately 8.3 billion pods were sold in the United States in 2013 and single-serve machines were present in about 27% of U.S. homes. Every disposable brew still discards a plastic body and foil lid. A reusable filter keeps portion-controlled, one-button brewing, but you fill it yourself and wash it afterward. You still buy ground coffee. The pod waste disappears.
What the Switch Does Not Change
You still handle grounds, rinse mesh, and maintain the brewer. If you brew rarely, that extra minute may not feel worthwhile. Daily brewing is where the avoided pods add up. A breakroom that swaps one disposable per brew also cuts the same steady volume.
The payoff depends on fit and settings. A reusable pod that matches your 2.0 series, seats flush, and runs under the brewer's reusable setting earns its place. A mismatched pod produces leaks, weak coffee, or a brewer that refuses to start. Judge the switch over three brews: full-strength cup, no grit in the cup, and no leak around the lid mean the setup is working. If you're weighing cost too, our guide to saving money with reusable K-Cups for Keurig breaks down the habit side. Cutting repeat disposables around the kitchen pairs naturally with other low-waste swaps, including home care sets on Loyaltie.
Decide two things now. Do you brew often enough, and which 2.0 series do you own?
Which Keurig 2.0 Models Accept a Reusable K-Cup
Compatibility depends on the brewer generation and pod recognition, not whether a box says K-Cup. Keurig's 2.0 quick-start guide states that 2.0 brewers were not compatible with the original My K-Cup reusable-filter accessory. The K-200 user guide also says the brewer will not operate with pods that lack the Keurig Brewed seal.
Keurig later made a dedicated My K-Cup 2.0 filter, described as optimized for all K-Cup brew sizes. That is why an older reusable pod can drop into the holder and still fail. The 2.0 brewer checks the pod, and the menu sequence tells it what is brewing. Match both before you fill anything.
Keurig 2.0 Models and Reusable Filter Requirements
| Model or pod | Menu step before brewing | Compatibility note |
|---|---|---|
| Keurig K-200 | Select option 4, which may need repeating each time | Pods without the Keurig Brewed seal will not brew |
| Keurig K-300, K-400, K-500 | Insert My K-Cup 2.0 filter, close brewer, select option 4, then brew size | Use the 2.0 filter designed for these series |
| Original 2.0 brewers | Use the 2.0-specific filter sequence for your series | Original My K-Cup accessory was not compatible |
| Older or non-Keurig-branded pods | Not applicable | May not work with the system; confirm the seller lists your exact series |
Verify Before You Buy
- Read the model number. Check the base, back label, or manual for K-200, K-300, K-400, or K-500.
- Match the filter version. Confirm the seller names your exact series, not just Keurig generally.
- Check the operating method. Make sure the instructions cover your brewer's menu behavior.
- Run three brews before judging the filter. Brew one small cup, one large cup, and one back-to-back cup. Consistent flow and no overflow mean the pod is seated and recognized. A weak or slow third cup points to grind, dose, or alignment.
The model-by-model guide to choosing the right reusable K-Cup for different Keurig models helps if your badge is unclear. If your model is one of those four series and the filter is the 2.0 version, proceed. If either does not match, stop and confirm before spending anything.
Practical rule: I would start with the model label, not the product photo. Photos hide height, lid profile, and recognition problems.
How to Fill, Seat and Align the Reusable Filter
Start by reviewing the fill and seating sequence below, then follow it exactly on your first three brews.
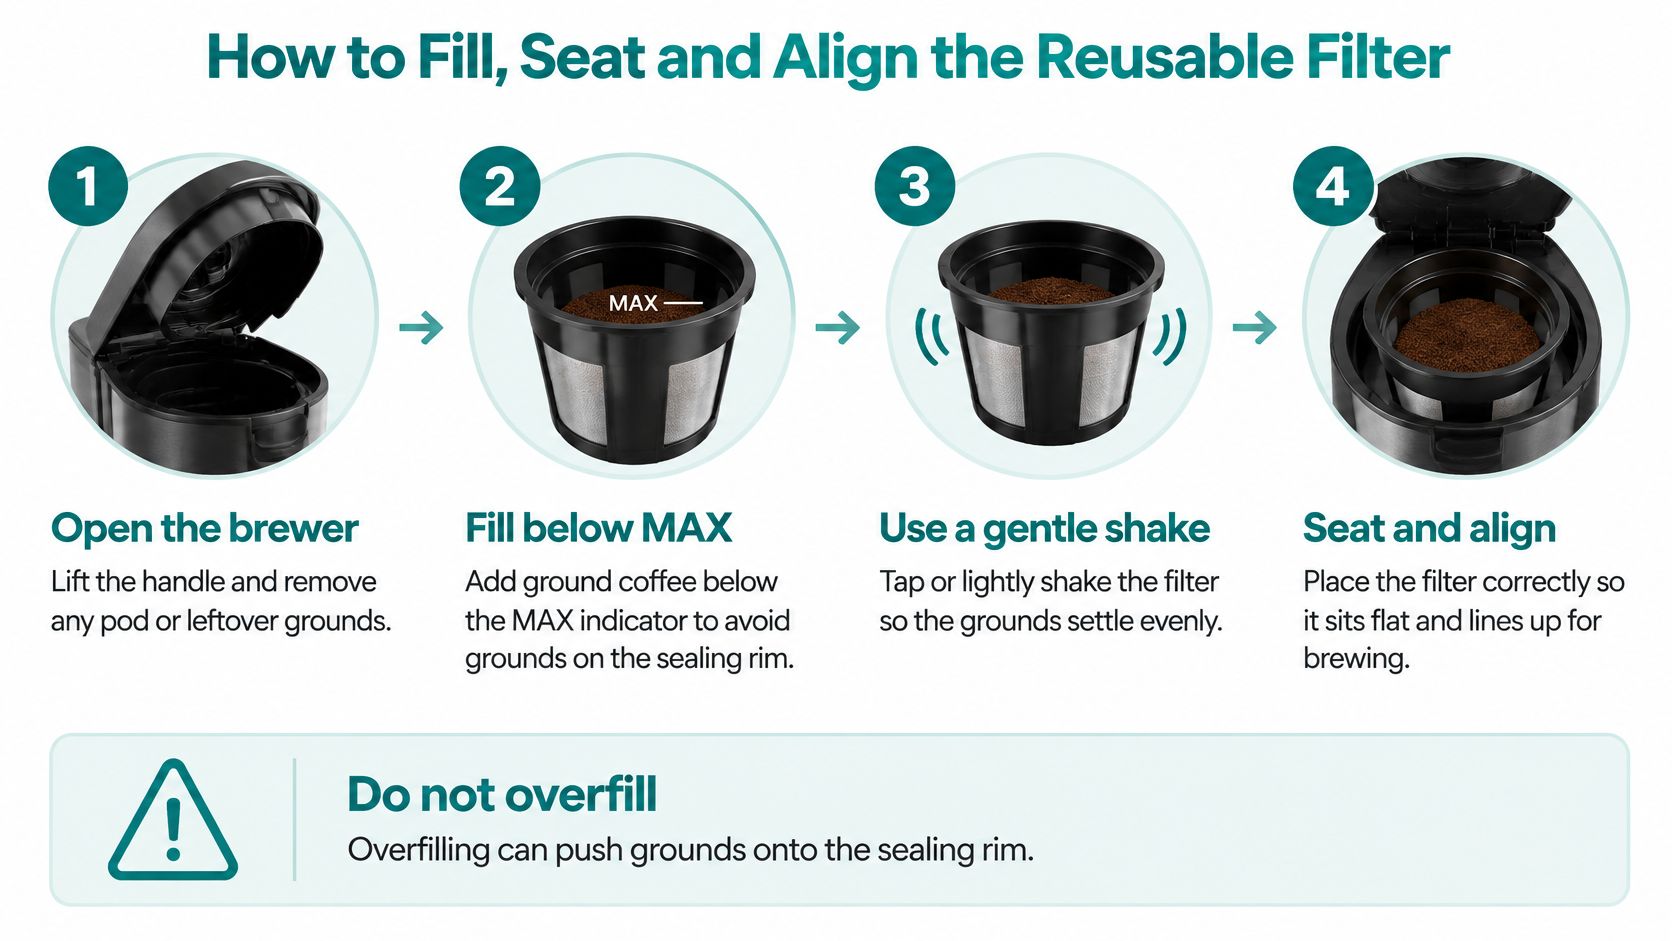
Treat dose, grind, seating, and alignment as controlled variables. Keurig's support instructions for My K-Cup identify incomplete seating and outlet or needle misalignment as conditions to check before brewing. Most messy first cups trace back to one of those details, not the beans.
Fill Without Choking the Mesh
- Open and clear the chamber. Lift the handle and remove any pod, loose grounds, or residue from the holder. Old grounds on the rim stop the next filter from sitting flat.
- Fill below MAX. Add a consistent dose below the MAX indicator. Overfilling pushes coffee onto the sealing rim and gives water a path around the filter.
- Use a coarse-to-medium grind. Don't use espresso-fine coffee, and don't tamp. Fine, compressed grounds raise resistance, slow flow, and can force water sideways instead of through the bed.
- Level with a light shake. Tap the filter once or twice so grounds settle evenly. You're leveling the surface, not packing it.
Don't treat a reusable K-Cup like an espresso basket. It needs headroom and loose grounds so water can move.
Seat, Align, and Close
- Wipe the sealing rim. Run a fingertip or dry cloth around the edge. Even a few grounds there can break the seal and leave sediment in the cup.
- Insert handle facing front. Press the filter down until it sits flush, with its outlet aligned with the brewer's exit needle. If it rocks or tilts, lift it out and reseat it.
- Lock the cap, don't overtighten it. Close the cap only to its intended lock position. The manufacturer cautions against overtightening, and forcing it can distort the seal.
- Close the brewer completely. The handle should close without you leaning on it. Resistance means the filter is overfilled, tilted, or not fully seated.
Watch the handling sequence once before your first attempt, especially the seating motion.
After brewing, wait before you grab the filter. The manufacturer warns that the filter and contents may be hot. Let it cool, then empty damp grounds promptly so oils and fines don't harden into the mesh.
Success looks boring. The filter sits flush, the brewer closes cleanly, no grounds ring the chamber, and the menu appears ready. If you need force at any point, I would reopen it and find the reason rather than brew through it.
Menu Option 4 and Brew Sizes for Reusable Pods
A filter can fit perfectly and still brew badly if you skip the menu step. The official K300/K400/K500 My K-Cup guide says to insert the filter with its handle facing front, press it down firmly, close the brewer, select option 4, then choose a brew size.
On the K-200, you may need to select option 4 each time because it can be the default menu screen. Don't assume yesterday's setting survived. Check the screen before every reusable brew until the habit sticks.
Run the Three-Brew Test
Keurig says the 2.0 filter is optimized for all K-Cup brew sizes, but it doesn't publish extraction, flow-rate, or clogging benchmarks. Test your own coffee instead of trusting a generic claim.
- Lock the variables. Pick one coffee, one grind, one dose below MAX, and a smaller brew size.
- Brew three consecutive cups. Record brew time, beverage volume, visible sediment, and whether the brewer stops or leaks.
- Change one variable. Adjust only dose, grind, or volume on the next set. Changing all three tells you nothing.
- Increase size last. Move up only after strength and flow look right, because more water dilutes the same dose and exposes weak extraction.
If the small cup tastes weak, fix grind or dose before choosing a larger size. A bigger cup won't create strength that wasn't there. If flow slows or the cup turns muddy, go slightly coarser or reduce the dose a little.
Once three brews run cleanly at one size, make that size your default for that coffee. Write the dose and grind on the bag. That small note saves you from re-testing every time you open a new roast.
Fixing Leaks, Weak Coffee and Slow Flow
Slow flow is the complaint that lands on reusable filters most often, and it is usually the wrong suspect. Scale inside the brewer's passages restricts flow and drops cup volume whether the pod holder holds steel or plastic. If output was shrinking with disposable K-Cups, descale before you blame the refillable pod.
Run the descale cycle Keurig specifies for your model, using that model's solution and rinse volumes, and pull the water filter first if the instructions call for it. A full cycle, start to finish, is the only way to learn whether scale was the cause. Stopping halfway proves nothing.
Washing the reusable pod cannot reach the mineral deposits inside the machine. Two separate systems, two separate fixes.
Weak coffee and slow flow also get lumped together, and they shouldn't be. Weak coffee is a ratio problem: too much water for the dose, or a grind so fine the water stalls and channels through a narrow path. Slow flow is a restriction problem: scale, an overfilled pod, or a blocked exit needle. Tightening the grind fixes the first. It rarely fixes the second, and often makes it worse.
Reusable K-Cup Symptoms, Causes and Fixes
| Symptom | Likely cause | Fix |
|---|---|---|
| Overflow from the top | Gasket on the exit needle sits too high | Reposition the gasket lower on the needle, then brew again |
| Grounds in the cup | Grounds collected in the exit needle | Clean the exit needle with a toothpick or straightened paperclip |
| Low volume or slow brew | Mineral scale in internal passages | Run the descale cycle from your brewer's own instructions, or when the descale light comes on |
| Weak or sour coffee | Overfilled filter or grind too fine | Fill below the MAX indicator and use a coarser grind |
| Brewer stops or leaks | Filter not seated flush or outlet misaligned | Reseat the filter flush and align the outlet with the needle |
Most fixes take one brew to verify. Reseating the pod, wiping the rim, clearing the needle and lowering the fill should change the next cup immediately. Descaling takes a full cycle, so give it the whole run before you judge it.
For recurring problems, our breakdown of issues you may experience when using reusable K-Cups covers the patterns worth separating, including the difference between a pod that never seated and one that clogs mid-brew.
On leaks specifically, I'd recheck rim debris and outlet alignment before replacing anything. Most first leaks trace back to setup rather than pod design. There is a simple test that settles it: if the same pod leaks in every position, and a different pod seals fine in that same chamber, the pod is the problem. If both leak, the brewer is.
Official 2.0 Filter Versus Generic Refillable Pods
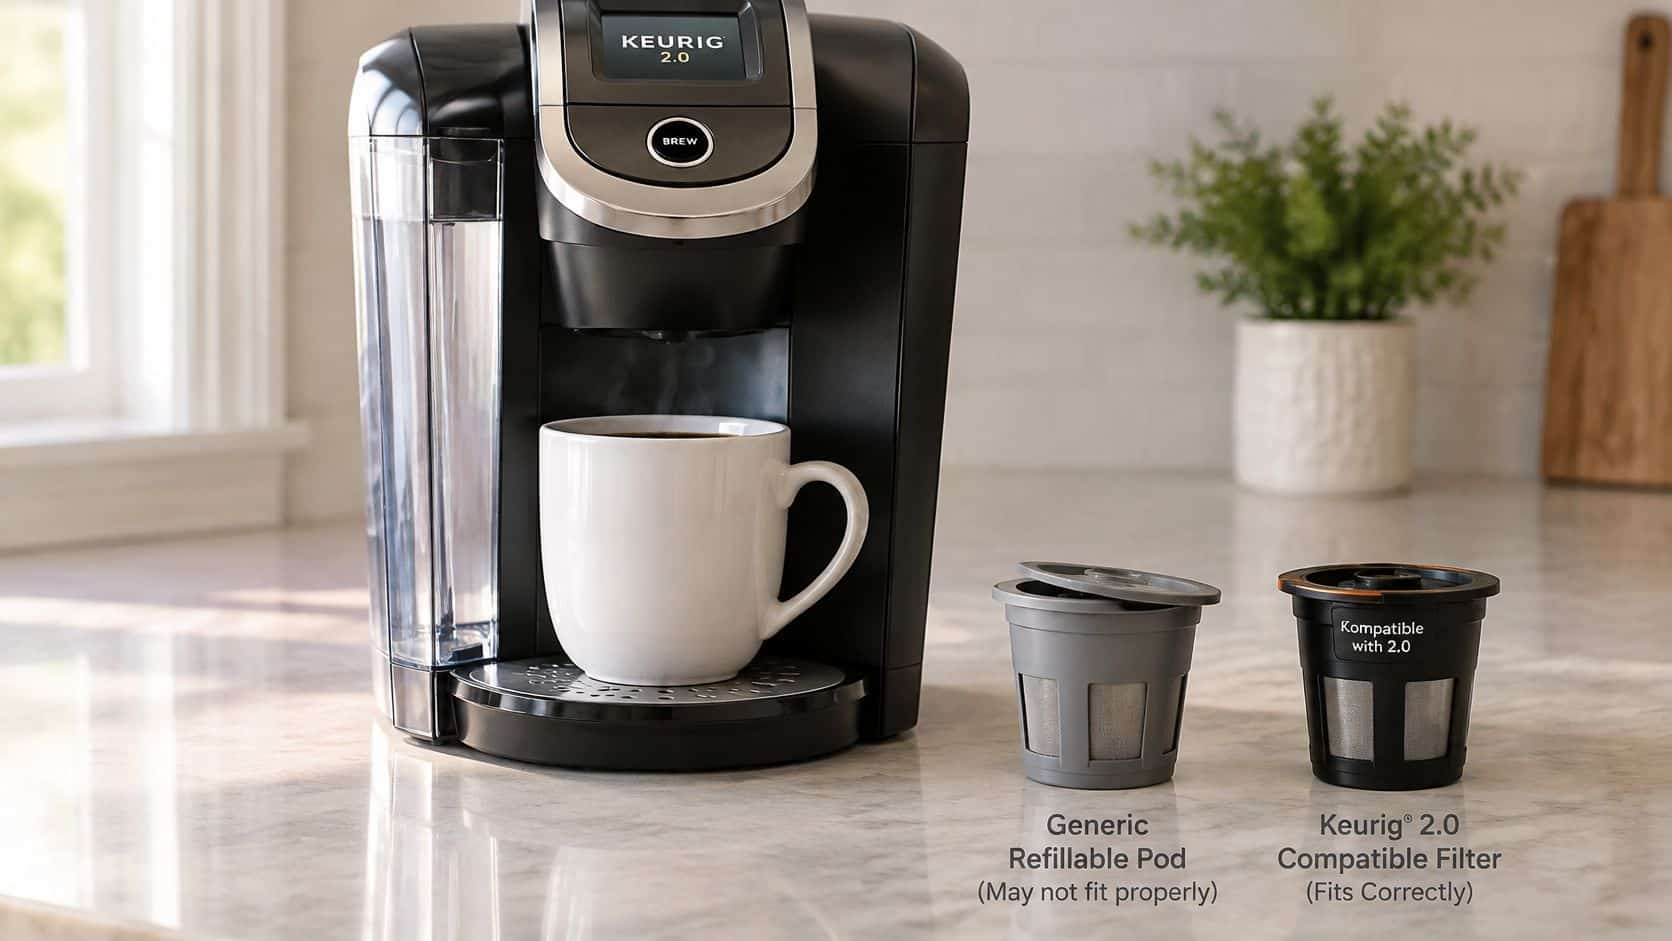
The common objection is fair. A generic refillable cup may fit a 2.0 chamber and still not work properly in it. Physical fit is only the first test.
Compare the two filter styles side by side before you judge by price alone.
Official 2.0 Filter Compared With Generic Refillable Pods
| Criterion | Official 2.0 filter | Generic refillable pod |
|---|---|---|
| Model compatibility | Named for the 2.0 K-200 to K-500 series in Keurig guides | Set by each seller's model list |
| Brew size support | Optimized for all K-Cup brew sizes | Stated by the seller, not Keurig |
| Menu behavior | Uses option 4 on the K-300 to K-500 series | Not documented by the brewer maker |
| Official documentation | Keurig user guides cover insertion and use | Seller instructions only |
| Leak and clog benchmarks | Not published by Keurig | Not published |
The official filter gives you documented compatibility, documented menu behavior, and named brew-size support. A generic pod asks you to trust the seller's list and your own testing. That doesn't make every generic pod bad. It means the burden of proof shifts to you.
Durability is the other gap. Keurig doesn't publish leak, clog, or success-rate benchmarks for reusable filters, so judge by how well a pod keeps sealing after repeated washing, heat cycles, and daily handling. A pod that seals on one machine can still leak on another if the lid warps or the rim wears.
My recommendation is simple. Buy the documented 2.0 option if you want the fewest unknowns. If you choose a generic refillable, run the three-brew test before you rely on it every morning.
Choose a Compatible Reusable K-Cup for Your Brewer
Your buying check has three steps. Confirm the model series, confirm the filter type for that series, then run the three-brew test with your usual coffee. Skip any one of them and you're guessing.
For the single-needle brewers covered here, PureHQ's stainless steel refillable reusable K-Cups come as a 2-pack for $19.95 and are listed for Classic, 2.0, K-Elite and K-Mini series. That's the relevant fit for this guide. Don't use that listing for K-Supreme, K-Slim or K-Duo Gen 2 machines, because those require a different product.
If your brewer already showed slow flow or shrinking volume, add maintenance at the same time. The Keurig and Breville descaling and cleaning tablets come in a 24-count pack with 6 compatible water filters for $19.95. A clean filter in a scaled machine still gives you a disappointing cup, so pair the descaler with the reusable pods when the symptoms point that way.
Check your model badge one last time, match it against the compatibility list, and order the 2-pack that fits your brewer. When it arrives, start with a smaller brew size, select option 4, and let three clean brews prove the setup before you change anything.
Shop PureHQ's reusable K-Cups, compatible water filters, and descaling supplies to brew your own ground coffee in a Keurig 2.0 without the disposable pod for every cup. Visit PureHQ Inc. to check your exact model against the compatibility list and order the filter pack that fits your brewer today.

