Coffee Machine Care
How to Clean a Keurig for a Flawlessly Fresh Brew
Mar
Is your morning coffee ritual being ruined by a brew that tastes weak, bitter, or just… off? You're not alone. According to Keurig Green Mountain's own reports, one of the most common user complaints is a decline in coffee quality over time. The problem isn't your coffee pods; it's a hidden layer of mineral scale and rancid coffee oil residue building up inside your machine's internal components.
This unseen gunk doesn't just sabotage your coffee's flavor. The U.S. Environmental Protection Agency (EPA) notes that mineral buildup, known as limescale, acts as an insulator on heating elements, forcing your brewer to work harder and use more energy just to heat water. Over time, this strain can lead to slower brew times, inconsistent cup volumes, and eventual machine failure, turning your convenient coffee maker into a frustrating countertop ornament.
The solution is a simple but consistent cleaning and descaling routine. By using the right tools and techniques to flush out these deposits, you can restore your Keurig's performance, extend its lifespan, and guarantee a fresh, delicious cup of coffee every single time. A clean machine isn't just about taste; it's about protecting the appliance you rely on daily.
Why Your Keurig Coffee Tastes Off
If your morning brew suddenly has a funky, bitter taste or the machine is groaning like it’s struggling to get through the workday, you're not imagining things. The culprit is almost always a stealthy combination of mineral scale and old coffee oil residue building up inside your brewer, completely sabotaging your coffee's flavor.
This buildup doesn’t just mean sour, lukewarm coffee; it can seriously shorten your machine's lifespan. Think of cleaning not as a chore, but as the secret to guaranteeing a fresh, delicious cup every single time—and protecting the machine you paid good money for.
The Problem Lurking Inside Your Brewer
Every time you brew a pod, two things get left behind in your Keurig: natural coffee oils and mineral deposits from your water. Those coffee oils are fine at first, but they go rancid fast, creating a bitter, stale flavor that completely masks the rich notes of your coffee grounds. If this sounds familiar, you can dive deeper into how these oils wreck your brew in our guide on why your coffee might taste bitter.
At the same time, minerals like calcium and magnesium—which are in most tap water—are building up on the heating element and inside the tubes. This gunk, known as limescale, acts like an insulator, forcing your machine to work way harder just to heat the water.
The result? A seriously disappointing cup of coffee. The water can't get hot enough, leading to under-extraction and a weak, sour taste. Over time, that constant strain can cause permanent damage to your machine's guts.
From Minor Annoyance to Major Malfunction
What starts as a slightly "off" taste can quickly spiral into bigger problems. The slow, steady accumulation of scale creates a domino effect of issues that ruin your coffee experience and hammer your brewer.
- Slower Brew Times: As scale builds up and narrows the internal pathways, water has a tougher time getting through. You'll notice it takes significantly longer to brew a single cup.
- Inconsistent Volume: Ever select a large cup and get a small one? That’s a classic sign of a clog. The machine is trying to dispense the right amount, but the flow is too restricted.
- Loud Noises: If your brewer starts making weird gurgling or straining sounds, it’s screaming for help. That’s the sound of the pump working overtime to force water through a clogged system.
This isn't a rare issue. The National Coffee Association's 2023 trend report found that single-cup brewers are used by 27% of past-day coffee drinkers. With millions of machines in daily use, mineral buildup from hard water is a widespread problem. According to Keurig's own support documentation, failing to descale regularly can lead to buildup that causes brewing issues and may ultimately lead to permanent damage.
The Solution Is Simpler Than You Think
The single most effective way to get your Keurig back to its old self is a consistent cleaning routine. This means tackling both the daily grime and doing a periodic deep clean to destroy that internal buildup. A clean machine doesn't just make better-tasting coffee; it runs more efficiently and safely.
Don't forget that the quality of your water makes a huge difference. Understanding how to go about choosing the best water filter can dramatically cut down on mineral deposits from the start. Using high-quality, compatible water filter cartridges—and replacing them regularly—is a proactive step that stops scale before it even forms.
Ultimately, staying ahead of the problem is key. You don’t need to wait for your coffee to taste bad to take action.
Your Guide to Descaling a Keurig Brewer
That blinking "Descale" light on your Keurig is more than just an annoyance; it’s a critical alert from your machine. It signifies that mineral buildup from your water is choking its internal pathways, putting your brewer on a fast track to the landfill and turning your favorite roast into a lukewarm, bitter disappointment.
You bought the machine for convenience, but now it's slow, noisy, and the coffee just doesn't taste right. This isn't just a simple cleaning issue—it’s a performance crisis happening inside the hidden tubes and heating element. The scale forces the pump and heating element to work overtime, which can lead to component failure.
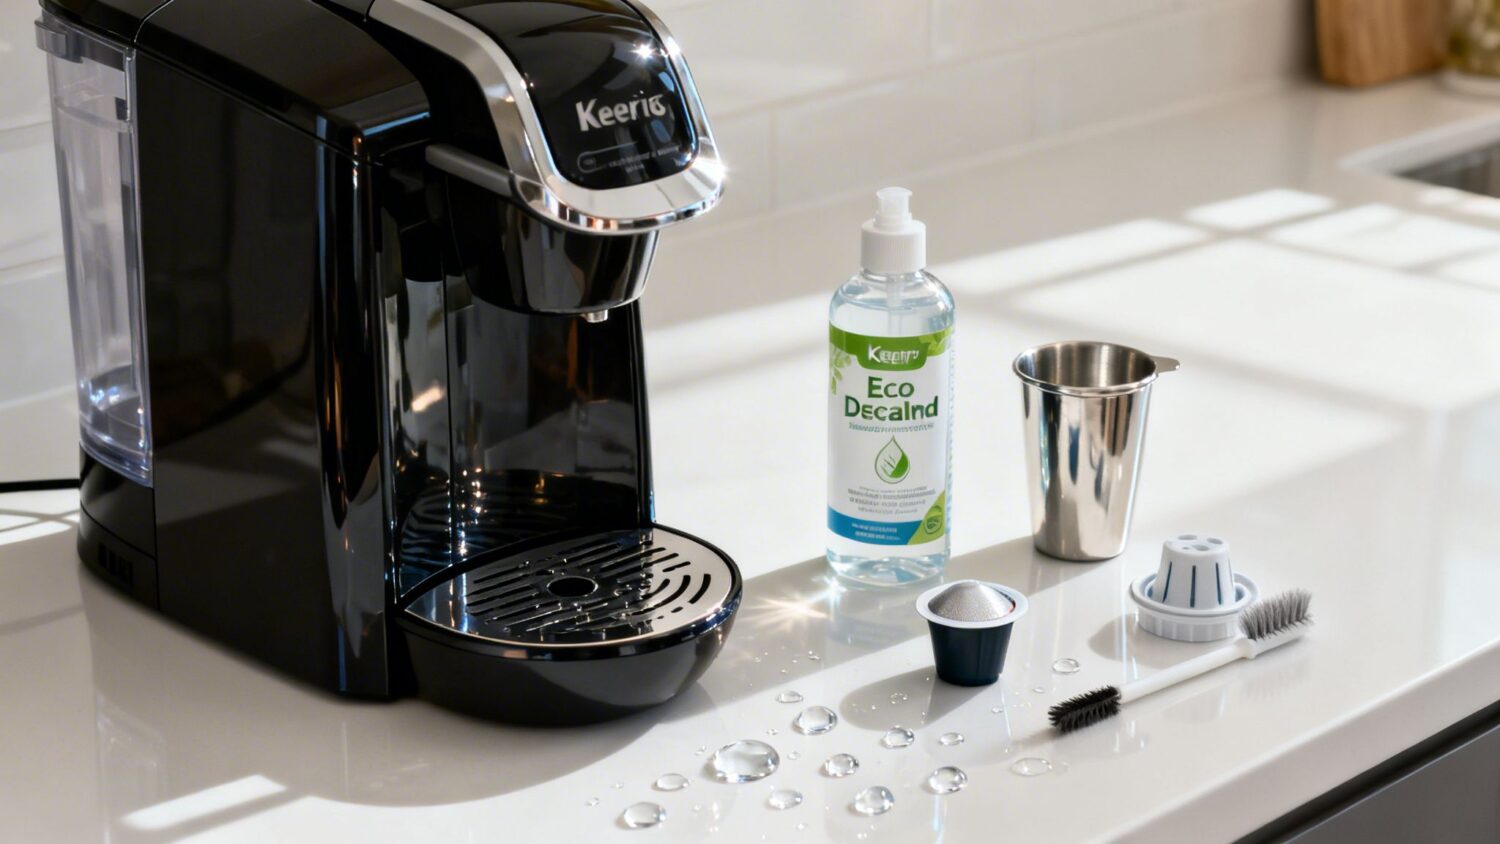
Ignoring this warning sign is a costly mistake. Keurig's official troubleshooting guides confirm that scale buildup is a primary cause of brewers not working properly. The good news? A proper descaling dissolves the mineral deposits and brings your brewer back to life. A high-quality descaling solution is your best friend here, specifically designed to dissolve that stubborn scale without damaging your machine's delicate internal parts.
This is exactly how a small problem turns into a dead machine:
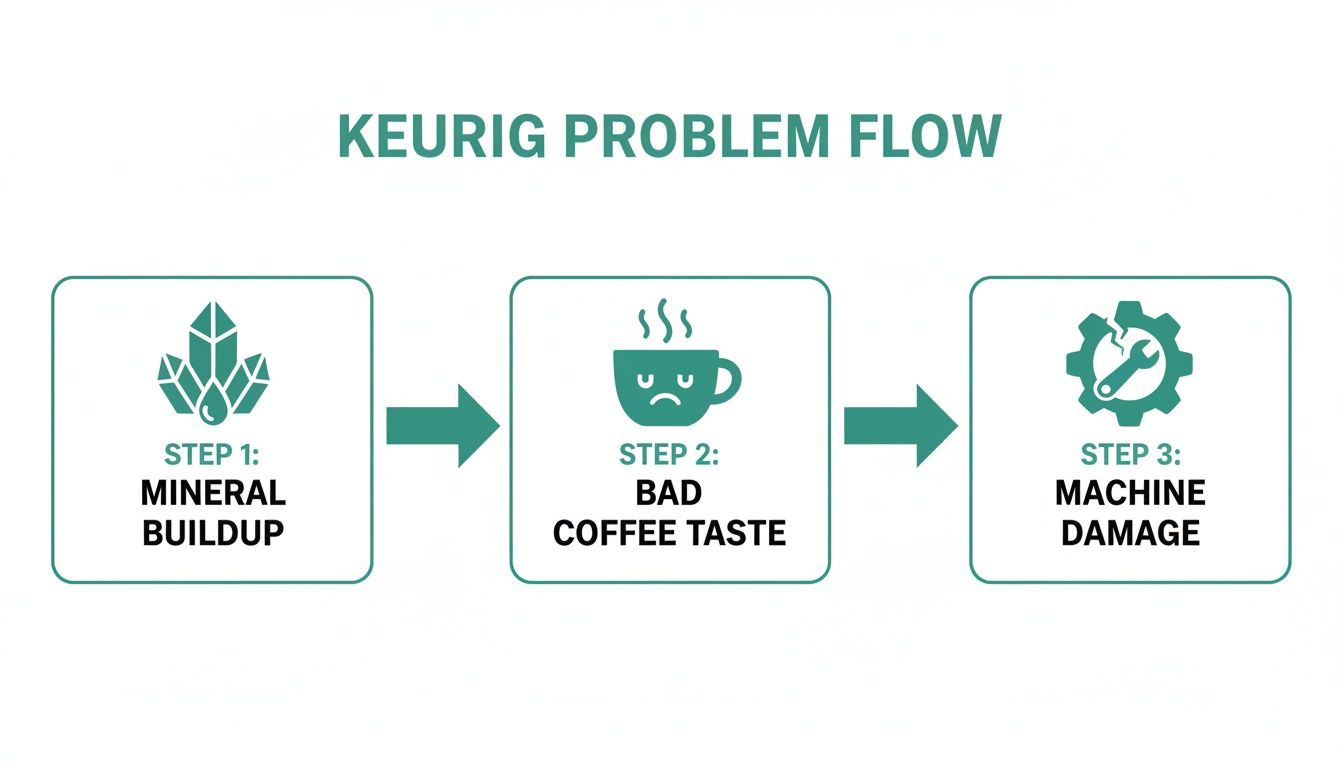
It’s a clear path: invisible mineral buildup leads to bad-tasting coffee, which, if you ignore it, causes irreversible damage.
Preparing Your Machine for Descaling
Before you get started, a little prep work ensures the descaling solution can work its magic without anything getting in the way.
First, power off your brewer and unplug it for safety. Empty the water reservoir completely—get rid of any old water sitting in there. If your Keurig model uses a water filter, the manufacturer directs you to remove it now. You don't want the filter to remove the very ingredients that are supposed to be cleaning your machine.
Next, double-check that there are no pods left in the chamber. The entire descaling process runs pod-free. Finally, grab a large ceramic mug (at least 10 oz) and set it on the drip tray. A heavier ceramic mug is a good choice because it won't splash hot liquid as easily as a lighter cup might.
Running the Descaling Cycle
With your machine prepped, you're ready to tackle that scale.
Pour your descaling solution into the empty water reservoir, following the directions on the package. The user manual for most Keurig models instructs you to mix the entire bottle or tablet with fresh water right in the tank.
Now, plug the machine back in and turn it on. Place your mug on the drip tray and run a cleansing brew cycle using the largest cup size setting. Since there’s no pod, the machine will just cycle the hot descaling solution through its entire internal system.
Keep running brew cycles—emptying the mug into the sink each time—until the "Add Water" light pops on. You might notice the water looks a bit cloudy or has white flakes floating in it. Don’t panic! That’s the dissolved scale, and it’s a great sign that the process is working.
Pro Tip: Once the reservoir is empty, let the machine sit powered on for about 30 minutes. This gives the solution still inside the heating element and tubes extra time to break down any really stubborn mineral deposits before you start rinsing.
Completing the Rinsing Phase
You've dissolved the scale, but now comes the most important part: flushing the system completely. You have to get every last trace of that descaling solution out to make sure your next coffee tastes like coffee, not chemicals.
Wash the water reservoir thoroughly with soap and water, then fill it to the max line with fresh, clean water. Put your mug back on the drip tray and, following official Keurig guidelines, run at least 12 full rinsing brews, again using the largest cup setting.
Yes, 12 times. It might seem excessive, but it's essential for clearing out the complex internal tubing of a Keurig. Don’t cut this step short; it's the key to getting back to a perfect-tasting brew.
Why a Dedicated Descaler Outperforms Vinegar
You’ve probably seen guides online suggesting white vinegar as a cheap descaling hack. However, Keurig's own support documents explicitly advise against using vinegar. The acetic acid in vinegar is not only less effective at dissolving heavy mineral buildup but can also damage the internal rubber gaskets, O-rings, and soft plastic tubing over time, leading to leaks.
Plus, its strong smell is notoriously hard to rinse out, leaving you with coffee that has a sour tang for days. You can see what actually goes into a professionally made cleaner in our guide on Keurig descaling solution ingredients.
A purpose-built cleaner like PureHQ’s Descaling Solution is formulated to be tough on scale but gentle on your machine’s internals. It works faster, rinses cleaner, and ensures your brewer’s integrity is never compromised. For even better long-term results, combine your cleaning routine with high-quality charcoal filters and other maintenance items.
The same basic principles for getting rid of buildup and residue apply to other kitchen appliances, too. For instance, you can learn how to deep clean your dishwasher to get equally spotless results.
Your 60-Second Daily Tidy-Up
This is the quick "end of day" routine for your brewer. It’s fast, easy, and stops coffee grounds and water spots from becoming permanent fixtures.
After your last brew, grab a damp cloth and give the machine's exterior a quick wipe. This alone prevents that dusty film from building up and keeps your counter looking sharp.
Next, pull out the drip tray and give it a fast rinse in the sink. This prevents stray coffee drips from turning into a sticky, brown mess that you’ll have to scrub off later.
Finally, lift the brewer handle, pop out the K-Cup holder, and rinse both parts under running water. This washes away any stray grounds before they can get stuck. Pop them back in, and you're done. Seriously, it takes less time than scrolling through your social media feed.
The 5-Minute Weekly Refresh
Once a week, set aside just five minutes to clean the parts that are constantly in contact with water and coffee. This is your best defense against both mineral scale and nasty, flavor-killing residue.
Here's your weekly game plan:
- Wash the Water Reservoir: Unlatch the reservoir and wash it in the sink with warm, soapy water, just like any other dish. Rinse it well to get rid of any soap before refilling.
- Scrub the K-Cup Holder: The daily rinse is good, but a weekly wash with soap and a soft brush gets rid of the oily coffee film that starts to build up.
- Clear the Needles: This is probably the most important weekly task. The entrance and exit needles are what puncture the pod, and they are notorious for getting clogged with coffee grounds.
According to Keurig's support page, a clogged needle is a top reason a brewer might stop dispensing water correctly or only brew a partial cup. A quick weekly check can prevent the vast majority of these frustrating clogs.
How to Unclog the Needles Without Any Fancy Tools
If you notice your brews are getting slow or weak, the needles are the first place to look. You don’t need special equipment—a simple paper clip will do the job perfectly.
First, unplug your machine. Safety first.
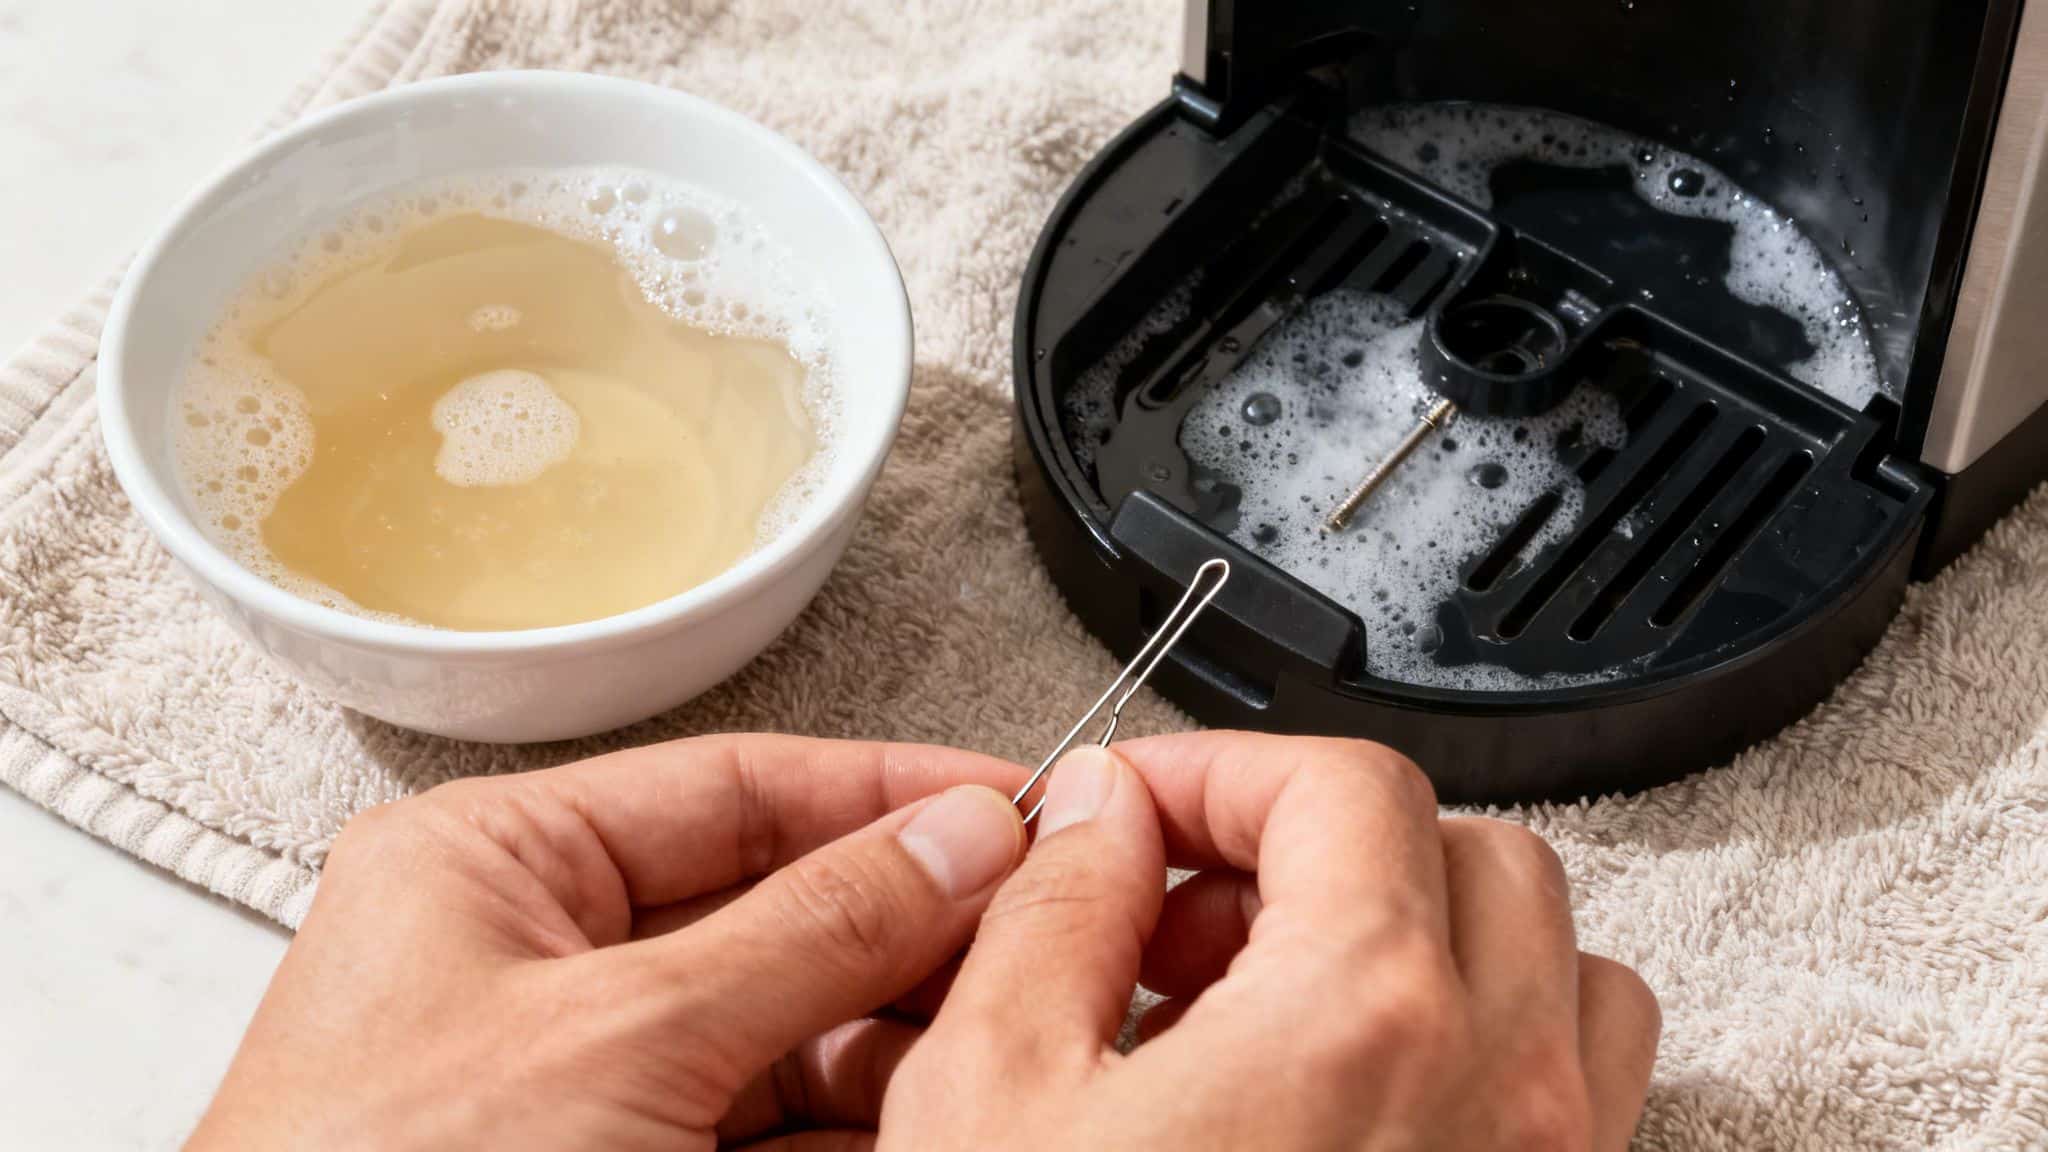
To clean the entrance needle (the sharp point under the brewer handle), carefully use a straightened paper clip. Gently poke the end of the paperclip into the small holes at the needle's tip and wiggle it around to break up any trapped grounds.
For the exit needle (which is inside the removable K-Cup holder), use that same paper clip to poke up through the tube from the bottom, clearing out any gunk. Once you're done, run two or three water-only brew cycles to flush everything out. This simple trick keeps the water flowing freely and ensures you get a full, proper brew every time.
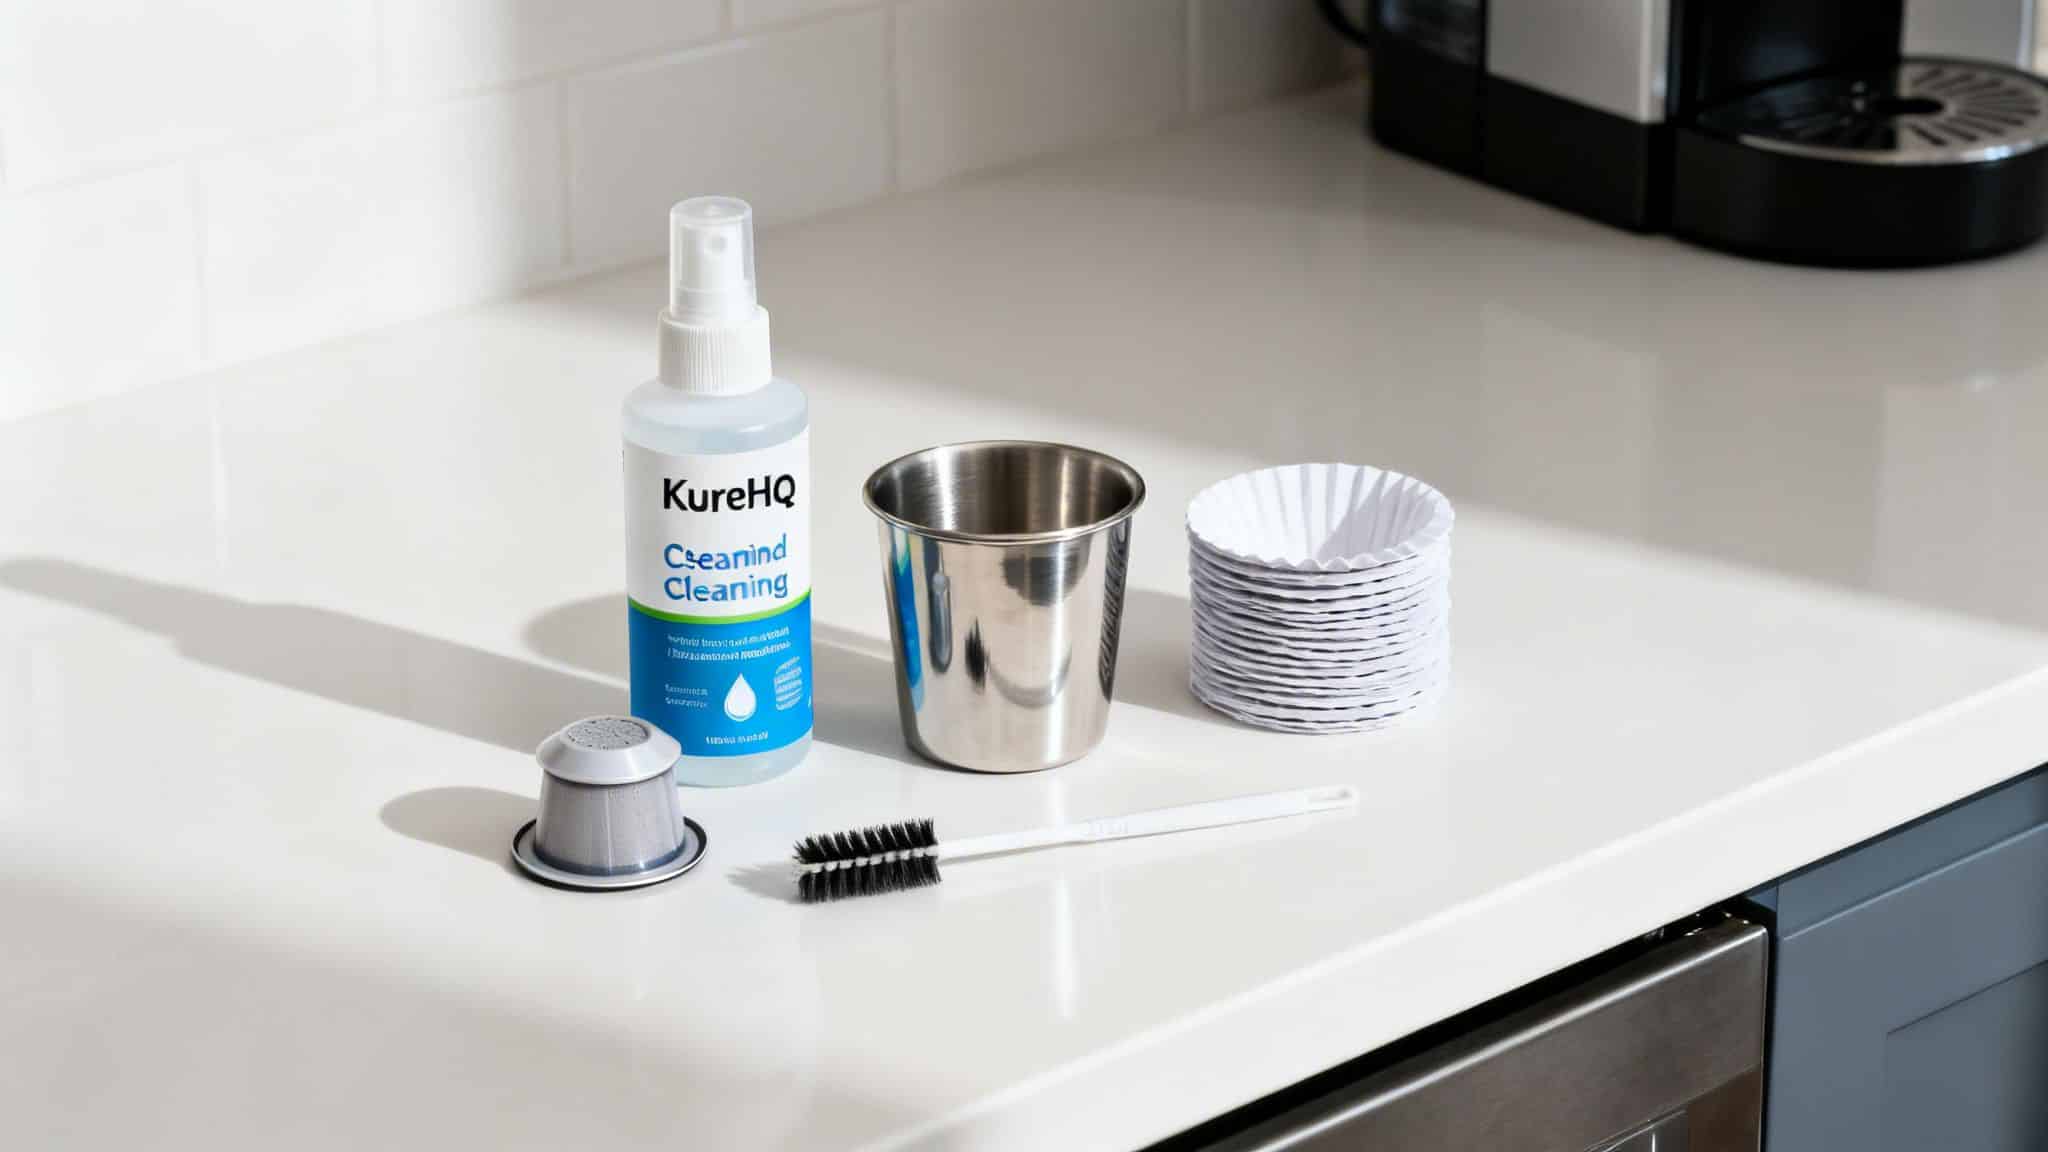
Being proactive about your water also makes a massive difference. Using high-quality PureHQ charcoal water filters and swapping them out every two months is a game-changer. These filters trap minerals and impurities before they get into your machine, which means less scale and better-tasting coffee. You can get all the details in our guide on how to clean your Keurig filter to make the most of this simple upgrade.
Choosing the Right Tools for a Flawless Clean
So your Keurig is sputtering, the coffee tastes off, and you know it’s time for a clean. You head for that big jug of white vinegar under the sink. It’s the classic DIY fix, right? Cheap, easy, gets the job done. But this common “hack” might be the very reason your coffee tastes like salad dressing and your machine is on a path to an early grave.
The wrong tools don't just do a bad job—they actively create new problems. As Keurig itself warns, vinegar’s harsh acidity can eat away at the delicate rubber gaskets and O-rings inside your brewer, making them brittle until they eventually start to leak. Worse, that potent smell clings to everything, tainting every cup for days. It’s a frustrating cycle: you clean your machine only to make your coffee taste terrible.
The real solution is to use accessories designed to work with your brewer, not against it. Investing in a proper descaler, a well-made reusable pod, and the right filters isn’t about spending more money. It’s about protecting your machine, saving yourself a ton of frustration, and guaranteeing a consistently delicious cup of coffee, every single time.
Premium vs. Standard Keurig Cleaning and Brewing Accessories
| Feature | PureHQ Premium Accessories | Standard/DIY Alternatives (e.g., Vinegar, Generic Pods) |
|---|---|---|
| Descaling Power | Formulated with citric acid and other agents to dissolve stubborn mineral scale and coffee oil residue quickly and completely. | Vinegar is only partially effective on heavy buildup and often requires multiple cycles. |
| Machine Safety | Gentle on internal components like rubber gaskets, O-rings, and sensitive heating elements, as recommended by manufacturers. | Acetic acid in vinegar can degrade rubber and plastic parts over time, leading to leaks and costly damage. |
| Taste Neutrality | Odorless and rinses away completely, leaving zero aftertaste to ruin your next brew. | Leaves a strong, sour odor and taste that is notoriously difficult to flush out of the system. |
| Reusable Pod Seal | A precision-fit lid and high-quality silicone O-ring create a tight seal, preventing leaks and ensuring full water pressure through grounds. | Flimsy plastic lids and weak seals allow water to bypass the grounds, leading to a watery brew and countertop messes. |
The Reusable Pod Dilemma: A Common Customer Complaint
Making the switch to a reusable K-Cup is a fantastic move for saving money and cutting down on waste. But not all pods are created equal, which leads to a frequent and frustrating customer objection.
"I tried a generic reusable pod, and it was a disaster. It leaked watery coffee all over my counter, and the lid wouldn't close right. I just ended up with weak coffee and a huge mess."
This is an incredibly common complaint, and it almost always comes down to poor construction. Cheaply made pods often use a weak plastic hinge that breaks and a poorly designed O-ring that fails to create a proper seal. This lets hot water escape around the top instead of going through the coffee, resulting in a weak, watery brew and a cleanup you didn't sign up for.
In contrast, PureHQ's stainless steel reusable pods are engineered to solve these exact problems.
- Built to Last: Made from high-grade stainless steel, they won’t warp, stain, or break like plastic alternatives.
- The Perfect Seal: A precision-fit lid and a high-quality silicone O-ring form a tight seal, forcing every drop of hot water through the coffee grounds for maximum flavor.
- Optimal Flow: A built-in stainless steel mesh filter ensures a smooth, even flow without letting annoying sediment slip into your cup.
For the ultimate convenience, you can pair our reusable pods with PureHQ's disposable paper liners. You get to use your favorite ground coffee with absolutely zero cleanup—just toss the liner when you're done. A well-designed system makes all the difference, a fact supported by data showing a strong link between maintenance and performance. You can learn more about the impact of maintenance on coffee machine performance and see why having the right tools is so crucial.
Your Ultimate Keurig Maintenance Schedule
You bought a Keurig to make life simpler, not to add a bunch of new chores to your to-do list. But then you start hearing about daily wipes, weekly washes, and quarterly descaling, and it all feels a bit overwhelming.
It's easy to lose track. Did you clean the needles last week? When was the last time you actually descaled? Before you know it, your coffee starts tasting a little… off. The machine sputters. That rich, bold flavor you love is replaced by something weak and disappointing. This is the slow, silent takeover by mineral scale and coffee oils.
The secret isn't a complicated checklist; it's building a few simple habits. By breaking down how to clean your Keurig coffee maker into a manageable routine, you take the guesswork out of the equation. This is your roadmap to a machine that runs perfectly and brews a great cup, every single time.
Daily Habits (Takes Less Than 60 Seconds)
Do these quick tasks after your last brew of the day. They're your first line of defense against grime and buildup.
- Wipe It Down: Grab a damp cloth and give the exterior a quick wipe to get rid of any coffee splashes or dust.
- Rinse the Drip Tray: Just slide it out, give it a rinse in the sink to wash away any drips, and pop it back in.
- Clear the K-Cup Holder: Remove the pod holder and rinse it under running water. This gets rid of any stray grounds before they can cause trouble.
Weekly Tasks (About 5 Minutes)
Once a week, give a little extra attention to the parts that see the most action. This is what stops clogs in their tracks.
- Wash the Water Reservoir: Empty out any old water and wash the reservoir with warm, soapy water. Rinse it well before refilling with fresh water.
- Clean the Needles: This is important: Unplug the machine first! Gently use a straightened paperclip to clear out any grounds from the entrance needle (under the handle) and the exit needle (in the pod holder).
Monthly Maintenance
This one simple step is a game-changer, especially if you have hard water. It stops limescale before it ever gets a chance to build up inside your brewer.
- Replace the Water Filter: If your Keurig uses a filter, swap it out. A fresh PureHQ Charcoal Water Filter is designed to trap impurities from your water, making your descaling efforts way more effective down the line.
The Quarterly Deep Clean
Every 3 to 6 months, it's time for a full descaling. This is the only way to dissolve the mineral deposits that regular cleaning can't touch.
Pay attention to your machine. Keurig recommends descaling every 3 months if you have hard water. Slower brewing and coffee that isn't quite hot enough are dead giveaways that it's time to descale.
A consistent schedule is the real secret to a Keurig that lasts for years and consistently makes coffee you love. Stick with this routine, and you'll get the most out of your machine, guaranteed.
Your Keurig Cleaning Questions, Answered
You've got the basics down, but a few questions always seem to linger. Can you really use that kitchen vinegar hack everyone talks about? What do those weird gurgling sounds actually mean? It's easy to get stuck when you’re trying to do the right thing for your brewer but can't find a straight answer.
That hesitation is exactly what lets scale and old coffee oils build up, leading to the very problems you want to avoid: a slow machine and bitter coffee. Let's clear up the confusion with some straight answers so you can keep your Keurig running perfectly.
Can I Just Use Vinegar to Clean My Keurig?
We get this one all the time. While it’s a popular DIY tip, Keurig officially advises against it in their support articles. The primary reason is that vinegar, a mild acid, may not effectively descale the brewer and its strong odor can be difficult to fully rinse from the machine's internal components.
More importantly, it can be harsh on the machine's internal rubber parts and heating elements over time. That can lead to leaks and permanent damage. A properly formulated descaler is engineered to be tough on scale but gentle on your machine's delicate components, ensuring a deep clean without risking your brewer.
How Do I Know When It’s Time to Descale My Keurig?
Many newer Keurig models make it easy with a "Descale" indicator light. If your brewer doesn't have one, your coffee will tell you. Watch for these other tell-tale signs:
- The coffee just isn't as hot as it used to be.
- Your brew cycle is noticeably slower than normal.
- The machine is shorting you on coffee, dispensing less than the cup size you picked.
- You start hearing new or unusual gurgling sounds during the brew.
As a rule of thumb, descaling every 3-6 months is a solid plan. But if you have hard water, Keurig recommends you descale more frequently to keep things flowing smoothly.
My Keurig Is Clogged and Won’t Brew. What Do I Do?
A total clog is almost always caused by coffee grounds getting stuck in the machine’s needles. Don't panic, it's usually an easy fix.
First, unplug your brewer for safety. Then, grab a straightened paperclip or a dedicated needle cleaning tool and gently clear any gunk from the puncture needle (it’s under the handle) and the exit needle (in the K-Cup holder).
Once they're clear, run a few water-only brew cycles to flush everything out. If it’s still stubborn, a full descaling cycle can often dissolve mineral blockages hiding deeper in the internal lines.
Regular weekly needle cleaning is the single best way to prevent a clog. A minute of maintenance now will save you from a coffee-less morning later.
Are PureHQ Accessories Compatible with My Keurig Model?
Yes! PureHQ designs its accessories for a perfect fit with the most popular Keurig models, including K-Classic, 2.0, K-Supreme, and K-Duo brewers.
Unlike generic brands that can cause leaks or poor seals, we list detailed compatibility on every product page. Always check the list before you buy to guarantee a perfect fit and flawless brew.
Ready to master your maintenance routine? The PureHQ complete maintenance bundle has everything you need to get started today.
Shop the full range of PureHQ Keurig accessories and taste the difference a flawless clean makes.
