Coffee Machine Care
How to Clean Your Keurig With Vinegar (and Why a Descaler Might Be Better)

Feb
Does your morning coffee taste… disappointing? If that once-rich brew now tastes weak, bitter, or just lukewarm, the problem isn't your K-Cup—it's the hidden enemy inside your machine. Mineral scale and bacteria are quietly building up, wrecking your coffee's flavor and slowly damaging your brewer.
This buildup chokes your machine's internal lines, forcing it to struggle and leading to slower brewing, inconsistent temperatures, and a watery, unsatisfying cup. Even worse, the warm, moist environment inside your Keurig is a perfect breeding ground for germs. A National Sanitation Foundation (NSF) study identified coffee reservoirs as one of the top five germiest places in the kitchen. You can explore more on these findings about kitchen appliance hygiene, but the fact remains: without regular cleaning, your daily coffee ritual might be less appealing than you think.
Fortunately, restoring your Keurig to peak performance is simple. A thorough descaling with vinegar can dissolve the mineral buildup and flush out germs, bringing back the fresh, robust flavor you've been missing. This simple maintenance is a must for anyone wondering about descaling a Keurig machine for a better coffee taste.
Why Your Keurig Coffee Tastes a Little Off
If your daily brew has lost its magic, you're not imagining it. Over time, every Keurig machine becomes a battleground for two unseen enemies that wreck your coffee's quality: mineral scale and bacterial growth. This combo doesn't just make your coffee taste bad; it slowly damages your brewer.
The main culprit is limescale, a hard, chalky deposit of calcium and magnesium that comes from your tap water. As water heats up inside your Keurig, these minerals get left behind, gradually coating the heating element and constricting the narrow water lines.
This buildup forces your machine to work harder, leading to some all-too-common frustrations:
- Slower Brewing Times: Water is literally struggling to get through the clogged internal pathways.
- Inconsistent Temperatures: The heating element is caked in scale, so it can't heat the water efficiently. The result is a lukewarm, disappointing cup.
- Weaker Coffee: The brewer can't push the right amount of water through the K-Cup, leading to under-extraction and a watery, weak flavor.
The Hidden Health Concern
Beyond just bad taste, a neglected Keurig can become a breeding ground for germs. Think about it: the inside of your brewer is warm and moist—the perfect environment for mold and bacteria to take hold.
According to research from the NSF, a public health and safety organization, coffee maker reservoirs can host more germs than some bathroom fixtures if not cleaned properly. That's because mold and bacteria can thrive in unseen areas like the water reservoir and drip tray where moisture just sits. You can explore more on these findings about kitchen appliance hygiene.
The slow decline of your coffee's flavor and your brewer's performance is often so gradual you might not notice until it’s a major problem. A regular cleaning routine is the only way to stop it.
Fortunately, fixing this is straightforward. A thorough descaling dissolves the mineral buildup and flushes out any lingering germs, restoring your machine to peak performance. By simply cleaning your Keurig with vinegar, you can get rid of the source of that bitter taste and slow brewing, ensuring every cup is as fresh and flavorful as it should be. This simple maintenance is a must for anyone wondering about descaling a Keurig machine for a better coffee taste.
To keep your brewer cleaner between descaling cycles, think about adding PureHQ charcoal water filters. They help reduce the mineral content in your water from the start, slowing down the buildup.
Ready to bring your Keurig back to life? Let's walk through the exact steps for a deep clean.
The Complete Vinegar Descaling Process for Your Keurig
Getting your Keurig back to its old self is easier than you think. With some basic white vinegar from your pantry, you can dissolve the hard water scale that’s slowing down your brew and making your coffee taste… well, off.
Let's walk through the whole process, from prepping the machine to the final fresh-water flush. It’s simple, effective, and will have your coffee tasting great again in about an hour.
First things first: safety and prep. Power off your machine and unplug it from the wall. You don't want any surprises. Next, pull out any K-Cups left in the pod holder and empty the water reservoir and drip tray completely. We want a clean slate so the vinegar can get straight to work.
Preparing and Running the Vinegar Solution
The magic is in the mix. You’re going to create a 50/50 solution of distilled white vinegar and fresh water. For a typical 48-ounce reservoir, that means 24 ounces of vinegar and 24 ounces of water.
Stick to plain white vinegar. Skip the apple cider or other flavored vinegars—they have impurities and sugars that can gunk up your machine, which is the exact opposite of what we're trying to do here.
Once you’ve filled the reservoir, grab a large ceramic mug and place it on the drip tray. Power your Keurig back on. Now, without putting a K-Cup in, run a brew cycle using the largest cup size setting. This first blast of acidic solution starts the process, working its way through the internal parts to break down that stubborn scale buildup.
Keep running these pod-free cycles until your Keurig’s "Add Water" light comes on. When it does, stop. Don't add any more water just yet. The vinegar solution that's still inside needs time to sit and work its magic, especially in the heating element and tubing where the worst of the mineral gunk lives.
All in, the standard descaling process takes about 45-60 minutes. This includes running the vinegar solution through, letting the machine soak for a solid 30 minutes, and then flushing it with fresh water until the vinegar smell is a distant memory. For a deeper dive, you can check out a complete guide to descaling your Keurig with vinegar.
This flowchart breaks down the common problems that tell you it's time for a deep clean.
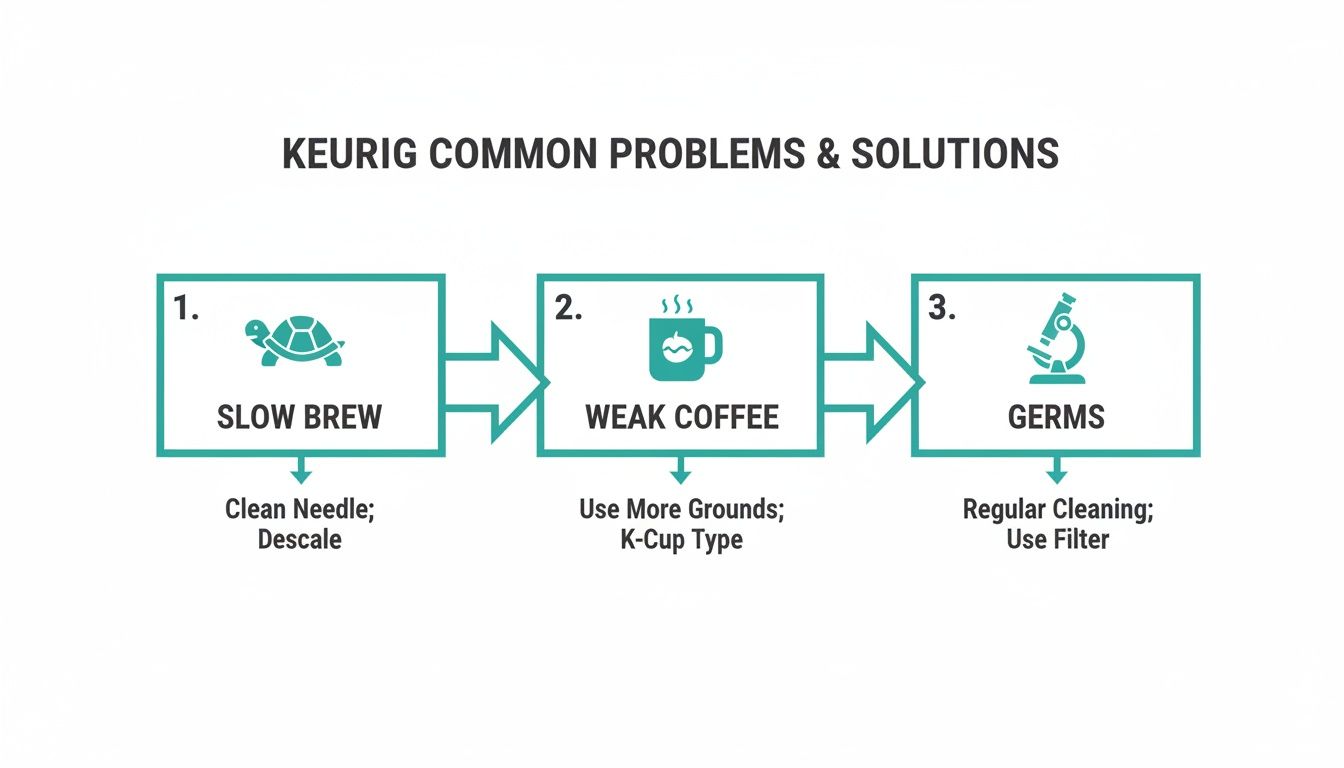
As you can see, things like slow brewing or weak coffee aren't just annoyances—they're clear signs that your machine is overdue for some maintenance.
The Soaking and Rinsing Phases
Okay, now for the most important (and easiest) part: let the machine sit, powered on, for at least 30 minutes.
This is the soak phase. It’s where the acetic acid in the vinegar really gets to work dissolving the toughest mineral deposits clinging to the heating element and water lines. Don't get impatient and skip this—it's what makes the difference between a quick rinse and a true deep clean.
After the 30-minute soak is up, it's time to rinse everything out. Start by removing the water reservoir and giving it a good wash with warm, soapy water to get rid of any vinegar residue. Then, fill it to the max line with fresh, clean water.
Put your mug back on the drip tray and start running fresh-water cleansing brews. Plan on running at least 12 rinse cycles. Yes, that sounds like a lot, but it’s the only way to be absolutely sure you’ve flushed every last trace of vinegar taste and smell from the machine. No one wants a vinegary coffee.
Once you’re back to a clean slate, consider adding a PureHQ charcoal water filter to your reservoir. It helps reduce new mineral buildup from the start, making your next cleaning day even further away.
Vinegar vs. Commercial Descalers: What Is Best for Your Brewer?
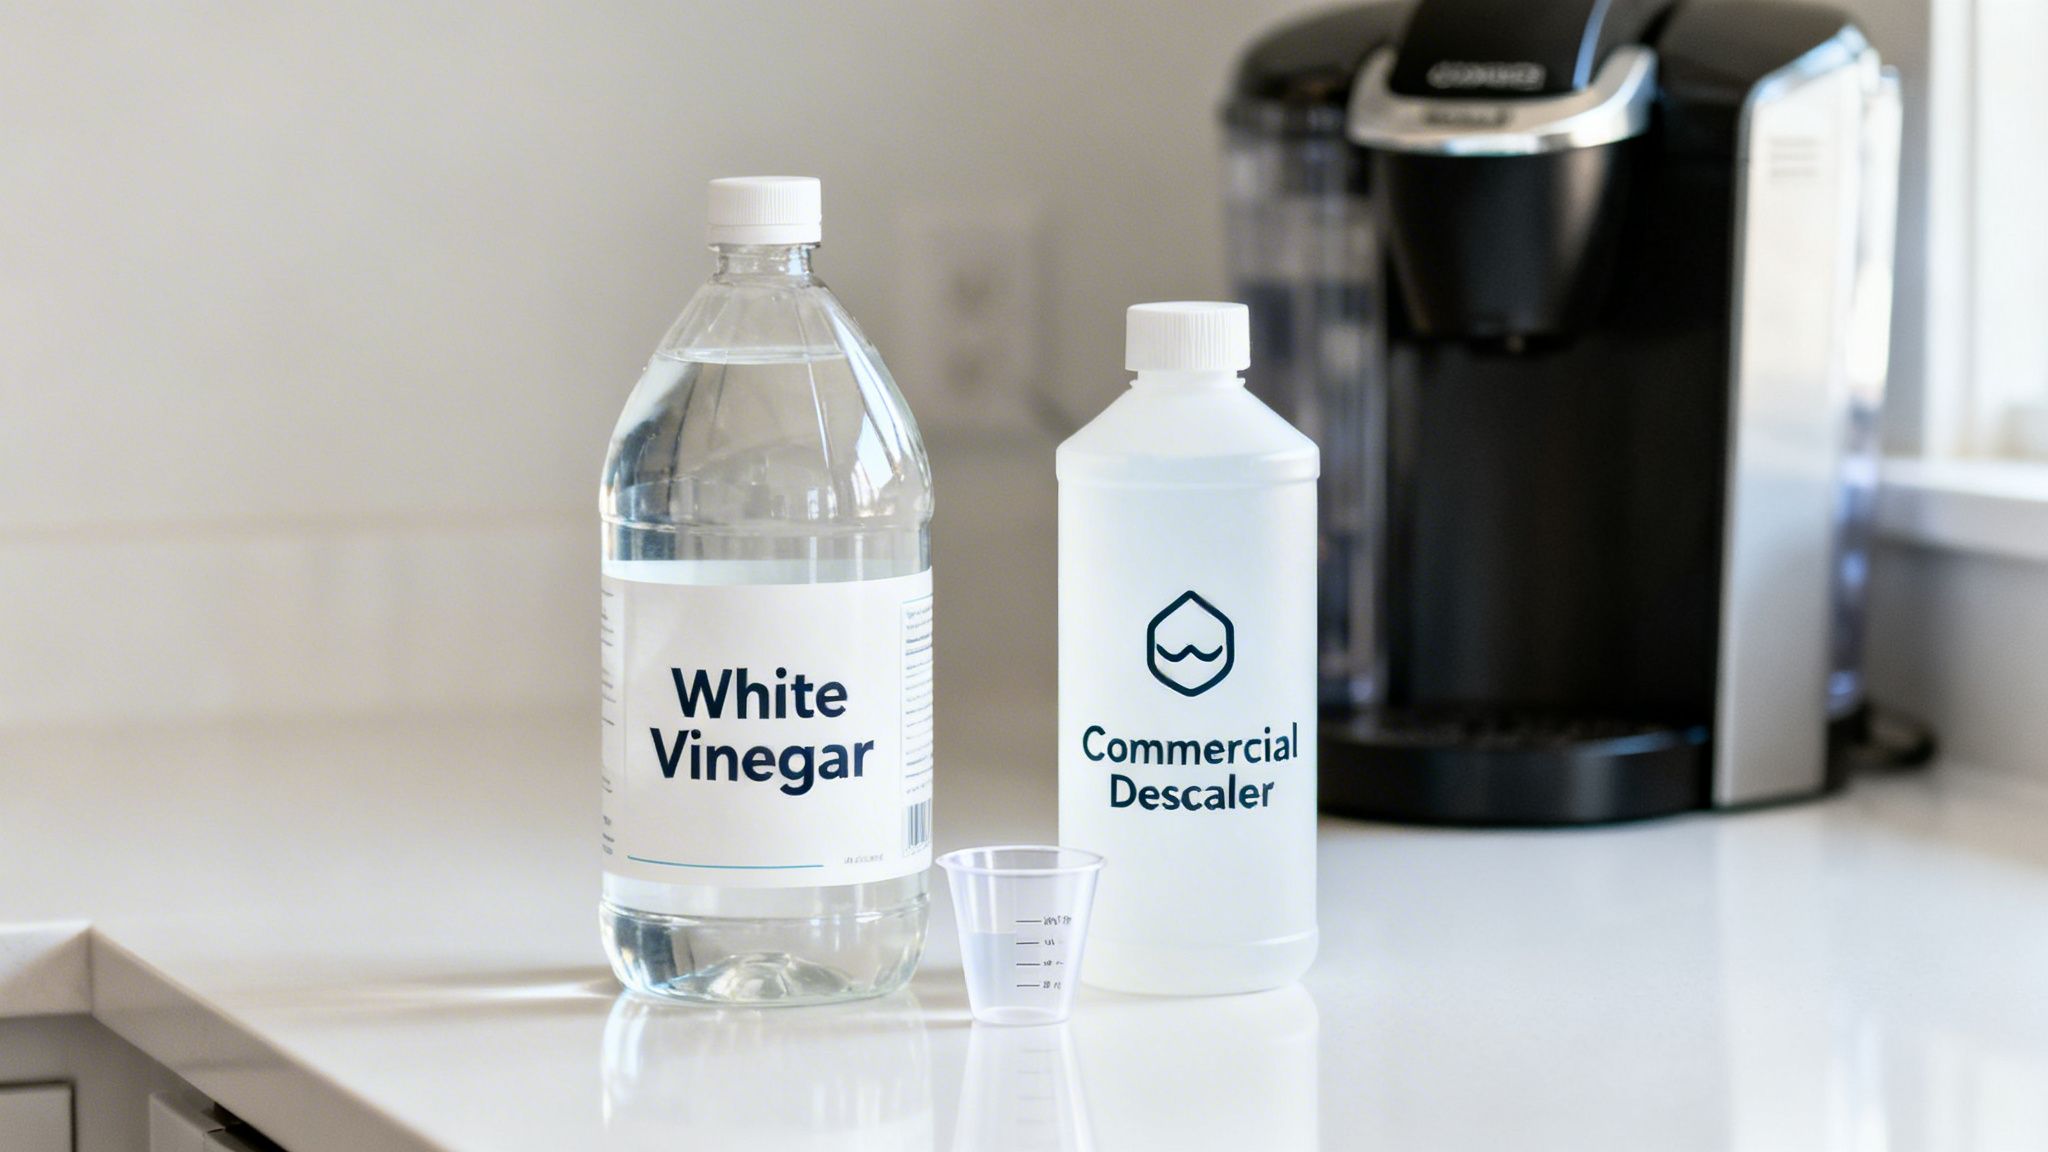
So, you know your Keurig needs descaling, but you're stuck staring at a bottle of white vinegar in your pantry, wondering if it’s really up to the job. It's a classic debate: the cheap, do-it-yourself staple versus a specialized commercial cleaner.
Many coffee lovers worry that vinegar’s strong acidity might be too harsh for their brewer’s delicate insides. It's a valid concern, as repeated exposure to strong acids can potentially degrade rubber seals and plastic tubing over time. Then there's the biggest complaint of all: that lingering vinegar smell. Even after you think you’ve rinsed it enough, that sharp, acidic aroma clings to everything, tainting your next few cups with an unwelcome vinegary tang. It leads to endless rinse cycles, wasting water and time just to get your coffee to taste like coffee again.
The Case for a Formulated Solution
This is exactly where a dedicated product like PureHQ Descaling Solution makes all the difference. Unlike plain vinegar, our solution is engineered specifically for coffee makers. It’s built around food-grade citric acid and other gentle ingredients that are ruthless on mineral scale but completely safe for your brewer's sensitive parts.
You get a powerful clean without risking damage or leaving behind that foul odor. If you want to dive into the science, you can learn more about the ingredients in Keurig descaling solutions in our detailed breakdown.
Key Takeaway: While vinegar is a handy option, a commercial descaler is formulated to be tough on scale but gentle on your machine, ensuring a thorough clean without the harsh smell or potential damage.
Now, I'm a big fan of natural cleaning methods for homes for everyday tasks—they're effective and eco-friendly. But for a specialized appliance like a Keurig, a purpose-built formula almost always provides better results and, just as importantly, peace of mind.
A Head-to-Head Comparison
To make the choice crystal clear, let's put the two methods side-by-side. While both can work, the differences in performance, safety, and convenience are pretty significant when it comes to keeping your brewer in top shape for years to come.
Comparing Cleaning Methods: Vinegar vs. PureHQ Descaler
Here's a straightforward look at how household vinegar stacks up against a professional-grade descaler.
| Feature | White Vinegar | PureHQ Descaling Solution |
|---|---|---|
| Cleaning Power | Good. Effective at dissolving basic calcium and magnesium deposits. | Excellent. Formulated with multiple acids to break down stubborn scale and coffee oils. |
| Odor & Taste | Poor. Leaves a strong, lingering smell that requires extensive rinsing. | Excellent. Odorless formula that rinses away cleanly after just a few cycles. |
| Component Safety | Fair. Can be harsh on some rubber gaskets and plastic parts with long-term use. | Excellent. Specifically designed to be gentle and non-corrosive on all internal components. |
| Rinse Time | Long. Often requires 10-12 or more rinse cycles to flush out the vinegar. | Fast. Typically requires only 2-3 rinse cycles, saving a ton of time and water. |
| Convenience | Good. Inexpensive and readily available in most households. | Excellent. Pre-mixed and ready to use, eliminating any guesswork with mixing ratios. |
After looking at the facts, the advantages of a specialized solution become obvious.
One of the most common worries I hear about using a third-party descaler is the fear it won't be compatible with a specific Keurig model or might cause leaks. The PureHQ Descaling Solution is a universal formula, tested to work safely and effectively across all Keurig models, from the classic K-Cup brewers to the newer K-Supreme machines. Its non-corrosive nature ensures it won't degrade the internal seals, which is a common cause of leaks over time.
For a fast, effective, and truly worry-free clean that protects your investment, a dedicated descaler is simply the better choice.
How Often You Should Actually Descale Your Keurig
Knowing how to descale your brewer is one thing. Knowing when to do it is the real secret to preventing problems before they even start. Too many people wait until their coffee tastes bitter or their machine starts groaning, but by then, a significant amount of mineral scale has already choked the internal parts and tanked its performance.
That's a reactive approach, and it puts a ton of unnecessary strain on your Keurig. Every cleaning you delay lets more limescale harden inside the heating element and water lines. This forces the machine to work harder just to heat and pump water, which can seriously shorten your brewer's lifespan and lead to lukewarm coffee or frustratingly slow brew times.
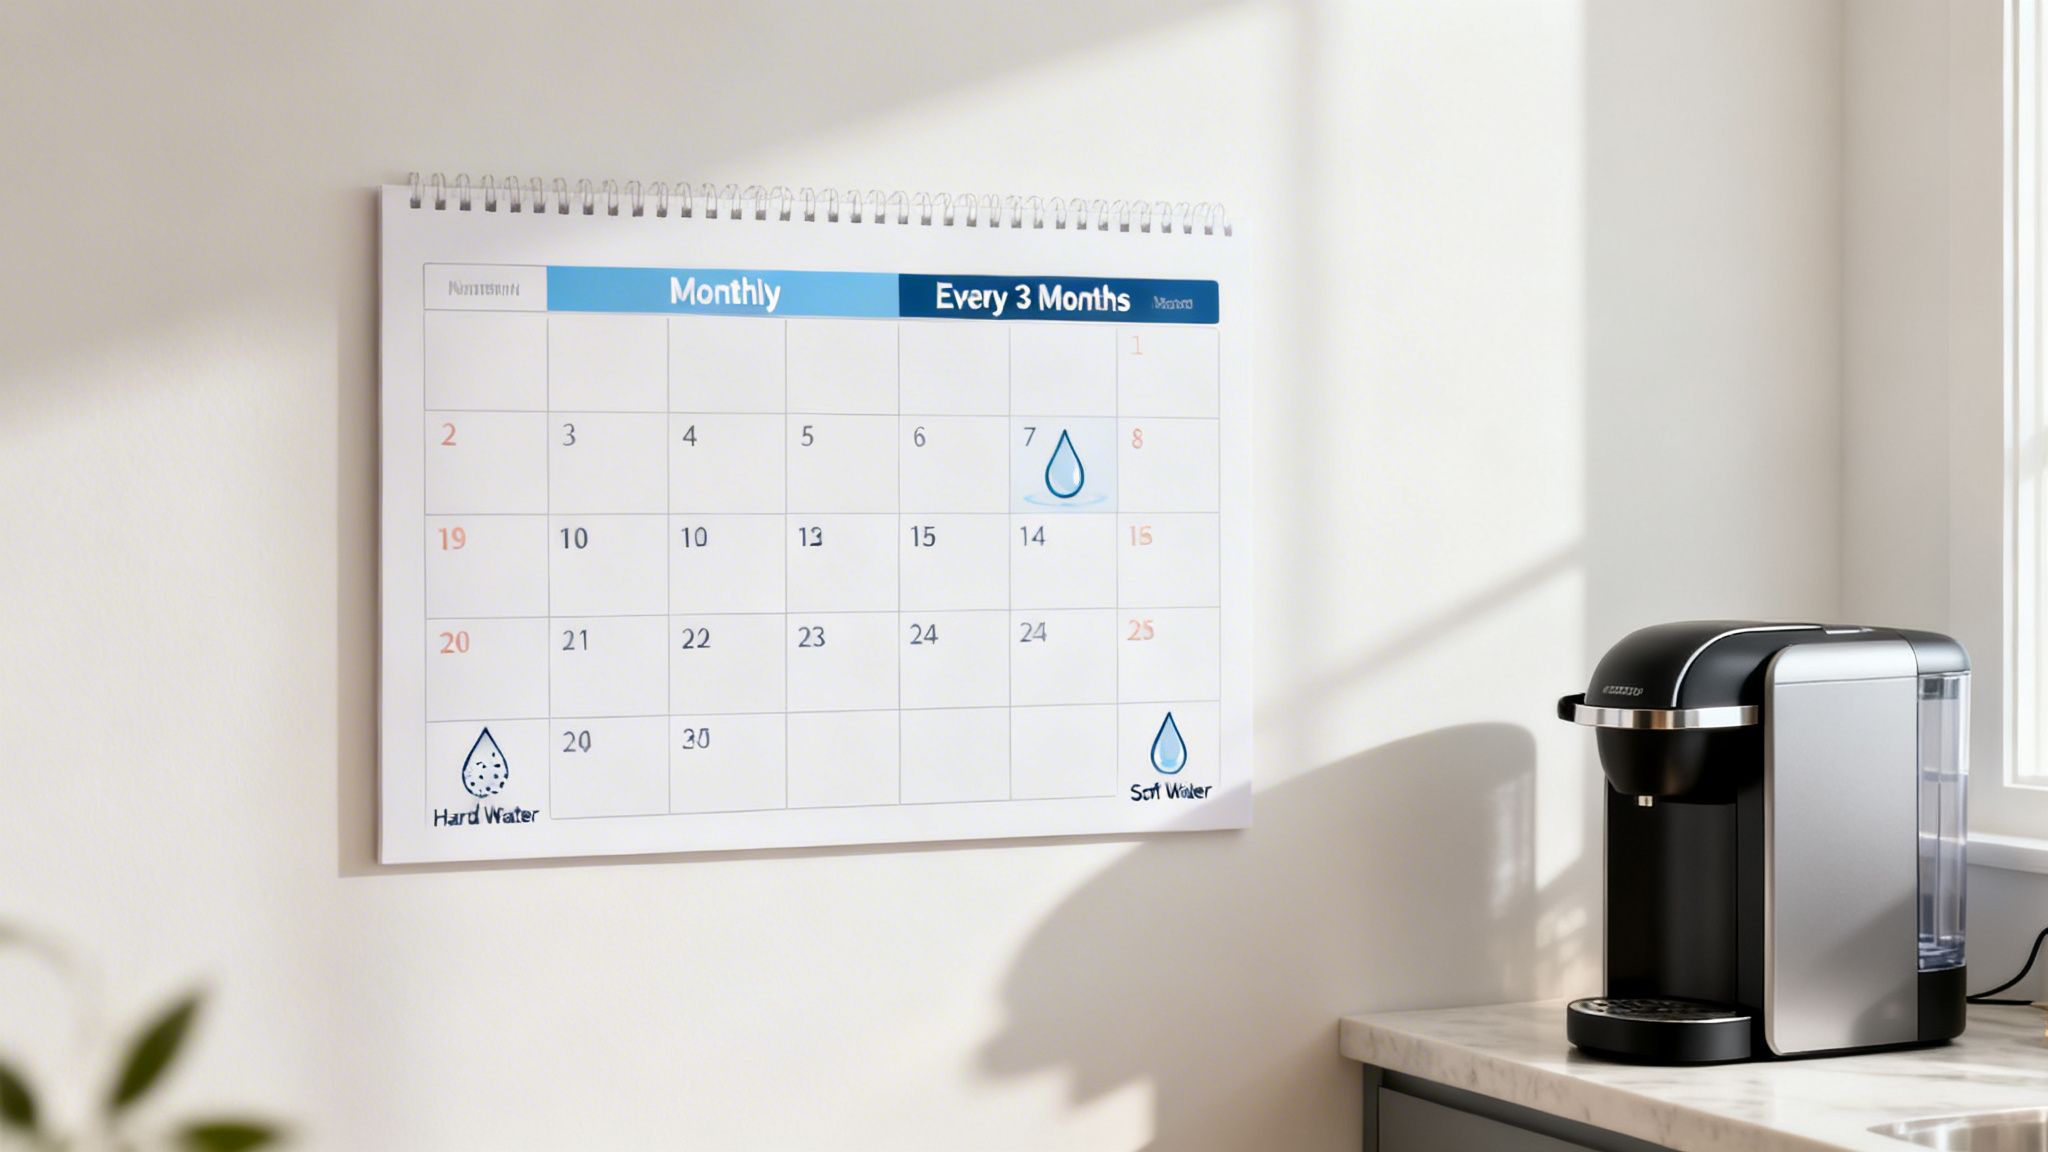
The fix is easy: get on a proactive cleaning schedule. The two things that matter most are your water type and how often you use the machine. The simplest way to stay on top of it is to set a recurring calendar reminder. It’s a tiny bit of effort that guarantees your brewer runs smoothly and every single cup tastes fresh.
Your Water Hardness Dictates the Schedule
The number one factor determining how often you need to clean is the hardness of your water. Hard water is packed with dissolved minerals like calcium and magnesium—the main culprits behind limescale.
And here’s a reality check: data from the U.S. Geological Survey indicates that hard water is present in over 85% of the United States. That means there's a very good chance your machine is building up scale way faster than you think.
If you live in a hard water area, descaling every 6 to 8 weeks is non-negotiable for preventing slow flow and weak, bitter coffee. For an office Keurig that churns out 50+ brews a week, you really need to be doing a deep clean every single month. On the other hand, if you're lucky enough to have soft water, you can probably stretch that interval to every 3-4 months.
Pro Tip: Don’t just wait for the "Descale" light to come on. On many Keurig models, that light isn't a sensor that detects scale—it’s just a pre-programmed timer based on brew cycles. Your water quality is a far more reliable indicator of when a clean is actually needed.
Listen to Your Machine
Even with a calendar reminder, your Keurig will give you some pretty clear signs when it’s overdue for a descale. Pay attention to these warning signals, because they mean mineral buildup is already messing with your machine's performance.
- Unusual Noises: Hear any gurgling or straining sounds during a brew? That's often the pump struggling to push water through clogged lines.
- Slower Brew Times: If your morning cup is suddenly taking forever to brew, it's a classic sign of restricted water flow.
- Coffee Isn't Hot Enough: Scale acts like an insulator on the heating element, preventing the water from reaching its optimal temperature.
Adopting a regular cleaning routine is simple, and you can read our complete guide on how often to clean your coffee maker to learn more. But if you want a truly hassle-free experience that demolishes scale without the lingering smell of vinegar, the PureHQ Descaling Solution offers a faster, more effective clean every single time.
Troubleshooting Problems After a Vinegar Clean
You did everything right. You descaled your Keurig with vinegar, ran all the rinse cycles, and you're ready for that first glorious, fresh cup of coffee. You take a sip, and… ugh. There it is—that faint but unmistakable taste of vinegar.
It's one of the most common and frustrating issues after a DIY descale, turning your well-intentioned maintenance into a truly disappointing brew.
When this happens, it can feel like all that rinsing was for nothing. Even worse, you start to worry that the vinegar has somehow permanently affected your brewer or that you’ll have to waste a dozen K-Cups just to get back to normal. It’s a common roadblock that discourages a lot of people from sticking to a regular cleaning routine.
The good news? These post-cleaning problems are almost always temporary and surprisingly easy to fix.
Getting Rid of That Lingering Vinegar Taste
Nine times out of ten, a vinegary aftertaste is caused by one simple thing: not rinsing enough.
While 12 cycles might sound like overkill, some models—especially older or more compact ones—are notorious for trapping odors in their internal tubing. The most direct fix is to simply run several more fresh water cycles until the smell is completely gone.
If the taste persists, you can try a little kitchen chemistry to neutralize the remaining acid.
- Use Baking Soda: Add one teaspoon of baking soda to a full reservoir of fresh water.
- Run a Single Cycle: Brew one large cup using this solution. The baking soda is fantastic at neutralizing any lingering acetic acid.
- Flush Thoroughly: After that, just discard the baking soda water and run two or three more plain water cycles to make sure everything is completely flushed out.
Important Note: That lingering odor is the single biggest complaint about using vinegar. This is exactly where a formulated product like PureHQ Descaling Solution shines—its odorless ingredients rinse away cleanly after just a few cycles, saving you a ton of time and water.
What to Do When the Descale Light Stays On
Another frequent headache is that stubborn "Descale" light that just refuses to turn off, even after you've done a thorough cleaning. Don't worry, this usually isn't a sign that your machine is still dirty. More often than not, it's just a little glitch in the machine's internal cycle counter.
Different Keurig models have their own specific reset procedures, but a common trick involves a simple button combo. For many models, pressing and holding the 8oz and 10oz buttons together for 5 seconds will manually reset the light.
If that doesn't work, unplugging the machine for a full minute often does the trick by clearing the sensor. When in doubt, always check your specific Keurig model’s manual for the exact reset sequence.
By knowing how to handle these common issues, you can make your next experience cleaning your Keurig with vinegar completely hassle-free.
Your Top Keurig Cleaning Questions, Answered
Even the most straightforward cleaning job can bring up a few questions. When you're dealing with your beloved coffee machine, it's always better to be safe than sorry. Let's tackle some of the most common things people ask when descaling with vinegar.
A big one we hear all the time: "Can I just use apple cider vinegar instead?" The answer is a hard no. You need to stick with distilled white vinegar, and only distilled white vinegar. Other types have sugars, coloring, and other bits and pieces that can gunk up your Keurig's insides or leave behind a residue that's even harder to get rid of.
Let's Talk Warranty and Safety
Probably the most critical question on everyone's mind is whether using vinegar will void their warranty. Here's the deal: Keurig officially recommends their own branded descaling solution. Using anything else, including vinegar, could give them a reason to deny a warranty claim if the machine fails. While vinegar is a tried-and-true method used by millions, it's a risk you take.
Another common pain point is a clogged exit needle, which is what punctures the bottom of the K-Cup. When grounds get stuck in there, you get weak, watery coffee. You can absolutely clean this yourself. Just straighten out a paperclip and gently poke it into the needle's opening to clear out any stubborn coffee grounds.
Don't skip cleaning the exit needle! It’s one of those little maintenance steps that makes a huge difference. A clogged needle is the #1 culprit behind slow brewing and weak coffee because the water just can’t flow through properly.
By getting these common questions out of the way, you can avoid simple mistakes and keep your Keurig brewing like it should. But if you're worried about the warranty or just can't stand the thought of a potential vinegar aftertaste, a dedicated descaler is always your best bet.
For a faster, more effective, and odor-free clean that's gentle on your brewer, Shop PureHQ Descaling Solution now.
