Coffee Machine Care
Your Guide to Using a Keurig Coffee Maker Cleaning Kit
Jan
Did you know that the warm, damp environment inside your coffee maker can become a breeding ground for bacteria and mold? That bitter, off-taste creeping into your morning coffee isn't just unpleasant—it's a sign of a much bigger problem. It’s the taste of rancid coffee oils, limescale, and hidden gunk building up inside your brewer, slowly ruining its performance and tainting every single cup.
This buildup isn't just about bad flavor. It’s a direct attack on your machine, forcing the pump and heating element to work harder, which can lead to a complete breakdown. You're left with lukewarm, weak coffee and the frustration of a costly appliance on its last legs.
But what if you could restore your Keurig to factory-fresh condition in one simple deep clean? A dedicated Keurig coffee maker cleaning kit is the single most effective way to flush out all that hidden grime. It’s a complete solution that dissolves mineral scale and scrubs away bitter oils, bringing back the fresh, delicious coffee you love and protecting the machine you rely on every day.
What's Really Hiding Inside Your Keurig Machine
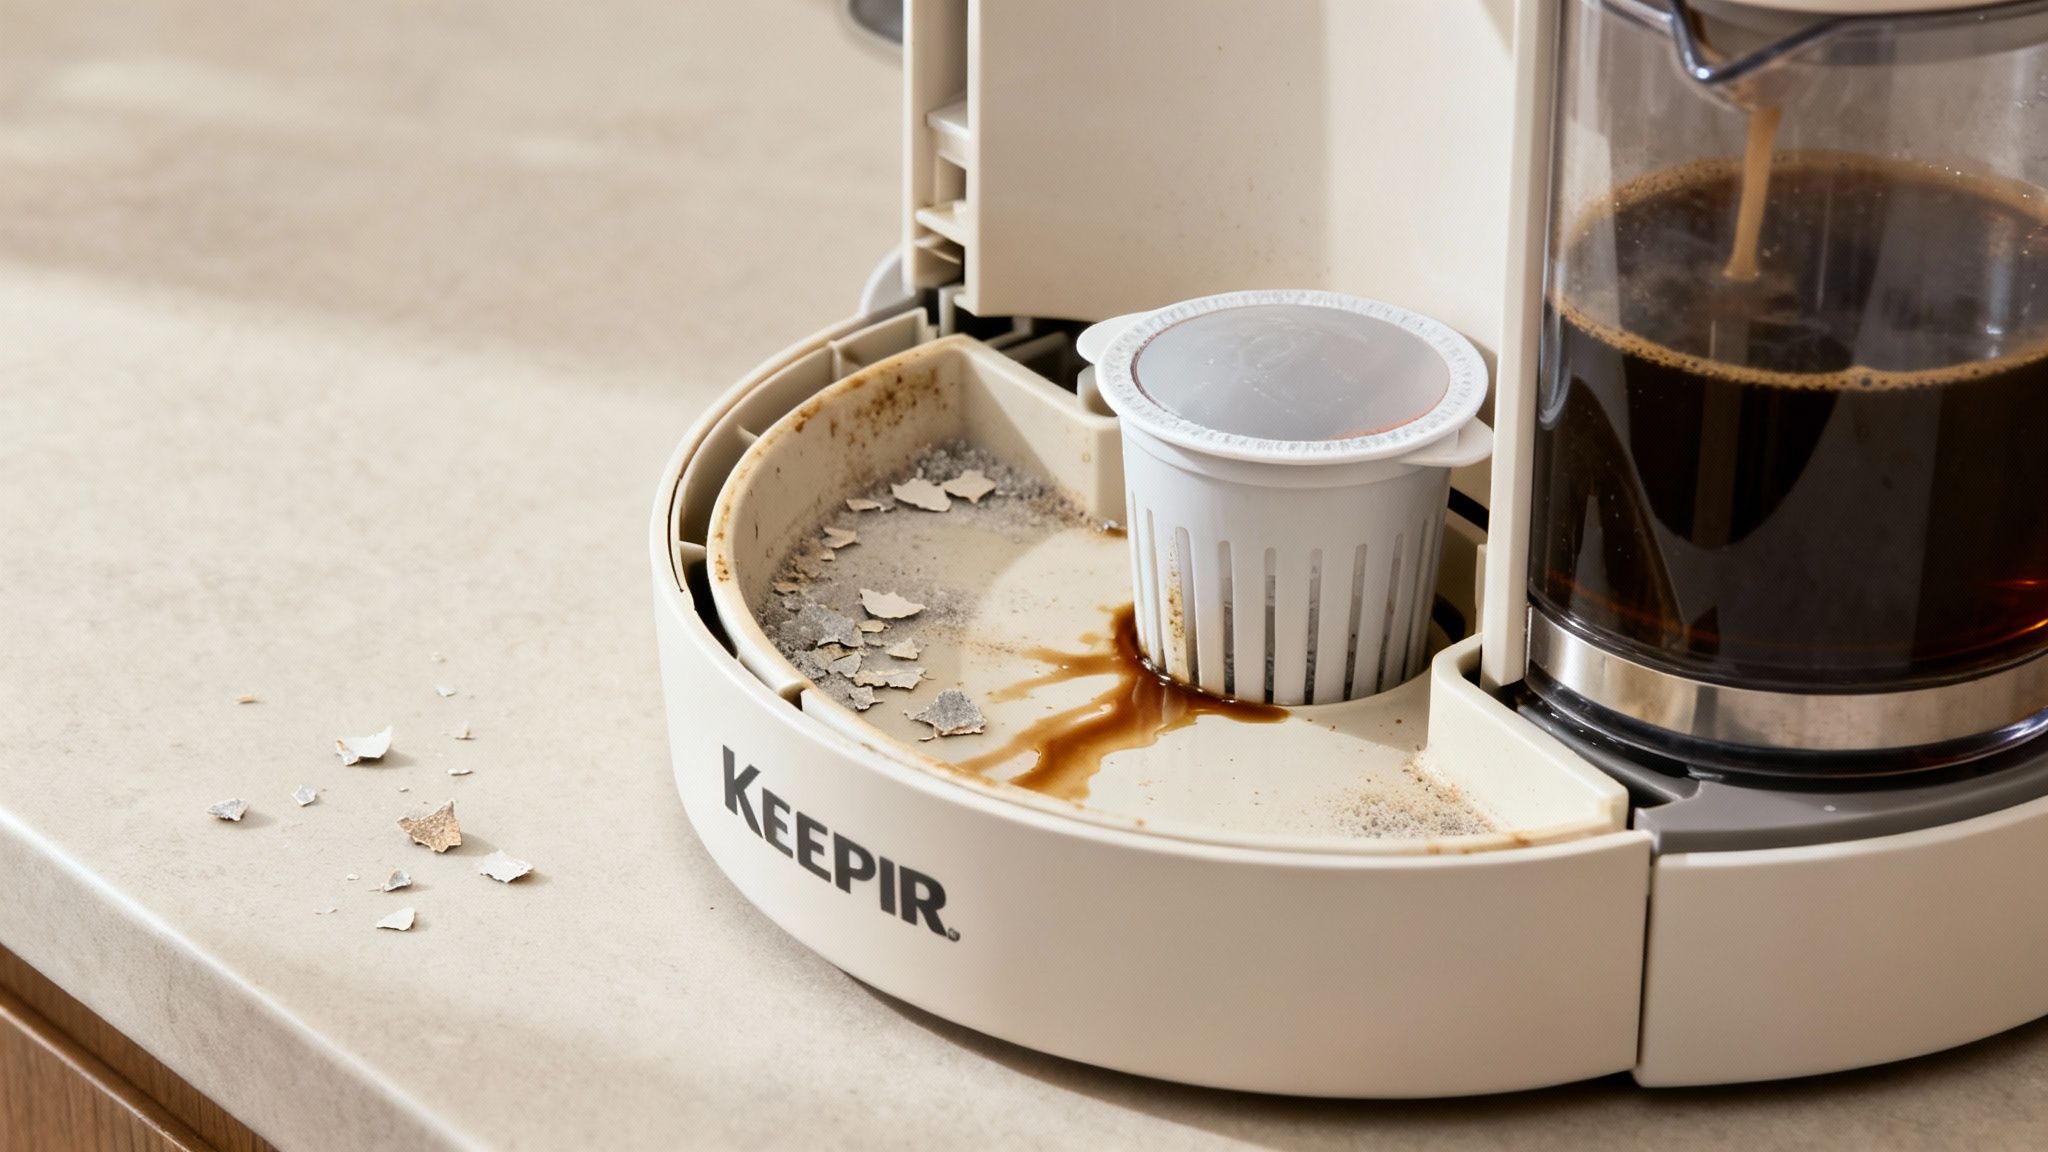
That reliable Keurig you count on every day has a dark side. With every cup you brew, a grimy combination of mineral scale and rancid coffee oils is forming inside the water lines and brew chamber. The number one enemy is limescale, a chalky deposit from your tap water that clogs your machine like cholesterol in an artery. At the same time, sticky coffee oils cling to every surface, turning rancid and creating a bitter, stale flavor.
The real frustration comes when this hidden gunk starts to sabotage your morning routine. Your once-rich coffee tastes weak or metallic. The machine sputters and struggles, taking longer to brew a full cup. You're using the same premium K-Cups, but the result is a disappointing, bitter mess. It's a daily reminder that something is wrong, turning your relaxing coffee ritual into a source of aggravation.
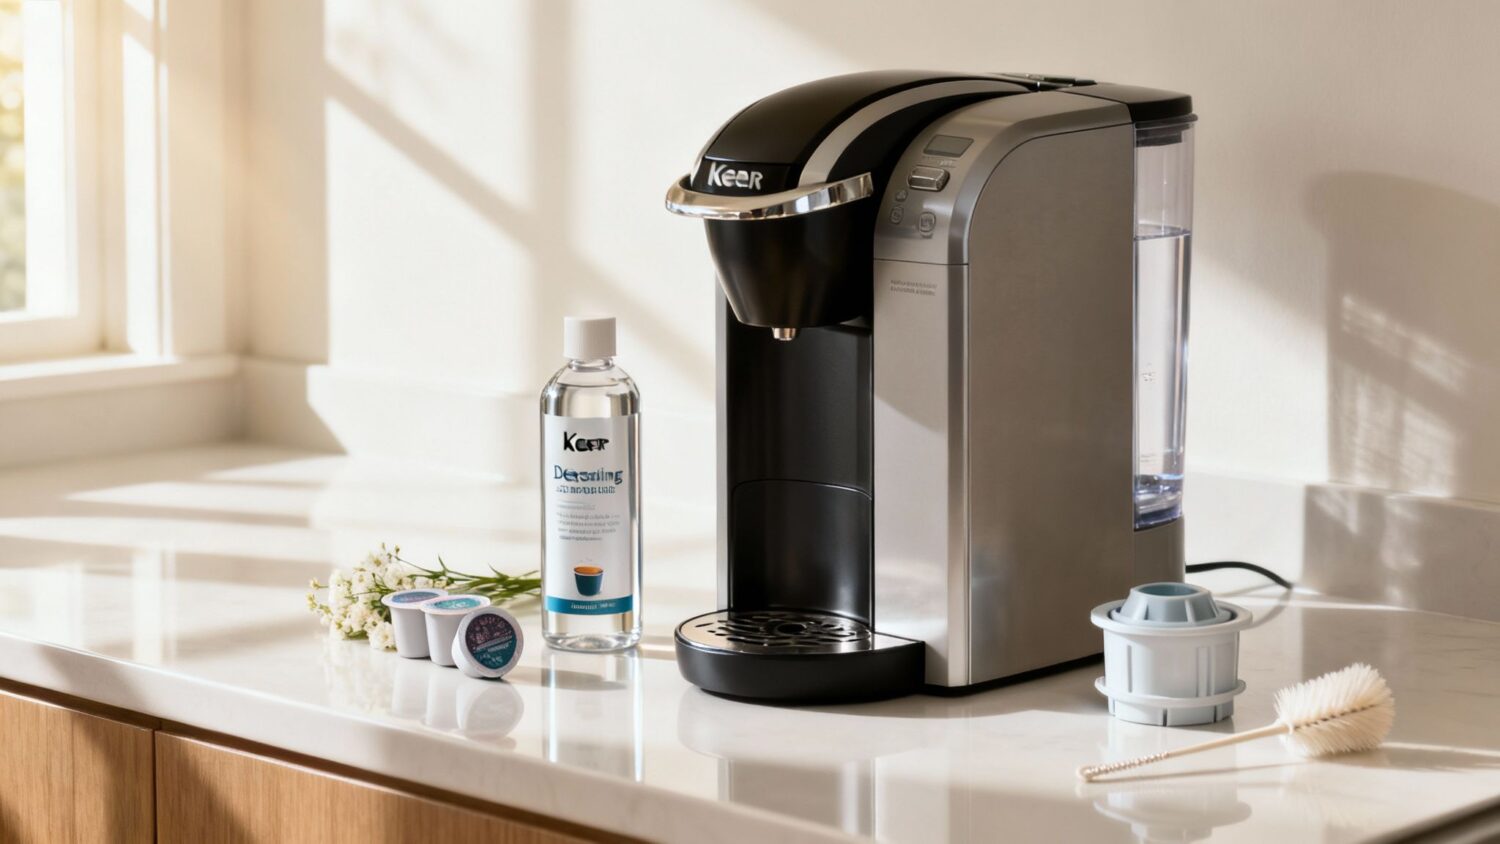
The solution is a complete keurig coffee maker cleaning kit. It’s the only way to launch a two-pronged attack on the grime. A powerful descaling solution dissolves the hard water minerals that cause clogs, while specialized cleaning pods scrub away the foul-tasting coffee oils that vinegar can’t touch. This single, easy process restores your machine’s performance and brings back the pure, clean taste your coffee is supposed to have. To keep things running smoothly, also remember to change your water filters regularly; they are your first line of defense against new mineral buildup.
Why a Complete Kit Beats the Vinegar Method
Let’s be honest, that lingering, acidic smell you get after cleaning your Keurig with vinegar isn't just annoying; it's a sign that the "fix" isn't working. Many coffee lovers grab the vinegar bottle thinking it's a cheap, easy solution, only to find it barely does half the job. Vinegar can dissolve some mineral scale, but it does absolutely nothing against the real enemy of good coffee: rancid coffee oil.
This is where the agitation kicks in. You've spent time running smelly vinegar through your machine, followed by endless rinse cycles, yet your coffee still tastes bitter. That's because the greasy, sticky oil buildup is still clinging to the brew chamber and needle, tainting every cup. Brewing cup after cup with that leftover vinegar scent isn’t just unpleasant—it’s a sign you’ve wasted your effort fighting the wrong battle entirely, and the harsh acid may even be damaging your machine's internal seals.
This is exactly where a professionally formulated keurig coffee maker cleaning kit comes in as the definitive solution. Unlike the brute-force approach of vinegar, a complete kit provides a specialized two-part clean. First, the descaling solution is engineered to be tough on mineral scale while being gentle on your machine's internal parts. Then, the cleaning pods are designed to scrub the brew chamber and needle, targeting the exact areas where those foul-tasting coffee oils hide. It ensures every part of the brew path gets cleaned correctly, restoring your coffee's true flavor without leaving any weird smells behind.
PureHQ Cleaning Kit vs DIY Vinegar: A Head-to-Head Comparison
To put it in perspective, let's break down how a dedicated kit stacks up against the old vinegar-and-water trick. One is a precision tool; the other is a blunt instrument.
| Feature | PureHQ Cleaning Kit | DIY Vinegar and Water |
|---|---|---|
| Coffee Oil Removal | Excellent. Specialized cleaning pods are designed to scrub away stubborn, rancid oils from the brew chamber and needle. | Poor. Vinegar has no effect on coffee oils, leaving the primary source of bitter taste behind. |
| Descaling Power | Superior. Formulated with food-grade citric acid to safely and effectively dissolve mineral buildup without harming internal parts. | Fair. Can dissolve some mineral scale but can be harsh on rubber seals and gaskets over time. |
| Aftertaste and Odor | None. The components are designed to rinse away completely, leaving your machine fresh and your coffee pure. | Poor. Often leaves a strong, lingering vinegar smell and acidic aftertaste that can ruin several cups of coffee. |
| Ease of Use | Very High. Simple, pre-measured pods and solutions make the process quick, clean, and foolproof. | Moderate. Requires measuring, mixing, and multiple time-consuming rinse cycles to try and flush out the smell. |
As you can see, a dedicated kit is the only way to solve the entire problem. While you can learn more about the DIY approach in our guide on cleaning your Keurig with vinegar, it's clear that a specialized kit is superior.
Overcoming Common Objections
A common customer objection is the fear of leaks or poor fit from third-party pods. We've obsessed over this. PureHQ pods are meticulously designed to guarantee a perfect, leak-free fit across all major Keurig models, including K-Classic and 2.0 brewers. They create a tight seal that forces the cleaning solution through the entire brew path for maximum impact, ensuring durability and performance without the mess.
How to Deep Clean Your Keurig Like a Pro
That glaring "Descale" light on your Keurig isn't just a reminder; it's a cry for help. It means your machine is struggling under a layer of mineral scale and oily residue. This is the core problem that leads to sputtering sounds, slow brewing, and coffee that tastes flat and bitter.
The real frustration kicks in when you realize it's not just about taste. That gunk is slowly wrecking your coffee maker, forcing the pump and heating element to work overtime until they just give up. It’s the coffee machine equivalent of driving your car with the oil light on. Every slow, lukewarm cup is a sign your machine is on its last legs, and the thought of a complete breakdown is incredibly aggravating.
Thankfully, the solution is a complete keurig coffee maker cleaning kit. The PureHQ kit is designed to tackle both problems at once, giving you a powerful descaling solution to dissolve minerals and special cleaning pods to blast away the stubborn coffee oils vinegar can't touch. This one-two punch doesn't just improve the taste; it brings your machine back to life from the inside out. For even more protection, be sure to use a high-quality descaler to prevent future buildup.
Your Deep Cleaning Walkthrough
First, prep the machine. Unplug it, empty the reservoir, and wash the K-Cup holder and drip tray with warm, soapy water. This ensures the cleaning solutions can zero in on the internal parts.
Now, it’s time for the descaler. Pour the entire bottle of PureHQ descaling solution into the empty water reservoir and top it off with fresh water. Place a large mug under the spout, plug the machine in, and turn it on.
- For Newer Keurigs with a "Descale" Mode: If your machine has a dedicated descale function, initiate it now. The machine will walk you through the brew cycles until the reservoir is empty.
- For Classic Keurig Models: No descale mode? No problem. Just run a series of large brew cycles using only hot water until the "Add Water" light comes on.
Once the cycle is finished, let the machine sit for 30 minutes to allow the solution to dissolve stubborn scale. Afterwards, rinse the reservoir thoroughly, fill it with fresh water, and run at least three full reservoirs of plain water through the brewer to flush everything out. You can find more tips in our detailed guide on descaling a Keurig machine.
Finishing the Job with Cleaning Pods
With the scale gone, it's time to deal with the oily gunk. Pop one of the PureHQ cleaning pods into the K-Cup holder and run one large brew cycle.
The real magic of the cleaning pod is its foaming action. It's specifically designed to scrub the puncture needle and brew chamber—areas the descaling solution doesn't always reach—eliminating the bitter oils that ruin your coffee's flavor.
After the cycle finishes, toss the used pod. Then, run two more large brew cycles with just plain water to rinse away any remaining foam.
As you can see, a full kit tackles multiple issues for a far better cup of coffee. For the final touch, pop in a fresh PureHQ charcoal filter before refilling the reservoir to trap impurities from the start.
Creating Your Simple Keurig Maintenance Routine
The problem is that limescale and oily residue start rebuilding the very next day after a deep clean. This invisible buildup is a slow-motion disaster, putting stress on your machine's pump and heating element until one day, it just gives up.
The real frustration isn't just a sudden breakdown; it's the gradual decline you might not even notice at first. Your coffee starts tasting a little bitter, the machine groans a bit louder, and brew times creep up. Before you know it, you’re dealing with clogs and lukewarm coffee, all because that performance-killing gunk has been allowed to take over from the inside.
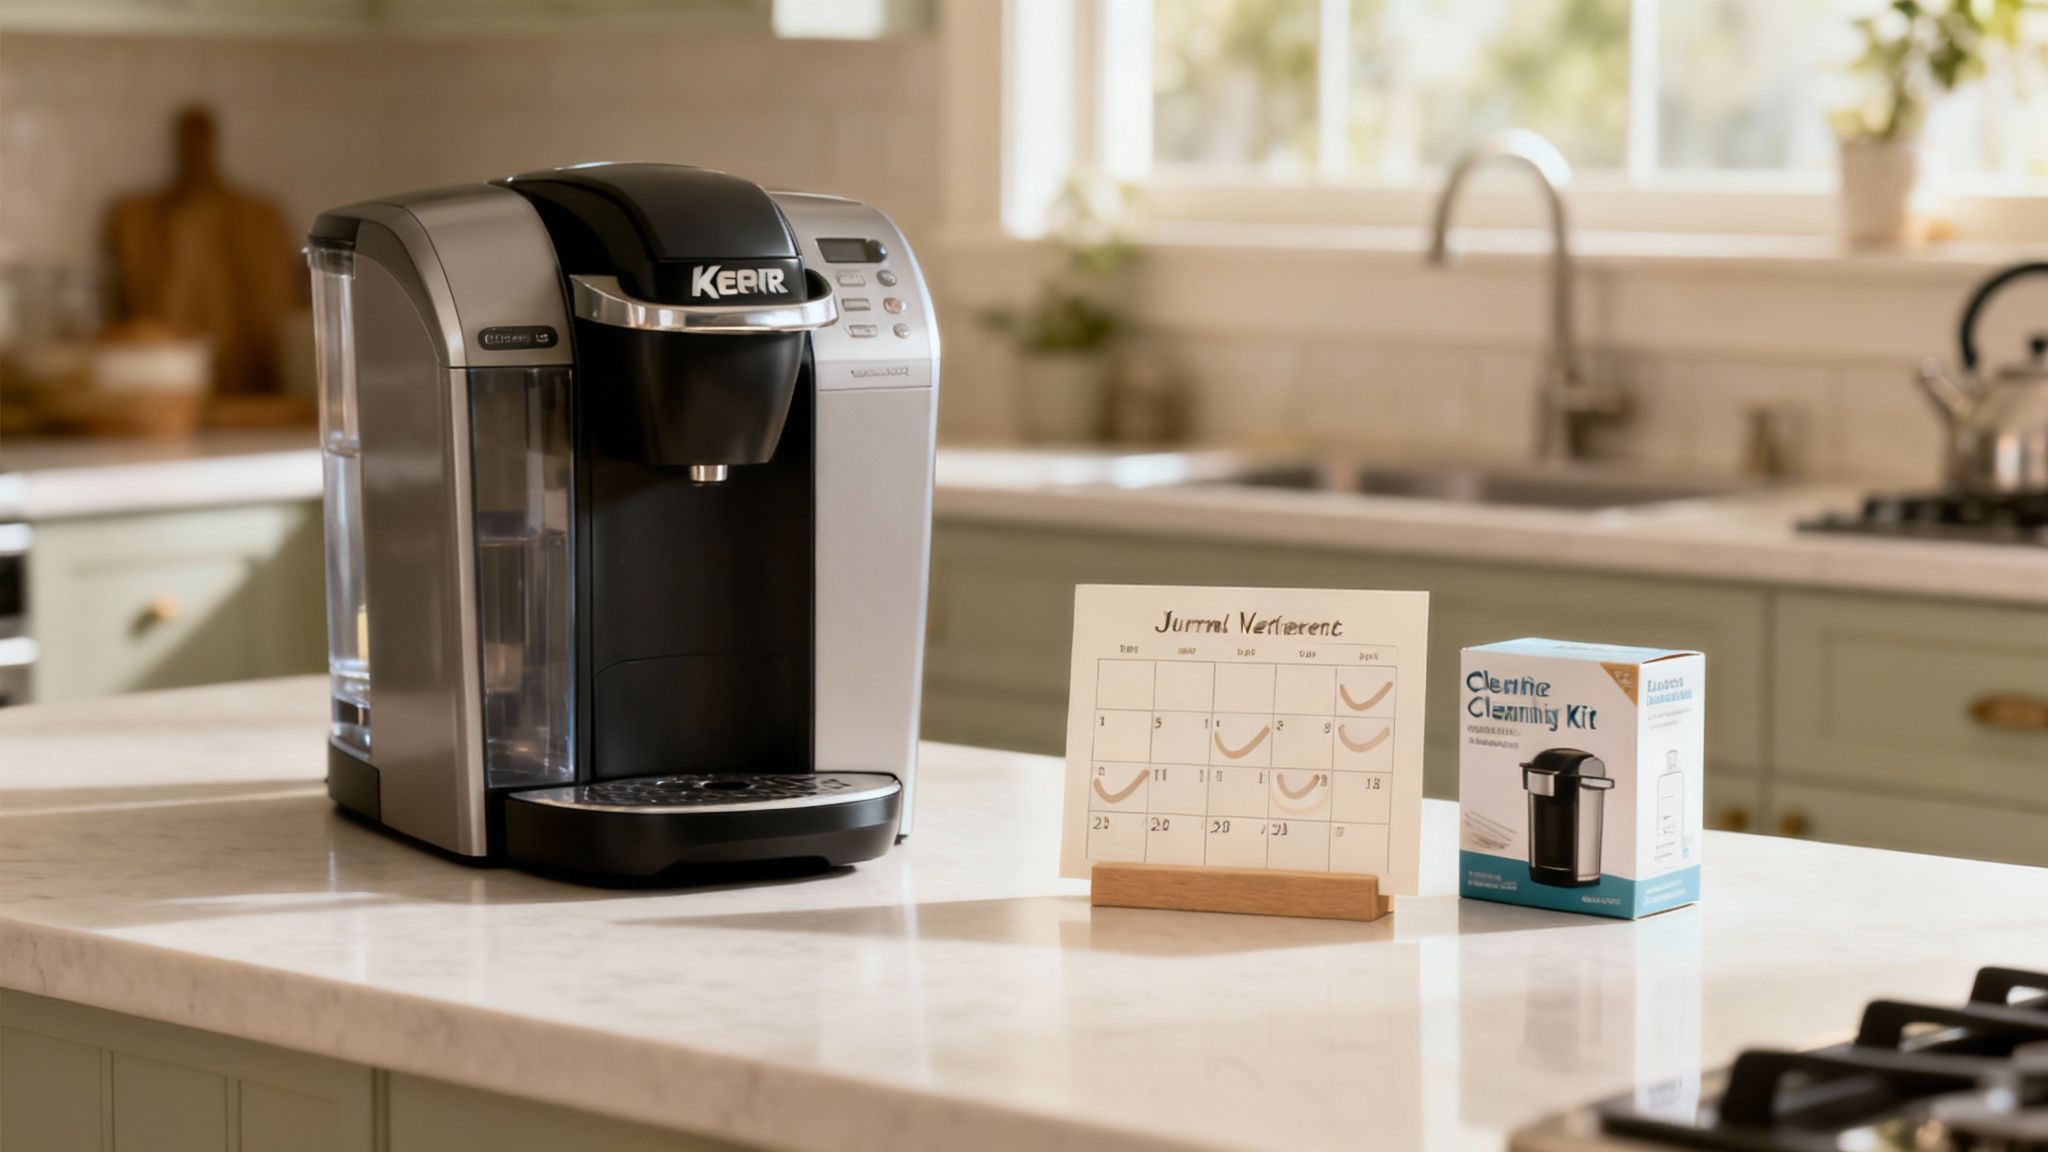
The only real solution is to turn that one-time deep clean into a simple, consistent maintenance habit. Protecting your investment doesn't mean hours of work—just a smart, easy-to-follow schedule using your Keurig coffee maker cleaning kit. Consistency stops severe buildup before it leads to clogs, slow brewing, and eventual machine failure, keeping your coffee tasting great every single day.
Your Effortless Maintenance Schedule
Think of this like basic car maintenance—a tiny bit of effort now saves you from a massive headache later. By breaking down the tasks into daily, weekly, and quarterly actions, you can keep your machine in peak condition.
Daily Habits (Under 1 Minute)
- Empty and Rinse the Drip Tray: This prevents overflow and stops gunk from building up.
- Wipe Down the Exterior: A quick once-over with a damp cloth keeps your machine looking new.
Weekly Tasks (2-3 Minutes)
- Wash the Water Reservoir: Use warm, soapy water to clean the tank and get rid of any slick biofilm.
- Clean the K-Cup Holder: Pop out the pod holder and give it a thorough wash to remove trapped grounds.
This isn't just about your machine. The single-serve coffee maker market is booming, expected to hit $1.688 billion by 2032. As more people invest in these brewers, demand for quality accessories that extend their lifespan grows. You can explore more insights at Credence Research.
The Quarterly Deep Clean
Every three months, hit the reset button with the full PureHQ kit.
- Run the Descaling Solution: Dissolve all the hardened mineral scale that does the most damage.
- Use a Cleaning Pod: Scrub away the oily coffee residue that makes your coffee taste bitter.
- Replace the Water Filter: Pop in a fresh PureHQ charcoal water filter to trap new impurities immediately.
To make this a no-brainer, keep an extra PureHQ descaling solution and cleaning pods on hand. A simple routine is the key to protecting your machine and enjoying perfect coffee.
Troubleshooting Common Cleaning Problems
You did everything right—you followed the steps, ran the descaling solution, and used the cleaning pod. But when you power the machine back on, that stubborn "Descale" light is still staring back at you. This is the problem: it feels like your Keurig is ignoring you, and your efforts were for nothing.
This is where the agitation kicks in. Is the machine still dirty? Is it broken? Maybe you're dealing with something else, like slow brewing or a small puddle of water on your counter. These issues can make you question if using a keurig coffee maker cleaning kit was even worth it, and the lingering frustration can make you want to give up.
But don't worry, the solutions are almost always straightforward. The key is to tackle these lingering issues head-on so you can get the satisfaction of a job well done and a perfectly brewed cup of coffee. Let's walk through the most common problems and solve them in minutes.
The Descale Light Just Won't Turn Off
This is the most common complaint. Most Keurigs don't have a sensor to detect scale removal; they use an internal brew counter. You just need to manually reset it.
- For Keurig 2.0 and K-Series Models: After cleaning, with a full reservoir, turn the machine off. Press and hold the 8oz and 10oz buttons together for five seconds.
- For K-Supreme and K-Slim Models: With the machine on, press and hold the 8oz and 12oz buttons together for three seconds.
Slow Brewing or Leaks Are Still an Issue
If brew speed hasn't improved, the culprit is often a clog in the exit needle. A leak usually points to a poorly seated water reservoir.
Customer Concern Addressed: Many users worry that cleaning kits can cause leaks. A leak right after cleaning is almost always caused by the water reservoir's O-ring seal not sitting correctly after refilling—it has nothing to do with the cleaning solution itself. Just remove the reservoir, wipe the black seal at the base, and press it firmly back into place.
To clear a needle clog, unplug your machine. Carefully use a straightened paperclip and poke it up into the needle from underneath, wiggling it gently to dislodge trapped grounds. Using fresh PureHQ charcoal filters will help prevent new clogs.
Got Keurig Cleaning Questions? We've Got Answers.
The problem is that nagging doubt after cleaning. Is my Keurig really clean? Am I using the right products? You've followed the instructions, but the coffee still tastes a little "off," or the brew time is dragging, making you wonder if the cleaning even worked.
This uncertainty is agitating because the stakes are higher than just flavor. The warm, damp insides of your brewer can be a perfect spot for bacteria to grow if not cleaned properly. Suddenly, that hidden health concern makes your daily coffee ritual feel a little less comforting and a lot more worrisome.
This is exactly why a well-designed kit like PureHQ's is the perfect solution. It’s built to knock out those worries with a food-grade, citric acid-based descaler that's tough on mineral scale but safe for your brewer's internal parts. It's compatible with all Keurig models, from the K-Classic to the K-Supreme, providing peace of mind with every clean.
PureHQ Kit vs. Just Using a Descaler
A premium kit offers a complete clean, while standard alternatives only solve half the problem.
| Feature | PureHQ Complete Cleaning Kit | Standard Descaling Solution |
|---|---|---|
| Cleaning Scope | A full two-step clean. The descaler tackles mineral buildup, and the cleaning pods get rid of oily coffee residue. | A one-step process that only removes mineral scale, leaving behind the bitter oils that ruin flavor. |
| Compatibility | We've designed this for a perfect, leak-free fit and top performance in all Keurig models. | Generic formulas aren't always optimized for Keurig's specific parts or brew mechanisms. |
| Ease of Use | An all-in-one box with simple, foolproof instructions for a truly deep clean. | You often have to buy parts separately, and it might not tell you how to clean the brew chamber. |
For most homes, descaling every three months is the perfect rhythm. But if you have hard water, bumping that up to every two months will keep your machine in peak condition. And remember, swapping in a new PureHQ charcoal filter after cleaning is a simple way to catch impurities before they cause problems.
Don't let grime ruin another cup. Restore your machine’s performance and get back the pure, fresh taste you love. Shop the complete PureHQ Keurig Coffee Maker Cleaning Kit to solve your brewing problems for good.
