Coffee
7 Mistakes You're Making with Keurig Water Filters (and How to Fix Them for Better Coffee)
Dec
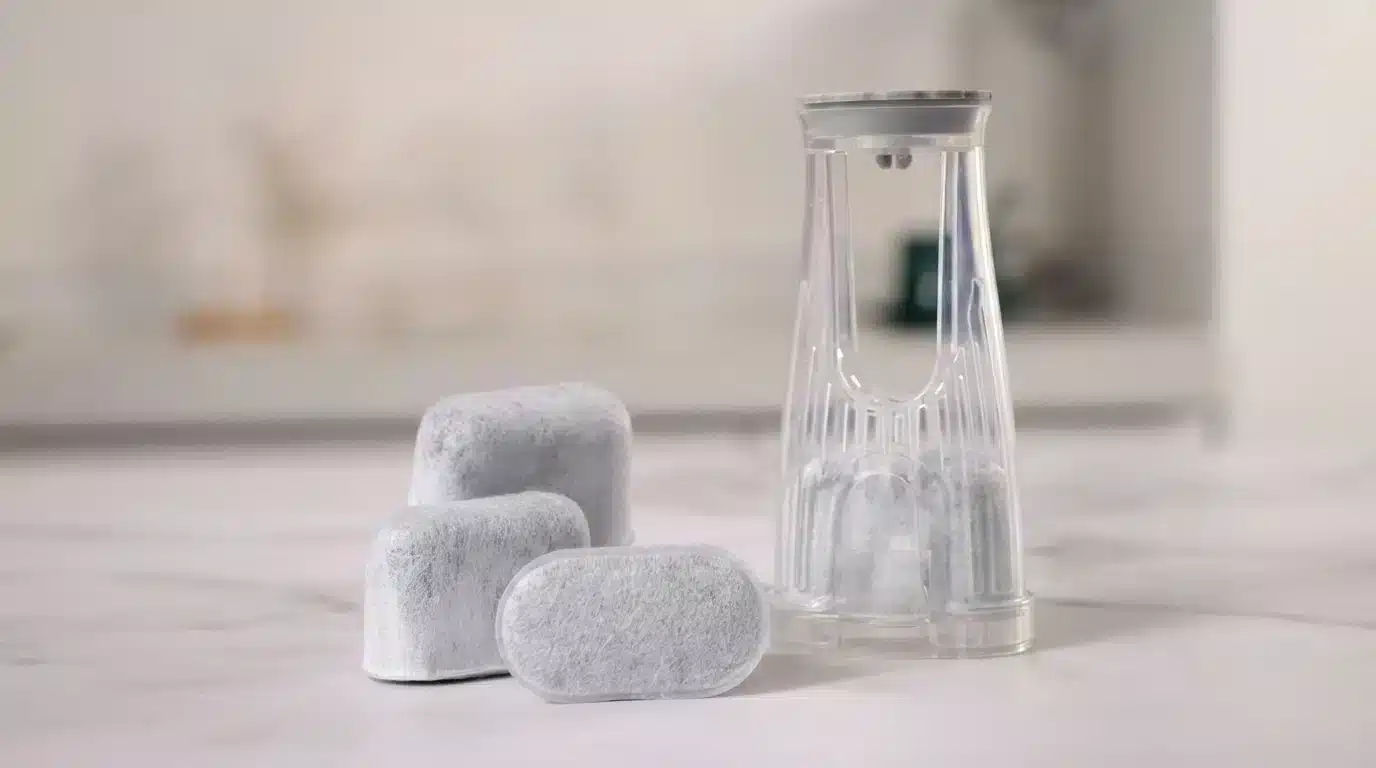
Actual Keurig-compatible water filter set with charcoal and filter holder. Improves water quality and your coffee experience.
Your morning coffee shouldn’t taste like disappointment in a cup. Yet here you are, staring at another weak, bitter, or downright awful brew from your Keurig machine. Before you blame the K-cups or consider tossing your coffee maker out the window, let’s talk about the real culprit: you’re probably making some pretty common mistakes with your Keurig water filters.
Don’t worry, you’re not alone. Most coffee lovers make these same errors, and the good news? They’re all fixable with a few simple adjustments that’ll have you brewing café-quality coffee at home.
Mistake #1: Skipping the 5-Minute Soak for New Filters
Here’s the deal: that fresh keurig charcoal filter straight out of the package isn’t ready for action. I know it’s tempting to rip it open and pop it right into your machine (especially when you’re desperate for that first cup), but hold up.
The Fix: Always soak your new keurig water filter in clean water for at least 5 minutes before installation. This crucial step removes charcoal dust and manufacturing debris that would otherwise end up floating in your coffee. Trust me, nobody wants to crunch on activated carbon with their morning brew.
Think of it like washing fresh vegetables, you wouldn’t skip that step either. Those few minutes of patience will save you from gritty, off-tasting coffee and extend your filter’s lifespan.
Mistake #2: Treating Descaling Like an Optional Chore
Reality check: Ignoring descaling is like never changing your car’s oil. Your Keurig might keep running, but not for long, and definitely not well.
Mineral deposits from water build up on your heating element and internal components over time, creating a crusty barrier that blocks proper water flow. When your k cup water filters can’t do their job effectively because of this buildup, even the best coffee grounds will taste terrible.
The Fix: Descale your Keurig every 2-3 months (more often if you have hard water). Use a proper descaling solution, not vinegar, which can damage internal seals. The process takes about an hour but transforms your coffee quality overnight.
⚠️ Stop Using Vinegar!
Vinegar can damage internal seals and leave a lingering smell. For a safe, odorless deep clean, use our Universal Descaling Solution.
Mark it on your calendar like any other important maintenance task. Your taste buds will thank you, and your machine will last years longer.
Mistake #3: Using Distilled Water (Yes, This Is Actually Bad)
This one surprises people. You’d think the purest water would make the purest coffee, right? Wrong.
Distilled water lacks the minerals your Keurig’s heating element needs to function properly. Without these essential minerals, you’re essentially starving your machine while also creating flat, lifeless coffee. The minerals in water aren’t just important for taste: they’re crucial for your machine’s internal mechanisms.
The Fix: Use filtered tap water, bottled water, or water filtered through a quality pitcher system. These options provide the right mineral balance for both optimal machine function and delicious coffee flavor.
🔧 Missing Your Filter Holder?
Many Keurigs don’t come with the filter assembly. Pick your reservoir type to get the full Starter Kit (Holder + 3 Filters).
Side Reservoir?
(K-Classic, K-Select, etc.)
Rear Reservoir?
(K-Duo, K-Compact, etc.)
If you’re concerned about tap water quality in your area, a good water filter pitcher is your best friend. It removes chlorine and impurities while preserving the beneficial minerals your Keurig craves.
Mistake #4: Never Removing the Water Tank During Brewing (Wait, What?)
You might not even realize you’re doing this, but if you’ve ever yanked out the water reservoir while your machine was actively brewing, you’ve potentially damaged your Keurig’s internal pump.
The Fix: Simple: wait until the brewing cycle completely finishes before touching anything. The machine’s pump system is designed to work with consistent water pressure, and interrupting that flow can cause permanent damage.
I get it; sometimes you realize the reservoir is low mid-brew, but patience is key here. Let the cycle finish, then refill. Your future self will appreciate having a working coffee maker.
Mistake #5: Filling Your Water Tank Like You’re Rationing for a Drought
Here’s something most people don’t realize: your reservoir’s water level directly affects brewing pressure and filter performance. When you only fill it halfway (or less), you’re reducing the pressure needed for water to properly flow through your keurig charcoal filters and brewing mechanism.
The Fix: Always fill your water reservoir to the maximum line. This ensures optimal water pressure for consistent extraction and proper filter function. Low water levels can cause uneven brewing, weak coffee, and premature filter clogging.
Plus, filling it up completely means fewer trips to refill throughout the day. More coffee, less hassle: that’s a win-win in my book.
Mistake #6: Ignoring the Signs of Clogged Water Channels
When was the last time you cleaned your Keurig’s internal needles or checked the mesh screen? If you can’t remember, you’re probably dealing with clogs that are sabotaging your coffee quality.
Clogged needles, dirty mesh screens, and air bubbles in water lines all prevent your keurig water filter from working effectively. Even the highest-quality filter can’t compensate for poor water flow.
The Fix: If your machine won’t draw water properly, try this simple trick: fill the reservoir about 1/4 full and rapidly lift and lower it several times. This helps remove air bubbles and prime the pump.
For more stubborn clogs, use a soft toothbrush to gently clean the internal mesh screen, and if you have Keurig’s maintenance tool (the small orange ring with a bulb), run it through a brewing cycle 5+ times to dislodge debris.
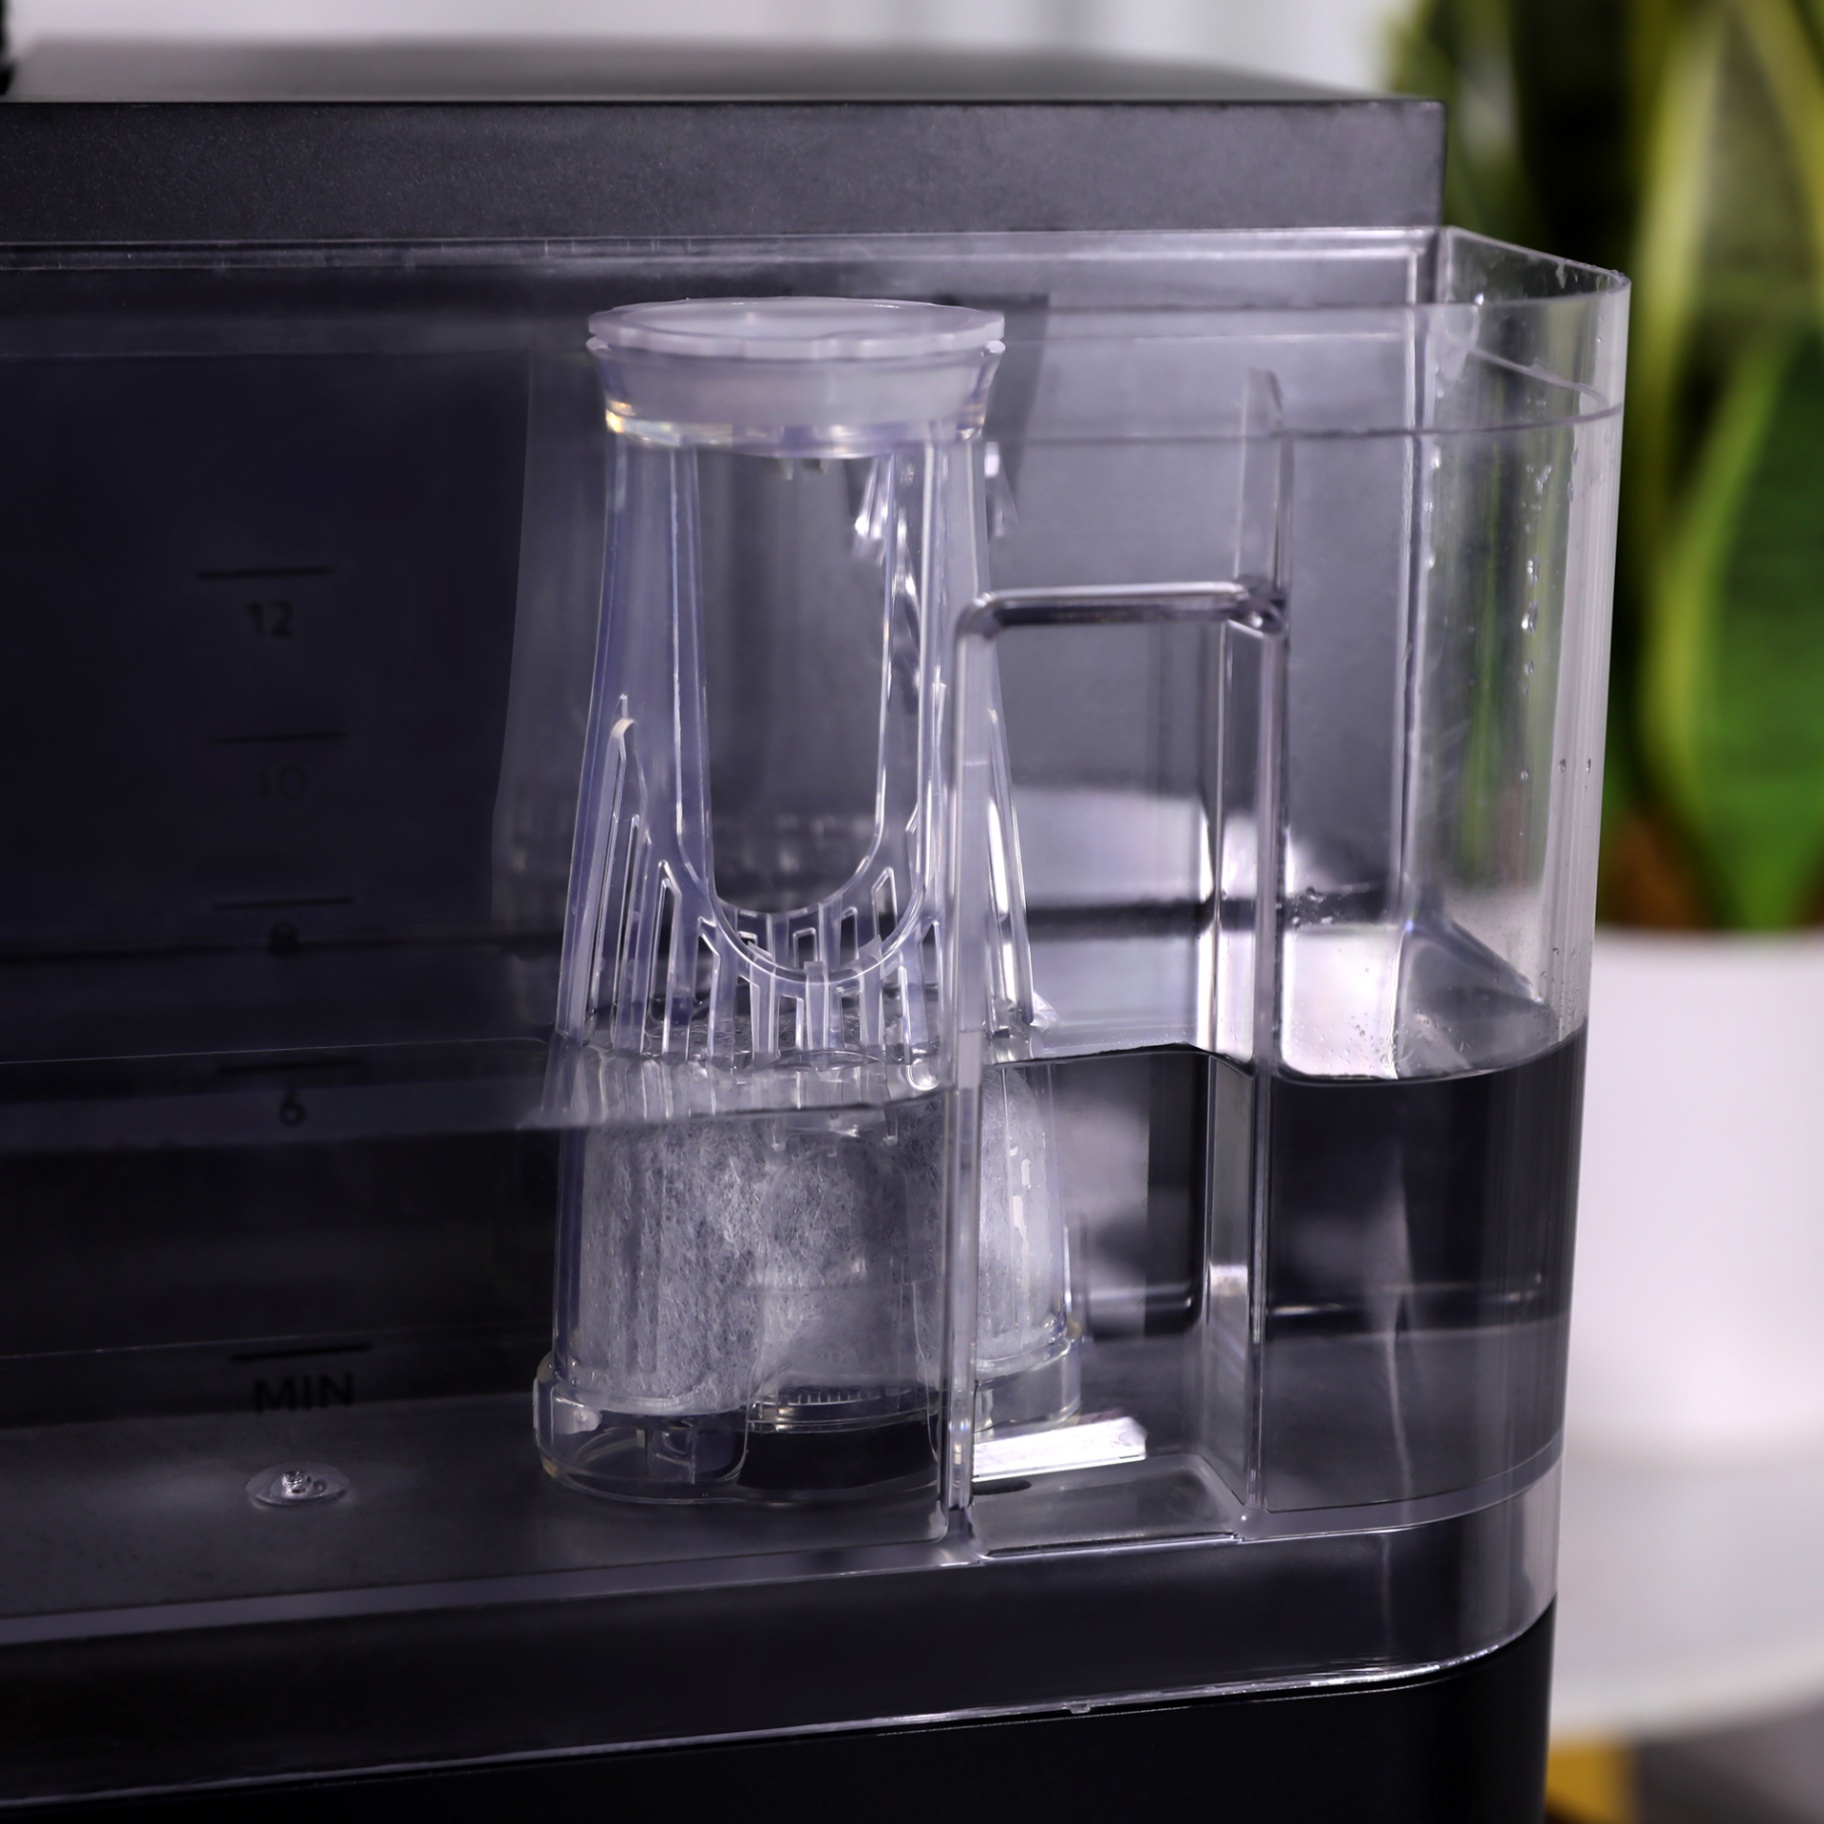
Charcoal filter in action inside a Keurig reservoir.
Mistake #7: Buying Cheap Replacement Filters and Expecting Premium Results
Let’s be honest: not all keurig charcoal filters are created equal. Those bargain-basement filters might save you a few dollars upfront, but they’ll cost you in coffee quality and machine longevity.
Cheap filters often use inferior materials that don’t effectively remove chlorine, sediments, and odors. They also tend to shed particles, clog faster, and provide inconsistent filtration.
The Fix: Invest in quality replacement filters from trusted suppliers. At PureHQ, our keurig water filters are designed to match or exceed OEM specifications while offering better value than expensive brand-name alternatives. We use premium activated carbon that provides superior filtration without the premium price tag.
💎 Premium Quality, Bulk Savings
Don’t overpay for single filters. Get a full year’s supply of our Premium Charcoal Filters (12-Pack) for less than the cost of a few brand-name ones.
With fast shipping and competitive pricing, you can stock up on quality filters without breaking the bank. Your coffee deserves better than bottom-shelf filtration.

PureHQ charcoal filters for Keurig and similar machines.
Looking for easy replacement? Check out our Keurig Water Filter Starter Kit, which includes a short filter holder and three premium charcoal filters—compatible with Keurig 2.0 K200, K250, K35, and K-Compact coffee makers.
Pro Installation Tips That Make All the Difference
When installing new filters, here’s what the pros know: press both side tabs simultaneously to properly separate the filter holder parts. Listen for that satisfying click when reassembling: it means your filter is securely seated and ready to work.
Always double-check for a secure fit before running your first brew cycle. A loose filter won’t just perform poorly; it can cause leaks and water damage to your countertop and machine.
The Bottom Line: Small Changes, Big Results
Your Keurig is capable of brewing excellent coffee: you just need to stop sabotaging it with these common mistakes. From proper filter soaking to regular descaling, these fixes are simple but transformative.
Remember, great coffee starts with great water filtration. When you combine quality k cup water filters with proper maintenance and technique, you’re not just fixing problems: you’re unlocking your machine’s full potential.
Ready to upgrade your coffee game? Start with these seven fixes, invest in quality filters, and prepare to fall in love with your morning brew all over again. Your taste buds (and your wallet) will thank you for making these smart changes.

Pingback: How to Clean a Keurig Filter for a Flawless Brew Every Time
If you needed to fill the water reservoir to full every time because it would affect the pressure downward then as you use the water from multiple cups of coffee that downward pressure would still be less. So unless it would have something to do with starting cycle of a filled to empty water reservoir then not filling it all the way couldn’t physically make any difference?